Quantcast
Channel: RSS Feed
Viewing all 391 articles
Browse latest View live

Creating a Shared Element Transition Animation in Ionic

$
0
0

Recently, someone asked me if it is possible to create a shared element transition in an Ionic application. I wasn’t actually familiar with that specific term, but it is something I’ve wanted to try building in Ionic for a while and it’s actually a little bit easier than I thought it would be. The basic idea is that rather than just transitioning directly to a new page, we take one of the items on the existing page and animate that into its position on the new page.

This seems like it would be rather complicated to implement, but after seeing this video demonstrating the effect for an Android application, it highlighted that it’s really just a bit of an animation trick rather than having to have some kind of complicated navigation structure.

If you watch the video (and I recommend that you do), you will see that the basic idea behind creating this effect is:

  1. Fade in the new page on top of the current page
  2. Have the “shared” element be positioned in the same spot on the new page as it was on the current page
  3. As the new page is fading in, animate the position of the shared element to its normal position for the new page

There is no actual sharing of elements between the pages, we just make it look like there is by having the starting position of the “shared” element on the new page be the same as its position on the previous page.

We are going to create this process in an Ionic & Angular application using the ModalController and some simple animations. Ours won’t be quite as impressive as the one in the video as we will just be focusing solely on this concept of “sharing” the element between the two pages and animating it. The example in the video also has some additional animations playing on the initial page which we won’t be implementing (e.g. the items that weren’t chosen fly off the page). That’s not to say it can’t be done, in fact I imagine it wouldn’t require that much more effort, but perhaps that’s a tutorial for another time.

Here is what we will be creating by the end of this tutorial:

Keep in mind that whilst we will be building the example above, you should treat this blog post more as research or a proof of concept rather than a fully fleshed out method for creating shared element transitions in Ionic. The method I am using to achieve this is rather manual. You could still implement this in your own applications with a bit of tweaking, probably in a variety of different situations. However, I’d like to investigate a more reusable/adaptable way to go about this in future.

Before We Get Started

Last updated for Ionic 4.0.0

This is a somewhat advanced tutorial and will assume that you already have a reasonably strong understanding of Ionic and Angular. If you require more introductory level content on Ionic I would recommend checking out my book or the Ionic tutorials on my website.

1. Create the Basic Layout

We are going to implement a basic master/detail pattern for this tutorial. We will have a list of cards that display images on the master page, and then when one of these are clicked the image for that card will become the “shared” element that is animated into position on the detail page.

A lot of this is just going to be basic layout stuff, so let’s get that out of the way first. I’ll assume you already have a “home” and “detail” page set up.

Modify src/app/home/home.page.html to reflect the following:

<ion-header><ion-toolbarcolor="danger"><ion-title>
      Transition
    </ion-title></ion-toolbar></ion-header><ion-content><ion-card(click)="launchDetail($event)"*ngFor="let card of cards"><imgsrc="http://placehold.it/600x300"/></ion-card></ion-content>

We are just looping over an array of cards here which we will set up later, but notice that we are also sending the event information along with the (click) binding. This is important as it will allow us to determine the position of the element that was clicked.

Modify src/app/detail/detail.page.html to reflect the following:

<ion-header><ion-toolbarcolor="danger"><ion-title>Detail</ion-title><ion-buttonsslot="end"><ion-button(click)="close()"><ion-iconslot="icon-only"name="close"></ion-icon></ion-button></ion-buttons></ion-toolbar></ion-header><ion-content><img#headersrc="http://placehold.it/600x300"/><divclass="container"><h2>Really cool...</h2><p>Lorem Ipsum is simply dummy text of the printing and typesetting industry. Lorem Ipsum has been the industry's standard dummy text ever since the 1500s, when an unknown printer took a galley of type and scrambled it to make a type specimen book.</p><p>Lorem Ipsum is simply dummy text of the printing and typesetting industry. Lorem Ipsum has been the industry's standard dummy text ever since the 1500s, when an unknown printer took a galley of type and scrambled it to make a type specimen book.</p></div></ion-content>

Here we have set up a template that has a header image at the top (which will be the shared element we are animating). Since we don’t want padding for the header but we do want it for the content, we will set up a container class with its own padding.

Modify src/app/detail/detail.page.scss to reflect the following:

.container{padding: 20px;}

2. Create a Custom Modal Animation

A key part of the shared element transition is having the detail page fade in on top of the master page. As I mentioned, we will be using a modal to overlay our detail page over the master page, but the default modal animation doesn’t use a “fade in” effect where the opacity is gradually animated from 0 to 1. Therefore, we are going to create our own custom modal animation so that we can make it do whatever we like.

If you are not already familiar with creating a custom modal animation in Ionic, I have a separate tutorial that you can view here: Create a Custom Modal Page Transition Animation in Ionic. It is not important for the sake of this tutorial that you understand the details of how this custom animation works if you are not interested.

Create a file at src/app/animations/fade-in.ts and add the following:

import{ Animation }from'@ionic/core';exportfunctionmyFadeInAnimation(AnimationC: Animation, baseEl: HTMLElement): Promise<Animation>{const baseAnimation =newAnimationC();const backdropAnimation =newAnimationC();
    backdropAnimation.addElement(baseEl.querySelector('ion-backdrop'));const wrapperAnimation =newAnimationC();
    wrapperAnimation.addElement(baseEl.querySelector('.modal-wrapper'));

    wrapperAnimation.beforeStyles({'opacity':1}).fromTo('translateX','0%','0%');

    backdropAnimation.fromTo('opacity',0.01,0.4);return Promise.resolve(baseAnimation
        .addElement(baseEl).easing('cubic-bezier(0.36,0.66,0.04,1)').duration(1000).beforeAddClass('show-modal').add(backdropAnimation).add(wrapperAnimation));}

We have created an animation that will animate to full opacity over one second.

3. Pass Position Information to the Modal

Now we need to define the launchDetail function so that we can launch the modal, but we also need to pass the information about the clicked element’s position to the modal page.

Modify src/app/home/home.page.ts to reflect the following:

import{ Component }from'@angular/core';import{ ModalController }from'@ionic/angular';import{ DetailPage }from'../detail/detail.page';import{ myFadeInAnimation }from'../animations/fade-in';

@Component({
  selector:'app-home',
  templateUrl:'home.page.html',
  styleUrls:['home.page.scss'],})exportclassHomePage{public cards =newArray(10);constructor(private modalCtrl: ModalController){}launchDetail(ev){this.modalCtrl.create({
      component: DetailPage,
      enterAnimation: myFadeInAnimation,
      componentProps:{'coords':{
          x: ev.target.x,
          y: ev.target.y
        }}}).then((modal)=>{
      modal.present();});}}

This is mostly just the normal method for launching a modal, but we are also suppying our custom enterAnimation and we pass in the coords of the clicked element using the componentProps of the modal.

4. Animate the Shared Elements Position

Now we just need to grab that passed in information and use it to animate the image element on the detail page from the position the element was in on the master page, to its normal position on the detail page.

Modify src/app/detail/detail.page.ts to reflect the following:

import{ Component, OnInit, ElementRef, Renderer2, ViewChild }from'@angular/core';import{ ModalController, NavParams }from'@ionic/angular';

@Component({
  selector:'app-detail',
  templateUrl:'./detail.page.html',
  styleUrls:['./detail.page.scss'],})exportclassDetailPageimplementsOnInit{

  @ViewChild('header') headerImage: ElementRef;constructor(private modalCtrl: ModalController,private navParams: NavParams,private renderer: Renderer2
  ){}ngOnInit(){let coords =this.navParams.get('coords');this.renderer.setStyle(this.headerImage.nativeElement,'transform',`translate3d(0, ${coords.y -56}px, 0) scale3d(0.9, 0.9, 1)`);this.renderer.setStyle(this.headerImage.nativeElement,'transition','0.5s ease-in-out');setTimeout(()=>{this.renderer.removeStyle(this.headerImage.nativeElement,'transform');},50);}close(){this.modalCtrl.dismiss();}}

We use @ViewChild to grab a reference to our image element so that we can animate it. In the ngOnInit function we grab the coords that were passed in to the modal using NavParams. We then set some initial styles on the image element. Using the coords information, we move the element to a position that matches the master page by using translate3d and we also scale it to be slightly smaller as it is on the master page.

When we change these styles back to their original styles, we want that transition to animate. So, we also modify the transition property of the element and give it a property of 0.5s ease-in-out which will animate the transition over half a second and use the ease-in-out animation easing.

After a slight delay, we then remove the transform style we applied which will trigger the animation. We should now have something like this:

Summary

I think there is more work to do here still, but we have a rather cool effect with relatively little effort. This isn’t just a “cool” animation either, it actually adds something to the user experience as it maintains the context better between the pages as it very clearly indicates that the new page contains information about the specific item that was clicked.


Creating a Simple Live Chat Server with NestJS and WebSockets

$
0
0

When we are building applications, there are many instances where we want data updates from the server to display immediately. Perhaps we have a chat application and we want to display new messages to a user, or maybe we’ve built a game that needs to display an update to the user as soon as something happens on the server.

The problem with a typical client/server set up is that we would trigger a request from the client to load some data from a server when the application loads and it would pull in the latest set of data - for the sake of an example, let’s say we would load in all of the current chat messages from the server. Once that initial load and request has been made, what happens when somebody else updates the data on the server (e.g. when someone adds a new chat message)? Nobody would know that a new chat message has been added except the person who added it, so we need some way to check the data on the server after the initial request for data.

We could, for example, set up some code in our client-side application to check (or “poll”) the server every 10 seconds. Every 10 seconds the application would make a request to the server for the latest chat data, and load any new messages. This is a viable solution, but it’s not ideal. This approach has two glaring flaws which are:

  1. A lot of likely unnecessary requests are made to the server
  2. There is a potentially long delay before the user will see the new data (which would be especially annoying in a chat application)

This brings me to the topic of today’s tutorial, there is a much better way to handle this situation…

Introducing Web Sockets

The WebSocket API allows for event-based two-way communication between a browser and a server. If we consider our initial example of “polling” a server every 10 seconds to get new data to be like calling somebody on the phone every 10 seconds for updates, then using web sockets instead would be like just calling them once and keeping the call open in the background so either party can communicate instantly whenever required.

When using Web Sockets, an event could be triggered as soon as a new chat message is added by anybody, and any clients listening will instantly be notified. This means that the chat message that was added would show up near instantaneously for the other users.

NestJS has support for web sockets built-in, which makes use of the popular socket.io package. This makes setting up communications using the WebSocket API in NestJS rather simple.

In this tutorial, we are going to build a simple live chat application using NestJS and Ionic/Angular. We will use our NestJS server to:

  • Broadcast any chat messages to any listening clients
  • Notify when a new client connects
  • Notify when a client disconnects

The server will just be used to relay information, it will be the responsibility of the clients to display the information. When we are done, the application should look something like this:

Websocket based chat application in Ionic built with NestJS

Before We Get Started

This tutorial assumes that you are already familiar with the basics of NestJS (and Ionic/Angular if you are using that on the front-end). If you need more tutorials on NestJS in general, I have more NestJS tutorials available here.

Although we are using Ionic on the front-end for this tutorial, it doesn’t particularly matter. You could use any front-end you like, but we will be covering specifically how to use the ngx-socket-io package which makes it easier to use socket.io in Angular. If you are not using Angular, then you would need to implement socket.io in some other way in your application (the basics concepts remain the same).

1. Creating the NestJS Server

First, we are going to create our NestJS server. In order to use web sockets in your NestJS project, you will need to install the following package:

npm install --save @nestjs/websockets

With that package installed, we are going to create a new module called ChatModule which will handle our web socket communication.

Run the following command to create a new module called Chat:

nest g module chat

Once the module has been generated, we are going to create a new file to implement a @WebSocketGateway.

Create a file at src/chat/chat.gateway.ts and add the following:

import{ WebSocketGateway, WebSocketServer, SubscribeMessage, OnGatewayConnection, OnGatewayDisconnect }from'@nestjs/websockets';

@WebSocketGateway()exportclassChatGatewayimplementsOnGatewayConnection, OnGatewayDisconnect {

    @WebSocketServer() server;
    users: number =0;asynchandleConnection(){// A client has connectedthis.users++;// Notify connected clients of current usersthis.server.emit('users',this.users);}asynchandleDisconnect(){// A client has disconnectedthis.users--;// Notify connected clients of current usersthis.server.emit('users',this.users);}

    @SubscribeMessage('chat')asynconChat(client, message){
        client.broadcast.emit('chat', message);}}

This is basically everything we need to handle the communication for our application, so let’s break it down. First, we decorate our class with @WebSocketGateway which is what will allow us to make use of the socket.io functionality.

You will notice that this class also implements OnGatewayConnection and OnGatewayDisconnect. This isn’t strictly required, but since we want to keep track of clients connecting and disconnecting we implement the handleConnection() and handleDisconnect() hooks. These will be triggered every time a client connects or disconnects.

We set up a member variable called server that is decorated with @WebSocketServer which will give us access to the server instance. We can then use this to trigger events and send data to connected clients. We make use of this in our handleConnection and handleDisconnect hooks where we are incrementing or decrementing the total number of users, and then notifying any connected clients of the new number of users.

The @SubscribeMessage decorator is used to listening to incoming messages. If we want to send a chat event from our client to the server, then we need to decorate the function that will handle that event with @SubscribeMessage('chat'). This function (onChat in this case) has two parameters: the first (which we are calling client) will be a reference to the socket instance, and the second (which we are calling message) will be the data sent by the client.

Since we want all connected clients to know about this chat message when it is received, we trigger a broadcast to those clients with client.broadcast.emit('chat', message). Then, any clients listening for the chat event would receive this data instantly.

We are almost done with the server, but before our gateway will start listening we need to add it to the providers in our chat module.

Modify src/chat/chat.module.ts to reflect the following:

import{ Module }from'@nestjs/common';import{ ChatGateway }from'./chat.gateway';

@Module({
    providers:[ ChatGateway ]})exportclassChatModule{}

Remember, when testing you will need to make sure your server is running with:

npm run start

2. Creating the Client-Side Application

With the server complete, now we just need to set up some kind of front-end client to interact with it. As I mentioned, we will be creating an example using Ionic/Angular but you could use any front-end you like. You could even have multiple different front ends interacting with the same server.

Install the following package in your Ionic/Angular project:

npm install --save ngx-socket-io

This package just implements socket.io in an Angular friendly way. As well as installing it, we will also need to configure the package in our root module.

Make sure to configure the SocketIoModule as shown in the app.module.ts file below:

import{ NgModule }from'@angular/core';import{ BrowserModule }from'@angular/platform-browser';import{ RouteReuseStrategy }from'@angular/router';import{ IonicModule, IonicRouteStrategy }from'@ionic/angular';import{ SplashScreen }from'@ionic-native/splash-screen/ngx';import{ StatusBar }from'@ionic-native/status-bar/ngx';import{ AppComponent }from'./app.component';import{ AppRoutingModule }from'./app-routing.module';import{ SocketIoModule, SocketIoConfig }from'ngx-socket-io';const config: SocketIoConfig ={ url:'http://localhost:3000', options:{}};

@NgModule({
  declarations:[AppComponent],
  entryComponents:[],
  imports:[
    BrowserModule, 
    IonicModule.forRoot(), 
    AppRoutingModule, 
    SocketIoModule.forRoot(config)],
  providers:[
    StatusBar,
    SplashScreen,{ provide: RouteReuseStrategy, useClass: IonicRouteStrategy }],
  bootstrap:[AppComponent]})exportclassAppModule{}

We use a url of http://localhost:3000 as this is where our NestJS server is running. In a production environment, you would change this to the location of wherever your NestJS server is running. Now, we are going to focus on implementing a chat service to handle most of the logic, and afterward, we will create a simple interface to send and receive chats.

Run the following command to create a chat service:

ionic g service services/chat

Modify src/app/services/chat.service.ts to reflect the following:

import{ Injectable }from'@angular/core';import{ Socket }from'ngx-socket-io';

@Injectable({
  providedIn:'root'})exportclassChatService{constructor(private socket: Socket){}sendChat(message){this.socket.emit('chat', message);}receiveChat(){returnthis.socket.fromEvent('chat');}getUsers(){returnthis.socket.fromEvent('users');}}

Once again, there isn’t actually all that much code required to get this communication working. We inject Socket from the ngx-socket-io package to get a reference to the socket instance, and then we utilise that our three methods.

The sendChat function will allow us to send a message to the server. We call the emit method with a value of chat which means that it is going to trigger the function on the server decorated with @SubscribeMessage('chat'). The server will receive the message sent, and then rebroadcast that to any other clients listening.

Whilst the sendChat function handles sending data to the server, the other two methods handle receiving data from the server. The receiveChat method listens to the chat event, which means that every time this line is triggered on the server:

client.broadcast.emit('chat', message);

The receiveChat method will get that message data. Similarly, the getUsers method listens to the users event, and every time this line is triggered on the server:

this.server.emit('users',this.users);

The getUsers method will receive the total number of active users. With these methods in place, let’s make use of them in one of our pages.

Modify src/app/home/home.page.ts to reflect the following:

import{ Component, OnInit }from'@angular/core';import{ ChatService }from'../services/chat.service';

@Component({
  selector:'app-home',
  templateUrl:'home.page.html',
  styleUrls:['home.page.scss'],})exportclassHomePageimplementsOnInit{public users: number =0;public message: string ='';public messages: string[]=[];constructor(private chatService: ChatService){}ngOnInit(){this.chatService.receiveChat().subscribe((message: string)=>{this.messages.push(message);});this.chatService.getUsers().subscribe((users: number)=>{this.users = users;});}addChat(){this.messages.push(this.message);this.chatService.sendChat(this.message);this.message ='';}}

Your page might not look exactly like this, but the example above is the gist of what needs to happen. In our ngOnInit hook we subscribe to both the receiveChat and getUsers methods which both return an observable. Every time a communication is received from the server, the observable will emit the new data and we can do something with it. In this case, we are pushing any new messages into the messages array, and any time we receive the total number of users from the server we set the users member variable to that value.

The only other method we have here is addChat which simple passes on whatever message the user typed to the sendChat method in the chat service (as well as adding the message to the messages array, since this client won’t receive a broadcast for its own chat message).

All of the main functionality has been completed now, but let’s create a nice chat interface to test it out in.

Modify src/app/home/home.page.html to reflect the following:

<ion-headerno-border><ion-toolbarcolor="tertiary"><ion-title>Live Chat</ion-title></ion-toolbar></ion-header><ion-content><ion-card><ion-card-content>
        There are currently <strong>{{users}}</strong> users online. Start chatting!
    </ion-card-content></ion-card><ion-listlines="none"><ion-item*ngFor="let message of messages">
      {{message}}
		</ion-item></ion-list></ion-content><ion-footer><ion-toolbar><textareaspellcheck="true"autoComplete="true"autocorrect="true"rows="1"class="chat-input"[(ngModel)]="message"placeholder="type message..."(keyup.enter)="addChat()"></textarea><ion-buttonsslot="primary"><ion-button(click)="addChat()"slot="end"class="send-chat-button"><ion-iconslot="icon-only"name="send"></ion-icon></ion-button></ion-buttons></ion-toolbar></ion-footer>

Modify src/app/home/home.page.scss to reflect the following:

textarea {
    width:calc(100%-20px);
    margin-left:10px;
    background-color: #fff;
    font-size:1.2em;
    resize: none;
    border: none;}

3. Test with Multiple Clients

Now, all we need to do is test it in the browser! This is a little bit awkward because we are going to need multiple clients in order to test the web socket communication. How you achieve this might depend on what kind of front-end you are using, but if you are using Ionic/Angular it is simple enough.

First, make sure your NestJS server is running with:

npm run start

Next, in a separate terminal window, serve your Ionic application:

ionic serve

The, open up another terminal window, and serve your Ionic application again:

ionic serve

You should now have two instances of your Ionic application running on two separate ports in the browser. You should be able to enter a chat message into either instance, and it will immediately show up in the other. At this point, the application should look something like this:

Websocket based chat application in Ionic built with NestJS

Summary

This is a very simplistic/bare-bones example, but it demonstrates the basic usage of web sockets. In a more typical application, you might want to extend this to perhaps store the messages in a database like MongoDB - you could still use a similar set up where you broadcast new chat messages to the clients, but you would then also store the messages in the database.

If you’d like to dive further into using web sockets in NestJS, there is a great complex chat application example available here and you can also find a lot more information in the NestJS documentation for web sockets.

Understanding the Ionic Ecosystem

$
0
0

With a little bit of research, you will quickly discover that the Ionic Framework is a framework for building cross-platform applications using web technology. What might be less obvious is exactly what it is that Ionic provides, and what using Ionic might look like for you.

This is especially the case today. The current generation of Ionic has opened the door for Ionic to be used in a myriad of different circumstances and in conjunction with different frameworks. This is great in the way that it provides developers with even more opportunities, but it can also make the Ionic ecosystem a little more confusing for newcomers.

The goal of this article is to provide a concise breakdown of what Ionic is and the options you have for using it. I will be addressing each of the following questions:

  • What exactly isIonic?
  • How do you build Ionic applications?
  • What is StencilJS and how does it relate to Ionic?
  • What role do Angular, React, and Vue play in Ionic applications?
  • What approach should you use when building Ionic applications?

NOTE: The current version of Ionic (4.x) takes a vastly different approach than previous iterations of the framework. Previous versions of the framework were built specifically to be used with the Angular framework, but now Ionic is a generic framework that can be used in conjunction with any framework (or without using a framework at all). This article will just be focusing on the current version of Ionic.

What is Ionic?

At its core, the Ionic framework is a set of web components. Web components allow developers to create their own custom elements that can be reused in any web application. Just as we have an <input> or <button> element that we can use by default with HTML, web components allow us to create custom elements like <my-timer> or <my-photo-viewer> that can be dropped in just like normal HTML.

In the case of Ionic, the set of web components that are provided to us to use in our applications look like this:

  • <ion-list>
  • <ion-item>
  • <ion-button>
  • <ion-header>
  • <ion-card>

Each of the Ionic web components is prefixed with ion indicating that these are Ionic web components (as is the standard practice for creating web components). If we ignore the ion- prefix, we can see that these are examples of the following user interface (UI) components:

  • List
  • Item
  • Button
  • Header
  • Card

The goal of the web components that Ionic provides is to supply us with all of the elements we would need to create a mobile application. This means we can easily implement common mobile patterns like scrolling lists, side menus, tabs and more just by dropping in some simple HTML syntax. There are many more components available than the ones I have listed here.

A typical page in an Ionic application might look like this:

<ion-header><ion-title>My Shopping List</ion-title></ion-header><ion-content><ion-list><ion-item>Bread</ion-item><ion-item>Iced Coffee</ion-item><ion-item>Pasty</ion-item></ion-list></ion-content>

With just a few web components, the example above will create a user interface that looks and behaves like a typical native mobile app page with a scrolling list.

The components that Ionic provide are also typically more complex than simple HTML elements. Web components allow us to build complex logic into the elements. Sometimes an Ionic component that we use might just provide some simple styling to match what you would expect to see in an iOS/Android application (like an <ion-button>) and sometimes the components will also have complex Javascript embedded into them (like the <ion-datetime> component that provides a mobile style scrolling date picker).

Although Ionic’s web components are specifically designed to work well on mobile devices, they can also be used in desktop applications.

Using Ionic

When building applications with Ionic, we don’t typically only use the web components that Ionic provides. We can’t really just drop these web components into an HTML file and build an entire application.

There is more to an application that just the user interface. We need to handle routing/navigation, data, logic, events, dynamic templates, and more. You could implement your own methods to achieve these aspects of your application just by using plain Javascript, but typically people will use an additional framework in conjunction with Ionic to handle these aspects of the application. We will discuss frameworks more in the next section.

As well as the web components themselves, Ionic also provides some additional tooling to help build applications.

Ionic CLI

The Ionic CLI (Command Line Interface) is a command line tool that is used to manage Ionic applications. It allows you to easily create an Ionic application, and provides tooling for serving your application throughout development, and building your application for production.

Capacitor

Capacitor is a separate project to Ionic (it is still created by the Ionic team), but it is used in conjunction with Ionic. Capacitor provides a common API for accessing native functionality across different platforms. This means that if you want to access functionality like the camera, you can use the same code for iOS and Android without having to worry about the underlying native implementation on each platform.

Capacitor also allows you to build your Ionic application as a native application for iOS/Android/Desktop. The Ionic CLI will allow you to create a build that can be deployed to the web, but to deploy to native devices you will need to use a solution like Capacitor.

Capacitor fulfills a similar role to the popular Cordova.

Appflow

Ionic Appflow is an optional platform (also provided by the Ionic team) that you can use in conjunction with your Ionic applications. This is a paid solution that provides functionality like continuous deployment and automatic application builds.

Ionic doesn’t just provide the user interface components for building mobile applications, they provide a start to finish development environment.

Angular, React, and Vue

As I mentioned, you don’t need to use an additional framework to build an application using Ionic’s web components, but most people do choose to use a framework to build applications today.

To put it simply, Ionic provides the user interface and the framework you are using with Ionic will provide the application logic. Since Ionic uses web components, there is no real limitation to what frameworks you can use - as long as the framework plays nicely with web components, you can use it.

Although you could use Ionic with other frameworks, Ionic also provides specific support for the three most popular Javascript application frameworks today: Angular, React, and Vue. You will find that as well as the set of web components Ionic supplies through the @ionic/core package, they also supply @ionic/angular, @ionic/react, and @ionic/vue packages. These packages just make it a little easier to use Ionic out of the box with these frameworks.

At the end of this article, I will provide my thoughts on which framework you should use when building Ionic applications. But first, there is one more piece of the puzzle we need to discuss.

The Role of StencilJS

StencilJS is the tool that the Ionic team uses to build their web components. StencilJS is a web component compiler, not a framework. In short, StencilJS just makes it easier to create web components. Although Stencil syntax is used to build the web components, the end result that is built is just a generic web component with nothing to do with Stencil - this is why it is a compiler and not a framework.

StencilJS is also available for you to use as well to build your own web components. It is in no way required that you use or understand Stencil in order to build Ionic applications, but it serves an interesting niche as a bit of a middle option between using a framework with Ionic and not using one.

Although StencilJS is not a framework, you can kind of use it as one to build Ionic applications. Ionic provides a StencilJS starter project called the Ionic PWA Toolkit which is mostly just a StencilJS application with the Ionic web components inlcuded by default and a basic project structure set up.

Instead of using a framework, we can use StencilJS to build out a bunch of web components that represent the various pages/components in our application. The toolkit then also provides some basic routing/navigation to switch between displaying those web components, and since we can handle the logic in the web components themselves, we kind of have this “pseudo-framework” that provides us with a lot of the functionality of a typical modern framework, without actually having to use one.

Personally, I think going this route is a little trickier than the other options currently, but there are some strong benefits to using StencilJS to build an Ionic application:

  • StencilJS is not a framework, it just helps you build web components, so your resulting application does not need to include any framework libraries that will need to be loaded
  • The work you put into building your application’s components is not tied to any specific framework, since they are just web components. You could reuse those components in other applications and other frameworks, and you never have to worry about the framework you decided to base your application on “falling out of favour”. It’s just generic web tech.

Which Option is Best?

Deciding on an approach to use in such a complex space can be hard, and this is one of those “it depends” kind of questions (isn’t it always?). Although there are no clear cut answers here, I will give my thoughts on which approach might suit you best.

  • If you have a preference for Angular, React, or Vue use Ionic with the framework you are comfortable with. However, keep in mind that the @ionic/vue and @ionic/react packages are currently in alpha/beta.
  • If you do not have a preference for a particular framework (but want to use one), use Angular. Since Ionic has historically used Angular, most of the community uses it, so there are far better resources/documentation/tutorials available. The @ionic/angular package is also stable/mature.
  • If the concept of not using a framework appeals to you and you are reasonably comfortable with web development, use StencilJS. StencilJS is reasonably new so there are probably going to be some things you need to figure out for yourself, but there are some powerful benefits to using it.

If you’re still not sure which approach to use, I think Ionic/Angular is a good default, but it doesn’t matter too much. Just start learning and start getting experience and then you will have a better basis for determining which approach suits you best.

Understanding JSX for StencilJS Applications

$
0
0

When building StencilJS applications (whether you are using Ionic with it or not) you will be using JSX to create the templates for your components. JSX is a syntax extension to standard ECMAScript (JavaScript) that adds additional XML style syntax. It was created by Facebook and popularised by its usage in the React framework, but JSX can be used outside of React - which is obviously the case for StencilJS.

In over-simplified terms, JSX allows you to mix HTML with JavaScript. If you’ve never used it, it’s definitely one of those kind of things that feels a little weird to get used to at first. The purpose of this article is to introduce you to the basics of JSX and how it would be used in StencilJS application, to help get you over that initial confusion hump.

Since many of the readers of this blog will already be familiar with Angular, I will make some references and comparisons to Angular throughout this article. However, if you are not familiar with Angular you will still be able to read the article (just ignore the references).

If you haven’t already been using something like React to build applications, then chances are you would be used to defining standard-looking HTML files to contain your template e.g:

my-template.html

<div><p>Hello</p></div>

Or if you were defining templates inside of your JavaScript/TypeScript files then you would typically define a template string like this:

template:`
  <div><p>Hello</p></div>
`

Either way, we are just using standard syntax in these cases. However, when you start using JSX, you will also be defining your templates inside of your JavaScript/TypeScript files but it will look something like this:

render(){return<div><p>Hello</p></div>;}

or this:

render(){return(<div><p>Hello</p></div>)}

and maybe you even have some variables defined with HTML syntax attached to them:

const myMessage =<p>Welcome to my app!</p>

If you’ve never used JSX then the examples above look like they would cause a bunch of syntax errors. We aren’t defining HTML inside of strings, we are just straight-up writing HTML inside of a JavaScript/TypeScript file. But, mixing HTML and JavaScript like this is exactly what JSX allows.

We are going to go through some examples that cover the basics of how to use JSX. Although this is in the context of a StencilJS application, the same concepts apply to JSX as a general concept.

A Basic Template

When building an application with StencilJS, we will have various components that make up our application. These components will each define a render function that specifies the template.

The render function simply needs to return the template, which will use JSX, that the component should use. This will look something like this:

import{ Component }from'@stencil/core';

@Component({
    tag:'app-profile',
    styleUrl:'app-profile.css'})exportclassAppProfile{render(){return(<div><p>Hello</p></div>)}}

The render function should return the JSX template, but it is also possible to add additional code inside of the render function (which could be utilised inside of the JSX template):

import{ Component }from'@stencil/core';

@Component({
    tag:'app-test',
    styleUrl:'app-test.css'})exportclassAppTest{const myMessage =<p>Welcome to my app!</p>;render(){return(<div><p>{myMessage}</p></div>)}}

Returning Multiple Root Nodes

The render function must return a single root node, that means that this is will work:

return(<div></div>)

and this will work:

return(<div><p>Hello</p><div><p>there.</p></div></div>)

but this will not:

return(<div>Root one</div><div>Root two</div>)

To address this scenario you can either wrap the two nodes inside of a single node:

return(<div><div>Root one</div><div>Root two</div></div>)

or you can return an array of nodes like this:

return([<div>Root one</div>,<div>Root two</div>])

Notice the use of square brackets to create an array, and that each node is followed by a comma as in an array. Although it may look a little strange to use HTML syntax in an array like this, it is the same idea as doing this:

return['array element 1','array relement 2']

Expressions

Expressions allow us to do things like execute logic inside of our templates or render out a variable to display on the screen. If you are coming from an Angular background, the idea is basically the same as interpolations with double curly braces, except that we just use a single curly brace like this:

render(){return(<div><p>{1+1}</p></div>)}

This example would execute the 1 + 1 operation, and display the result inside of the paragraph tag. In this case, it would therefore render the following out to the DOM:

<div><p>2</p></div>

We could also use expressions to make function calls:

calculateAddition(one, two){return one + two;}render(){return(<div><p>{this.calculateAddition(1,5)}</p></div>)}

Render out local or class member variables:

public myNumber: number =1;render(){const message =<p>Hi</p>;return(<div><p>{message}</p><p>{this.myNumber}</p></div>)}

and much more, some of which we will touch on later. A difference you might notice here if you are coming from an Angular background is that inside of the curly braces we need to reference the this scope in order to access the member variable, which isn’t the case with Angular templates.

Styles

If you attempt to add a style to an element in JSX like this:

    render(){
        return (
            <divstyle="background-color: #f6f6f6;padding: 20px;"><p>Hello</p></div>
        )
    }

You will be met with an error that reads something like this:

Type 'string' is not assignable to type '{ [key: string]: string; }'.

But what’s the deal with that? Aren’t we allowed to use HTML syntax? Not quite, there are a few differences. With JSX, inline styles must be supplied as an object, where the properties of that object define the styles you want:

render(){return(<div style={{
          backgroundColor:`#f6f6f6`,
          padding:`20px`}}><p>Hello</p></div>)}

We are assigning an expression (which we just discussed) to style that contains an object representing our style properties. You will notice that we are using camelCase - so instead of using the usual hyphenated properties like background-color or list-style-type we would use backgroundColor and listStyleType.

Conditional Templates

There are different ways to achieve conditionally displaying data/elements with JSX, so let’s take a look at a few. We covered before how you could make a function call inside of an expression in your template, and that is one way that you could conditionally display an element:

import{ Component }from'@stencil/core';

@Component({
    tag:'app-test',
    styleUrl:'app-test.css'})exportclassAppTest{private loggedIn: boolean =false;getWelcomeMessage(){if(this.loggedIn){return'Welcome back!';}else{return'Please log in';}}render(){return(<div><p>{this.getWelcomeMessage()}</p></div>)}}

You could also achieve the same effect by building some logic directly into the expression in the template, rather than having a separate function:

render(){return(<div><p>{this.loggedIn ?'Welcome back!':'Please log in.'}</p></div>)}

You could render entirely different chunks of your template using if/else statements:

import{ Component }from'@stencil/core';

@Component({
    tag:'app-test',
    styleUrl:'app-test.css'})exportclassAppTest{private loggedIn: boolean =false;render(){if(this.loggedIn){return(<div><p>Welcome back!</p></div>)}else{return(<div><p>Please log in.</p></div>)}}}

You can completely remove any rendering to the DOM by returning null instead of an element:

import{ Component }from'@stencil/core';

@Component({
    tag:'app-test',
    styleUrl:'app-test.css'})exportclassAppTest{private loggedIn: boolean =false;render(){if(this.loggedIn){return(<div><p>Welcome back!</p></div>)}else{returnnull}}}

If you don’t want to return entirely different templates depending on some condition (this could get messy in some cases) you could also render entirely different chunks just by using a ternary operator inside of your template like this:

import{ Component }from'@stencil/core';

@Component({
    tag:'app-test',
    styleUrl:'app-test.css'})exportclassAppTest{private loggedIn: boolean =false;render(){return(<div>{this.loggedIn

	    			?<div><h2>Hello</h2><p>This is a message</p></div>:<div><h2>Hello</h2><p>This is a different message</p></div>}</div>)}}

If you aren’t familiar with the ternary operator, we are basically just looking at this:

this.loggedIn ?'logged in':'not logged in';

which is a simplified version of:

if(this.loggedIn){return'logged in';}else{return'not logged in';}

We can also simplify the ternary operator more if we don’t care about the else case. For example, if we only wanted to show a message to a user who was logged in, but we didn’t care about showing anything to a user who isn’t, we could use this syntax:

import{ Component }from'@stencil/core';

@Component({
    tag:'app-test',
    styleUrl:'app-test.css'})exportclassAppTest{private loggedIn: boolean =true;render(){return(<div>{this.loggedIn &&<div><h2>Hello</h2><p>This is a message</p></div>}</div>)}}

This will only render out the message if loggedIn is true. The methods I have mentioned here should be enough to cover most circumstances, but there are still even more you can use. It’s a good idea to have a bit of a search around and see what kinds of methods suit you best.

Looping over Data

We will often want to create templates dynamically based on some array of data like an array of todos or posts and so on. In Angular, this is where you would use an *ngFor structural directive to loop over that data. However, with StencilJS and JSX we once again just use standard JavaScript syntax/logic embedded directly into the template.

We can use the map method on an array of data to loop through the data and render out a part of the template for each iteration. Let’s take a look at an example from the documentation:

render(){return(<div>{this.todos.map((todo)=><div><div>{todo.taskName}</div><div>{todo.isCompleted}</div></div>)}</div>)}

In this example, we would have a class member named todos that we are looping over. For each todo we will render this out to the DOM:

<div><div>{todo.taskName}</div><div>{todo.isCompleted}</div></div>

The {todo.taskName} and {todo.isCompleted} expressions used here will be executed and the values for the paticular todo in that iteration of the map method will be used.

In order for StencilJS to be able to perform as efficiently as possible, it is important that if you intend to change this data (e.g. you can add/remove todos) that you give each todo that is rendered out a unique key property. You can attach that key to the root node of whatever you are rendering out for each iteration, e.g:

render(){return(<div>{this.todos.map((todo)=><div key={todo.id}><div>{todo.taskName}</div><div>{todo.isCompleted}</div></div>)}</div>)}

Event Binding

The last thing we are going to cover is event binding, which we will use mostly to handle users clicking on buttons or other elements. We can handle DOM events by binding to properties like onClick. For example, if we wanted to run a method that we created called handleClick() when the user clicks a button we might do something like this:

<ion-button onClick={this.handleClick(event)}>Click me</ion-button>

This is fine, and would invoke our handleClick method, but the downside of this approach is that it won’t maintain the scope of this. That means that if you were to try to reference a member variable like this.loggedIn inside of your handleClick method it wouldn’t work.

You can solve this issue in either of the following ways. You could manually bind the function to the correct scope like this:

<ion-button onClick={this.handleClick(event).bind(this)}>Click me</ion-button>

or you could use an arrow function like this (which is the more popular approach):

<ion-button onClick={(event)=>this.handleClick(event)}>Click me</ion-button>

As well as onClick you can also bind to other DOM events like onChange and onSubmit. If you are using Ionic, then you could also bind to any of the events that the Ionic web components emit.

Summary

As always, there is still much to learn. However, the concepts we have covered in this article should be enough to get you started with JSX and get you used to the initial oddities of using JSX.

For further learning, I would recommend reading the JSX section in the StencilJS documentation as well as the React documentation for JSX. Not all of the React documentation will apply to StencilJS, but it is a good way to gain a broader understanding of JSX in general.

State Management with State Tunnel in StencilJS

$
0
0

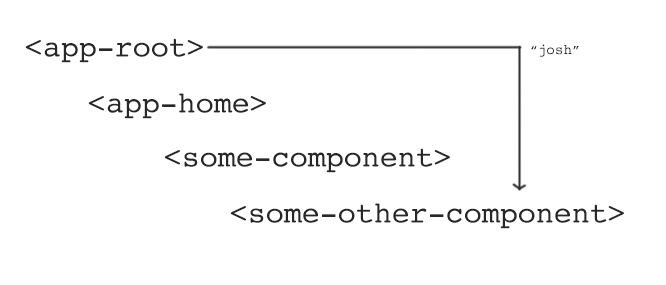
A StencilJS application, like many modern applications including those built with Angular or React, consists of a “tree” of components (in the case of StencilJS, this is a tree of web components).

We start with our root component that is added to the index.html file (the entry point for the application), then our root component will add additional components to its template, and then those components will add additional components to their templates and so on.

If we were to visualise the structure of a typical Ionic application built with StencilJS it might look something like this:

<app-root><ion-app><ion-router></ion-router><ion-nav><app-home><my-custom-component></my-custom-component></app-home></ion-nav></ion-app></app-root>

The “root” of our tree is <app-root> which then branches out to <ion-app> which branches out to <ion-router> and <ion-nav> and then our <ion-nav> branches out to <app-home> and so on. The entire application is encapsulated/nested within our initial <app-root> component, which you could consider to be the base of a tree.

Understanding this structure is key to understanding the concepts we will be discussing in this article. Before we discuss exactly what Stencil’s State Tunnel is (and how to use it), we are going to cover the basics of passing data through a StencilJS application. This will help highlight how using state management can simplify that process.

Throughout the article we will also be making references to React’s Context API and Redux - if you are already familiar with these concepts then you will have a headstart in understanding State Tunnel.

Passing Data to Components

If we want to pass data to a component, we can do so using props. If we have the following structure:

<component-one><component-two></component-two></component-one>

If we want to pass data from component-one to component-two we can do so using a prop like this:

<component-one><component-twoname="Josh"></component-two></component-one>

We could then retrieve that data inside of component-two.tsx using the @Prop decorator:

@Prop() name: string;

This concept can be used to pass data throughout an application, even to deeply nested child components. For example, let’s take a look at an example using an Ionic web component structure:

<app-root><app-home><some-custom-component></some-custom-component></app-home><app-profile></app-profile></app-root>

If we want to share some data from app-root among both the app-profile and some-custom component components (e.g. we are attempting to create some kind of “global” data) we could do so by using props like this:

<app-root><app-home userData={data}><some-custom-component userData={data}/></app-home><app-profile userData={data}/></app-root>

This concept is referred to as prop drilling. We basically pass the data to the component that needs it by “drilling” through each level of nesting with props. To get data from app-root to some-custom-component we first pass it to app-home and then app-home can pass it to some-custom-component.

There is nothing wrong with doing this, but you can see how cumbersome it could become if you have a high level of nesting. If you wanted to pass some data to a component that was nested 6 levels deep, you need to do a lot of “drilling”.

There are other methods for achieving the data sharing we are aiming to accomplish, but in this article, we are going to focus on something that StencilJS offers us out of the box.

Introducing Stencil State Tunnel

StencilJS provides a package called State Tunnel that allows us to share “state” throughout the application. By “state” we mostly just mean “data”. If our application has various dynamic parts that can be changed (e.g. different users might log in, different settings or filters might be applied) then our application’s “state” can change, and parts of our application might want to know what that “state” is.

Instead of having to pass data through each component along the way with prop drilling, with State Tunnel we can kind of teleport or “tunnel” data from one component to another. We could pass data directly from app-root to any component, no matter how many levels of nesting we have, by using State Tunnel.

If you are familiar with React’s Context API, State Tunnel is heavily inspired by that and the general concepts are largely the same.

Basically, we can change this:

Data flow without stencil state tunnel

to this:

Data flow with stencil state tunnel

If you have an Angular background, you could consider this to somewhat fill the role of providers/services - where in Angular we can “inject” a service into particular components to provide values and methods. As we will touch on later, Redux might be a better fit for this role but State Tunnel can be used to achieve it too.

Using Stencil State Tunnel

Now we are going to walk through the basics of using State Tunnel in a StencilJS application. Before we begin, you will need to make sure that you have the following package installed in your StencilJS project:

npm install --save @stencil/state-tunnel

1. Create the Tunnel

We can create a “tunnel” by implementing a file that makes use of the createProviderConsumer provided by the @stencil/state-tunnel package. We create an interface containing the data or methods that we want to be able to pass through the application:

Create a file at src/components/data/user.tsx and add the following:

import{ createProviderConsumer }from"@stencil/state-tunnel";exportinterfaceState{
  username: string;}exportdefault createProviderConsumer<State>({
    username:null},(subscribe, child)=>(<context-consumer subscribe={subscribe} renderer={child}/>));

The first parameter we supply to the createProviderConsumer here just sets a default value for the data that we are passing, and the second argument will generally remain the same for any tunnel you create.

2. Pass State to the Tunnel

Next, we need to add our tunnel to the root component and pass it the appropriate “state”. You do not need to set this up on the root component, but since the root component contains all other components, by setting up the tunnel on the root component you will be able to access the data from the tunnel anywhere in the application.

Modify src/components/app-root/app-root.tsx to include your tunnel:

import{ Component }from"@stencil/core";import Tunnel from"../data/user";

@Component({
  tag:"app-root",
  styleUrl:"app-root.css"})exportclassAppRoot{render(){const state ={
      username:"Josh"};return(<ion-app><ion-router useHash={false}><ion-route url="/" component="app-home"/><ion-route url="/profile/:name" component="app-profile"/></ion-router><Tunnel.Provider state={state}><ion-nav /></Tunnel.Provider></ion-app>);}}

The important part here is that any child of <Tunnel.Provider>, at any level of nesting, will be able to access data/methods from the tunnel. In the case of an Ionic application, all of the components in the application are displayed using <ion-nav />, so by surrounding <ion-nav /> with our tunnel we will be able to access the data all throughout the application.

3. Consume State from the Tunnel

Now we just need to access the data from the tunnel, and there are actually a couple of ways to do this. I will show you my preferred method of using injectProps, although it’s not really the “default” approach. I find that this approach is a little cleaner and it also allows for access to the data outside of the render method. You can read about the other approach in the documentation.

Add the tunnel to the component you want to access the data in:

import{ Component, Prop, Element }from'@stencil/core'import Tunnel from'../data/user'

@Component({
  tag:'app-profile',
  styleUrl:'app-profile.css',})exportclassAppProfile{

  @Element() el: AppProfile
  @Prop() username: string

  render(){return[<ion-header><ion-toolbar color="primary"><ion-buttons slot="start"><ion-back-button defaultHref="/"/></ion-buttons><ion-title>Profile</ion-title></ion-toolbar></ion-header>,<ion-content padding><p>My username is {this.username}</p></ion-content>,]}}

Tunnel.injectProps(AppProfile,['username'])

There are a couple of important parts here. First, it is important that we set up both @Element() and a @Prop():

  @Element() el: AppProfile
  @Prop() username: string

The injectProps method requires that the component has an @Element decorator (otherwise it can’t inject the prop), and then we use the @Prop to hold the data that is being passed in through the tunnel.

At the bottom of the file, we add this line:

Tunnel.injectProps(AppProfile,['username'])

To pull the data in from the tunnel and set it up on our @Prop.

What about Redux?

If you are familiar with Redux, then you will probably notice similarities with what we are trying to achieve here and Redux. In a sense, Redux is a more complex/powerful/capable version of the React Context API, and the same comparison applies to Stencil’s State Tunnel. For typical application purposes, you might find Redux a better fit for state management, and StencilJS also provides Stencil Redux for this purpose.

I will likely be covering Redux in more depth in future posts.

Summary

Stencil State Tunnel is a convenient way to share state among various components - all you need to do is install the package, create a tunnel and add it the root component (or to the some parent/ancestor of the component you want to share to), and then consume that tunnel in whatever component you like (as long as it is a child of the tunnel entry point).

As I just mentioned, for general “application” purposes, you may find that Redux is a better fit (but that doesn’t mean you can’t still use State Tunnel for simple scenarios).

Using NgRx for State Management in an Ionic & Angular Application

$
0
0

In this tutorial, we are going to tackle the basics of using NgRx for state management in an Ionic/Angular application.

If you are unfamiliar with the general concept of State Management/Redux/NgRx I would recommend watching this video: What is Redux? as a bit of a primer. The video is centered around Redux, but since NgRx is inspired by Redux the concepts are mostly the same. NgRx is basically an Angular version of Redux that makes use of RxJS and our good friends observables.

To quickly recap the main points in the Redux video, we might want to use a state management solution like NgRx/Redux because:

  • It provides a single source of truth for the state of your application
  • It behaves predictably since we only create new state through explicitly defined actions
  • Given the structured and centralised nature of managing state, it also creates an environment that is easier to debug

and the general concept behind these state management solutions is to:

  • Have a single source of “state” that is read-only
  • Create actions that describe some intent to change that state (e.g. adding a new note, or deleting a note)
  • Create reducers that take the current state and an action, and create a new state based on that (e.g. combining the current state with an action to add a new note, would return a new state that includes the new note)

To demonstrate using some pseudocode (I am just trying to highlight the basic concept here, not how you would actually do this with NgRx), we might have some “state” that looks like this:

{
    notes:[{title:'hello'},{title:'there'}],
    order:'alphabetical',
    nightMode:false}

The data above would be our state/store that contains all of the “state” for our application. The user might want to toggle nightMode at some point, or add new notes, or change the sort order, so we would create actions to do that:

ToggleNightMode
CreateNote
DeleteNote
ChangeOrder

An action by itself just describes intent. To actually do something with those actions we might use a reducer that looks something like this:

functionreducer(state, action){switch(action){case ToggleNightMode:{return{// New state with night mode toggled}}default:{return// State with no changes}}}

NOTE: This is just pseudocode, do not attempt to use this in your application.

This reducer function takes in the current state, and the action, and in the case of the ToggleNightMode action being supplied it will return a new state with the nightMode property toggled.

Before We Get Started

We will be taking a look at converting a typical Ionic/Angular application to use NgRx for state management. To do that, we are going to take the application built in this tutorial: Building a Notepad Application from Scratch with Ionic and add NgRx to it. You don’t need to complete that tutorial first, but if you want to follow along step-by-step with this tutorial you should have a copy of it on your computer.

We are going to keep this as bare bones as possible and just get a basic implementation up and running - mostly we will be focusing on the ability to create notes and delete notes. My main goal with this tutorial is to help give an understanding of the basic ideas behind NgRx, and what it looks like.

There is so much you can achieve with NgRx, and you can create some very advanced/powerful implementations, but that does come with an associated level of complexity. Looking at implementations of NgRx can be quite intimidating, so I’ve tried to keep this example as basic as possible (whilst still adhering to a good general structure). In the future, we will cover more complex implementations - if there is something, in particular, you would like to see covered, let me know in the comments.

Finally, it is worth keeping in mind that solutions like NgRx and Redux are not always necessary. NgRx and Redux are both very popular (for good reason), but they are not a “standard” that everyone needs to be using in all applications. Simple applications might not necessarily realise much of a benefit through using this approach.

1. Installing NgRx

We can easily install NgRx in an existing Angular application through the ng add command:

ng add @ngrx/store

As well as installing the @ngrx/store package it will also create a reducers folder with an index.ts file that looks like this:

import{
  ActionReducer,
  ActionReducerMap,
  createFeatureSelector,
  createSelector,
  MetaReducer
}from'@ngrx/store';import{ environment }from'../../environments/environment';exportinterfaceState{}exportconst reducers: ActionReducerMap<State>={};exportconst metaReducers: MetaReducer<State>[]=!environment.production ?[]:[];

We will be adding onto this implementation throughout the tutorial, but we’re mostly just going to leave it alone for now.

One thing in particular that we haven’t covered yet, but you may notice here, is the concept of a “meta reducer”. A regular reducer is responsible for taking in the state and an action and returning a new state. A meta reducer would take in a reducer as an argument and return a new reducer (kind of like how we can pipe operators onto an observable and return an altered observable if you are familiar with that concept). We won’t be using this concept in this tutorial, but you could use a meta reducer to do things like create a logging service for debugging (e.g. create a meta reducer that logs out some value every time the ToggleNightMode action is triggered).

The ng add command also adds the following line to your app.module.ts file:

StoreModule.forRoot(reducers,{ metaReducers })

This takes a global approach to implementing state management, but if you prefer you can also use StoreModule.forFeature in your individual lazy loaded modules to help keep things separate. There are many approaches you could take to structuring NgRx in your application. As I mentioned, I am trying to keep things simple here, so I would recommend taking a look at a few examples to see what style suits you best.

We are also going to store our actions in an actions folder, but the command doesn’t create that for us automatically. Let’s do that now.

Create an actions folder and note.actions.ts file at src/app/actions/note.actions.ts

Let’s start looking into how we can implement our first action.

2. Creating the Actions

To create an action we create classes that implement Action from the NgRx library. As we discussed, an action just describes intent. We won’t be adding any code to actually do anything here, we just want to describe what we want to do.

Modify src/app/actions/note.actions.ts to reflect the following:

import{ Action }from"@ngrx/store";import{ Note }from"../interfaces/note";exportenum ActionTypes {
  CreateNote ="[Notes Service] Create note",
  DeleteNote ="[Notes Service] Delete note"}exportclassCreateNoteimplementsAction{
  readonly type = ActionTypes.CreateNote;constructor(public payload:{ note: Note }){}}exportclassDeleteNoteimplementsAction{
  readonly type = ActionTypes.DeleteNote;constructor(public payload:{ note: Note }){}}export type ActionsUnion = CreateNote | DeleteNote;

First, we have an ActionTypes enumerated type that lists our various actions related to notes, and a description of what the action will do. Since these actions will be triggered from our existing notes service (you can trigger these actions elsewhere if you like) we make a note of the source of the action in the square brackets. This is purely to be more explicit/descriptive, it doesn’t serve a functional purpose.

We then create classes for each of the actions. It implements Action, it defines a type so we can tell what kind of action it is, and we can optionally supply a payload for that action. In the case of creating and deleting notes we will need to send a payload of data to correctly add or delete a note, but some actions (like toggling nightMode) would not require a payload.

Finally, we have the ActionsUnion which exports every action created in this file.

3. Creating the Reducers

As we now know, actions don’t do anything by themselves. This is where our reducers come in. They will take the current state, and an action, and give us a new state. Let’s implement our first reducer now.

Create a file at src/app/reducers/note.reducer.ts and add the following:

import*as fromNote from"../actions/note.actions";import{ Note }from"../interfaces/note";exportinterfaceNoteState{
  data: Note[];}exportconst initialState: NoteState ={
  data:[]};exportfunctionreducer(
  state = initialState,
  action: fromNote.ActionsUnion
): NoteState {switch(action.type){case fromNote.ActionTypes.CreateNote:{return{...state,
        data:[...state.data, action.payload.note]};}case fromNote.ActionTypes.DeleteNote:{return{...state,...state.data.splice(state.data.indexOf(action.payload.note),1)};}default:{return state;}}}

Things are starting to look a little bit more complex now, so let’s break it down. There is some stuff we are going to need in our reducer from our note actions that we just created, so we import everything from that actions file as fromNote so that we can make use of it here (this saves us from having to import everything that we want to use from that file individually).

We define the structure or “shape” of our note state as well as supply it with an initial state:

exportinterfaceNoteState{
  data: Note[];}exportconst initialState: NoteState ={
  data:[]};

The only data we are interested in are the notes themselves which will be contained under data, but we could also add additional state related to notes here if we wanted (like sort order, for example).

The last bit is the reducer function itself:

exportfunctionreducer(
  state = initialState,
  action: fromNote.ActionsUnion
): NoteState {switch(action.type){case fromNote.ActionTypes.CreateNote:{return{...state,
        data:[...state.data, action.payload.note]};}case fromNote.ActionTypes.DeleteNote:{return{...state,...state.data.splice(state.data.indexOf(action.payload.note),1)};}default:{return state;}}}

As you can see, the arguments for the reducer function are the state and the specific action which needs to be one of all the possible note related actions which we defined in our actions file. All we are doing here is switching between the possible actions, and we handle each action differently. Although we might run different code, the goal is the same: to return the new state that we want as a result of the action.

In the case of the CreateNote action, we want to return all of the existing state, but we also want the data to contain our new note (as well as all of the existing notes). We use the spread operator ... to return a new state object containing all of the same properties and data as the existing state, except by specifying an additional data property we can overwrite the data property in the new state. To simplify that statement a bit, this:

return{...state
      };

Basically means “take all of the properties out of the state object and add them to this object”. In effect, it is the same as just doing this:

return state;

Except that we are creating a new object. This:

return{...state,
        data:[...state.data, action.payload.note]};

Basically means “take all of the properties out of the state object and add them to this object, except replace the data property with this new data instead”. We keep everything from the existing state, except we overwrite the data property. We do still want all of the existing notes to be in the array in addition to the new one, so we again use the spread operator (this time just on the data) to unpack all of the existing notes into a new array, and then add our new one.

To reiterate, this:

[...state.data]

would mean “create a new array and add all of the elements contained in the data array to this array” which, in effect, is the same as just using state.data directly (except that we are creating a new array with those same value). This:

[...state.data, action.payload.note]

means “create a new array and add all of the elements contained in the data array to this array, and then add action.payload.note as another element in the array. To simplify even further, let’s pretend that we are just dealing with numbers here. If state.data was the array [1, 2, 3], and action.payload.note was the number 7, then the code above would create this array:

[1,2,3,7]

Hopefully that all makes sense. Once again, the role of our reducer is to modify our existing state in whatever way we want (based on the action it receives) and then return that as the new state.

Before we can make use of our actions/reducers, we need to set them up in our index.ts file.

Modify src/app/reducers/index.ts to reflect the following:

import{
  ActionReducer,
  ActionReducerMap,
  createFeatureSelector,
  createSelector,
  MetaReducer
}from"@ngrx/store";import{ environment }from"../../environments/environment";import*as fromNote from"./note.reducer";exportinterfaceAppState{
  notes: fromNote.NoteState;}exportconst reducers: ActionReducerMap<AppState>={
  notes: fromNote.reducer
};exportconst metaReducers: MetaReducer<AppState>[]=!environment.production
  ?[]:[];

The important part that has changed here is:

import*as fromNote from"./note.reducer";exportinterfaceAppState{
  notes: fromNote.NoteState;}exportconst reducers: ActionReducerMap<AppState>={
  notes: fromNote.reducer
};

We set up our overall application state on the AppState interface (this is named State by default). We are just working with a single notes reducer here, but you could also have additional state, for example:

exportinterfaceAppState{
  notes: fromNote.NoteState;
  photos: fromPhoto.PhotoState;}

Our store or “single source of truth” creates a nested/tree structure that might look something like this:

{
    notes: [
        {title: 'hello'},
        {title: 'there'}
    ],
    photos: [
        {url: ''},
        {url: ''}
    ]
}

When we are creating our notes actions/reducers we are just working within the notes“sub-tree” but it is still a part of the entire application state tree.

We also add the reducer we created for our notes under the notes property in the reducers constant that is exported (and is in turn used in our app.module.ts by StoreModule.forRoot()).

4. Creating Selectors

The last thing we are going to do before making use of our new state management solution in our notes service is create some selectors. A selector will allow us to read state from our store.

To create a selector, we can use createSelector which is provided by NgRx. We just supply it with the state we want to select from (e.g. the “sub-tree” of our state that we want to access), and a function that returns the specific data that we are interested in.

Add the following to the bottom of src/app/reducers/note.reducer.ts:

exportconstgetNotes=(state: NoteState)=> state.data;exportconstgetNoteById=(state: NoteState, props:{ id: string })=>
  state.data.find(note => note.id === props.id);

We are creating two functions here to use with createSelector. The getNotes function, when given the notes from our state tree, will return just the data property (which is the one we are interested in, since it is what actually contains the notes data).

The getNoteById function will take in additional props that can be supplied when attempting to select something from the store, which will allow us to provide an id. This function will then look for a specific note in the data that matches that id and return just that note.

Add the following to the bottom of src/app/reducers/index.ts:

exportconstgetNoteState=(state: AppState)=> state.notes;exportconst getAllNotes =createSelector(
  getNoteState,
  fromNote.getNotes
);exportconst getNoteById =createSelector(
  getNoteState,
  fromNote.getNoteById
);

With our functions created, we now just need to use them to create our selectors with createSelector. We first create a function called getNoteState to return the notes portion of our state tree. We then supply that, and the functions we just created, as arguments to createSelector in order to create our selector functions.

5. Accessing State and Dispatching Actions

Now everything finally comes together, and maybe you can see some of the benefit of doing all of this leg work up front. With our selectors created, we can easily get the data we want from our store wherever we like in our application. We can also easily make use of our CreateNote and DeleteNote actions.

To finish things off, we are going to keep the existing structure of the notes application, and just modify the methods in the NotesService.

Modify src/app/services.notes.service.ts to reflect the following:

import{ Injectable }from"@angular/core";import{ Store }from"@ngrx/store";import{ Storage }from"@ionic/storage";import{ Observable }from"rxjs";import{ Note }from"../interfaces/note";import*as NoteActions from"../actions/note.actions";import{ AppState, getAllNotes, getNoteById }from"../reducers";

@Injectable({
  providedIn:"root"})exportclassNotesService{public notes: Observable<Note[]>;constructor(private storage: Storage,private store: Store<AppState>){this.notes =this.store.select(getAllNotes);}getNote(id: string): Observable<Note>{returnthis.store.select(getNoteById,{
      id: id
    });}createNote(title):void{let id = Math.random().toString(36).substring(7);let note ={
      id: id.toString(),
      title: title,
      content:""};this.store.dispatch(newNoteActions.CreateNote({ note: note }));}deleteNote(note):void{this.store.dispatch(newNoteActions.DeleteNote({ note: note }));}}

To get access to our notes data, we just call this.store.select(getAllNotes) using the selector we created and it will return an observable. This observable will update any time the data in the store changes.

To get a specific note, we use our getNoteById selector, but since that selector also uses additional props (an id in this case) we pass that data along too:

returnthis.store.select(getNoteById,{
      id: id
    });

This will allow us to grab a specific note. Then we just have our createNote and deleteNote methods which are able to create or delete notes just be triggering the appropriate action and passing the note along with it:

this.store.dispatch(newNoteActions.CreateNote({ note: note }));this.store.dispatch(newNoteActions.DeleteNote({ note: note }));

Since we now have our notes class member set up as an observable now, if we want to be able to display the data it contains in our template we will need to add the async pipe.

Modify the <ion-item> in src/app/home/home.page.html to use the async pipe:

<ion-itembuttondetail*ngFor="let note of (notesService.notes | async)"[routerLink]="'/notes/' + note.id"routerDirection="forward">

The ngOnInit in the detail page will also need to be updated to make use of the observable returned by the getNote method now (if you have been following along with the notes application tutorial):

Modify ngOnInit in src/app/detail/detail.page.ts to reflect the following:

ngOnInit(){let noteId =this.route.snapshot.paramMap.get("id");this.notesService.getNote(noteId).subscribe(note =>{this.note = note;});}

Summary

Using NgRx looks a lot more complicated than just simply managing state yourself (and it is), but like a lot of things worth doing it’s a bit more upfront work for a longer-term payoff.

The state in this example application could rather easily be managed without using an advanced state management solution like NgRx. However, as applications become more complex the upfront work in setting up NgRx can be a great investment.

The Biggest Advantage of Ionic Applications: Web Views

$
0
0

I decided to write this article in response to some common questions/statements/responses I’ve been seeing for quite a while. In discussions where the cross-platform capabilities of Ionic are being explained, it would be common for the Ionic team, or bloggers/educators like myself, to say that Ionic allows you to build the following applications from a single codebase:

  • Web/PWA
  • Native iOS
  • Native Android
  • etc.

It seems to be a point of contention to refer to an Ionic application as native even when the end result is a standard native .apk or .ipa file and it has the ability to use Native APIs, on the grounds that the user interface is displayed using an embedded web view and not Native UI controls.

Although I am of the opinion that it makes sense and avoids confusion among newer mobile developers to refer to Ionic applications as native when they are deployed to iOS/Android using an .ipa or .apk package (except in circumstances where the discussion is specifically about Web Views vs Native UI) - I am not here to convince you of that in this article, and I don’t think people who don’t share my view on this are wrong.

The point I do want to address is that inevitably when Ionic applications are referred to as native in any way, people will often make statements like (either out of genuine curiosity or feigned confusion for the point of snark):

“Oh, did Ionic finally get rid of web views?”

Whether the commenters are well-intentioned or not, there does seem to be a perception that web views are inherently a bad thing. The reliance on web views - an embedded browser to run/display web code - to display the user interface of an Ionic application in an iOS/Android environment is a limiting factor when compared to using Native UI. However, whilst there are disadvantages to using a web view, the usage of web views is fundamental to the underlying ideology of the Ionic framework and it provides some of Ionic’s biggest advantages.

If the Ionic framework were ever to “get rid of web views” then it would cease to be the framework we know and love that utilises the power of the web. In this article, I want to discuss some of the advantages that using web views provides.

A Disclaimer

I’m always cautious about writing these kinds of articles because I don’t want to contribute to the overall noise and unproductive arguments of framework wars.

It is my opinion that different tools are suited to different tasks, teams, and developers. I think people should use the tool or tools that work for them and try not to mix their identity and self-worth into the tools they are using. In most cases, I think there are far bigger concerns that determine the success of an application than whether you use Ionic, React Native, Flutter, Objective-C/Swift, Java/Kotlin, or something else to build the application.

I want to make it clear that the point of this article is not to make the point that:

“Web views are the best, and Native UI can go suck a lemon”

I am not making the point that the web view approach Ionic uses is better, just that it has worthwhile advantages and “uses web views” is not something you can just lump entirely in the “cons” column when weighing the pros/cons of what approach to use.

What is a web view?

Before discussing some of the advantages of web views, let’s quickly recap what exactly they are and what role it plays in an Ionic application. We will specifically consider the case of an iOS application, but the same concept applies to Android (and other platforms) as well.

If you were building a native iOS application in the “standard” way, you would be writing your application entirely in the code that is native to that specific platform. In the case of iOS, that means Objective-C or Swift. To build out the user interface for the application, you would be using the various native views and controls that are provided by iOS.

When an Ionic application is deployed to iOS natively, the underlying package does still use this same native code, but the bulk of the application itself is built with web code. In order to display a web-based user interface inside of a native iOS application, we make use of WKWebView. This is basically like launching a browser inside of the native application, and displaying our application inside of that. There is no browser interface visible, so there is no obvious difference between an application that is using Native UI controls for the user interface or a web view. The files displayed in the web view are accessed locally, so there is no need to have an Internet connection or to connect to a specific website/URL in order to display the content in the web view.

The biggest downside to using a web view to display the application is that the web view essentially becomes its own little world sandboxed away from the rest of the native application. Native APIs outside of the web view can still be accessed by the application inside of the web view, so this “sandboxing” isn’t much of an issue in that regard. The biggest point of difference is that unlike a “standard” native application, an application that uses a web view is primarily using this web view for computation and rendering the interface - the web view essentially becomes the “engine” for the application.

Fortunately, web browsers are quite powerful today, so as long as the application is designed well this limitation will often not matter. In some types of applications, this limitation can be a determining factor on whether or not a web-based approach is viable, but it isn’t for most. It does mean you have less leeway for mistakes though, so you do need to be careful you aren’t making costly performance mistakes. In the end, even with the full power of native code available a poorly designed application will still be slow.

With an understanding of what a web view is, and why that might be a limitation, let’s consider some of the positive aspects of using a web view.

Your applications will work wherever the web does

This is ultimately the primary benefit of using a web view to run an application, and most of the rest of the points I will be making are derived from this in some way.

By creating a web-based application, it’s just a standard web application that you can run wherever the web works. This gives you the ability to create cross-platform applications from a single codebase by default. There are no special compilers required to transform the code you wrote into code that works on a specific platform or special renderers that can display your application on each platform. It’s just standard web code that works on the web.

Using a web view allows you to ignore the specifics of the platform you want to run your application on. If the platform allows you to use a browser/web view then it can run your application. It doesn’t matter whether that is on a desktop browser, a mobile browser, a browser embedded in an iOS/Android application, a browser embedded in a native desktop application, a browser on a fridge or even on a Tesla.

A familiar development and debugging environment

A lot of the time, people who start developing mobile applications with Ionic (or any other web-based approach) are going to be those who have some experience with web development and want to utilise those skills for developing mobile applications.

Since we are able to use web views, which is essentially just a browser, the development experience is not really much different to just developing any kind of web-based application. Most of the development will be done directly through a desktop browser. Even when your application is deployed natively to iOS or Android or somewhere else, you can still test and debug using browser-based debugging tools that are exactly the same as those that you would use on a desktop browser.

Although some circumstances may require you to poke around the native codebase or logs using XCode or Android Studio (typically only in cases where you are integrating Native APIs), the vast majority of your development and debugging will happen in the browser.

Avoiding gatekeepers

I’ve had to edit this section down a few times and remove personal anecdotes since it was getting a bit too ranty and rambly. The short of it is that, personally, I despise that in the case of native iOS and Android applications a single external company (mostly Apple, the Google Play store seems to have fewer issues in this regard) essentially has full control over the distribution of your application and it can apply whatever arbitrary rules it likes. For example, you could spend months developing an application for iOS and ultimately Apple can just say “no” and refuse to put it on the store. There have even been many cases where applications that have previously been allowed on the app store have been disallowed by Apple and removed.

There have been many high profile cases of rejections and removals, but the more common case for smaller developers is running foul of the grey areas in Apple’s App Store Review Guidelines. Many of the guidelines are vague and open to interpretation, and ultimately it may depend on the particular reviewer you get for your application.

Many developers will find themselves falling victim to this particular requirement:

4.2 Minimum Functionality - Your app should include features, content, and UI that elevate it beyond a repackaged website. If your app is not particularly useful, unique, or “app-like,” it doesn’t belong on the App Store. If your App doesn’t provide some sort of lasting entertainment value, or is just plain creepy, it may not be accepted.

Which basically means that if your app doesn’t seem “appy” or useful enough to the reviewer, they might just reject the application on the grounds that it would be better suited as a website. This may be true in many circumstances, a lot of apps would provide a better experience as a website/PWA, but if you’ve invested a lot of time into developing an iOS application specifically then this could sting. This particular requirement often leads to circumstances where a developer will submit an application and get rejected on this basis, and then sometimes even submit the exact same application later and have it accepted.

Of course, companies may operate their businesses as they please and if we want to get our applications into their platform we need to play by their rules and conform to their standards. I think that it is too risky to have your business model rely entirely upon remaining in the good graces of a company that can arbitrarily apply whatever rules they like.

Using a web-based solution like Ionic does not avoid this situation entirely. If you want to deploy an Ionic application natively to iOS then you face all the same rules everybody else does. What a web-based solution does give you is more options. Since your application is made from web code that runs in a browser, if you have developed it for one platform then you have (mostly) already developed it for other platforms too. If your application is rejected by Apple you can still deploy that same application to the Google Play store. Or, you could publish independently on the web (although you may need to make some concessions if your application relied on interacting with Native APIs) and your iOS users could still access your application this way.

Personally, I’m hoping for a future where the vast majority of applications are Progressive Web Applications distributed through the open web, and mostly only specialty apps are actually installed onto the device and distributed through other means - just like what has happened with Desktop applications. Many of the day-to-day applications that we use which once existed as native desktop applications we now use web apps for instead.

Independence

As well as being free from the whims of an external company that controls the distribution of your application, we should also consider our reliance upon the company that has created the tool that we are using to build the application. What if the tool or framework you are using to build your applications suddenly decides to go in a different direction, perhaps changing their licensing model or drastically increasing prices? What if the company goes completely bankrupt, will the tool/framework continue to be maintained? Will you still be able to use it? Are the skills you have developed specific to just that one tool, or could you use what you have learned from using that tool and more easily use a new tool or approach?

This probably isn’t too much of a concern if you are using the native language of the device to develop applications (i.e. Objective-C/Swift for iOS or Java/Kotlin for Android). It is something you should consider if you are relying on an external tool/framework to build your application like Ionic, React Native, Xamarin, Flutter, or anything else.

Frankly, I don’t know enough about all of these tools (nor do I have enough time) to cover the “disaster scenarios” for each one, but let’s consider a “disaster” case for Ionic.

The Ionic team today are certainly leading the charge for using the web platform to build mobile applications. I think that the efforts of the Ionic team have shown just how viable the web is for building modern mobile applications. As it stands today, the people developing and maintaining Ionic belong to a strong and well-funded company.

But, nothing is impervious to the various factors that influence life and business. Even the popular Parse platform which had the backing of Facebookshut down unexpectedly leaving thousands of developers in the lurch. I think this is much less likely to ever be the case for Ionic since Ionic is the company’s business, whereas Parse to Facebook is not its primary business interest. But it needs to be considered.

What if next week the Ionic team in its entirety were to be suddenly abducted by aliens or some kind of malevolent cosmic artificial intelligence. What would happen to those of us who rely upon Ionic to build our applications?

This is, again, a case where I think the web-based approach provides a strong benefit. If the entire Ionic team were to disappear, in the short term, it would have almost no impact (except for people who are relying on the Appflow services). All of Ionic’s components are MIT licensed, open source, web components. There is no services, or renderers, or compilers, or any other dependencies required to run Ionic applications that would disappear along with the Ionic team. We can just use these components in a web-based application in any way we like.

Having little to no short term impact is a huge benefit which means there isn’t going to be an “Oh frick, what do we do now?” moment. In the medium term, there is more to consider. Now that Ionic’s components are just generic web components, these should remain useable for quite a long time before requiring any maintenance. But there is also other parts of Ionic to consider like the Angular, React, and Vue specific packages. Or perhaps iOS releases a new version of their operating system with an additional “side notch”. Eventually, some maintenance will be required. Everything is entirely open source, though, so as long people are willing to organise and make contributions then these packages should remain in good standing for a long time (or you could also perform the maintenance yourself if you or your team had the capability to do so).

In the long term, there would need to be some driving force pushing the web forward for mobile applications. The Ionic team have done an incredible job in developing Ionic into what it is today, but without them, there would need to be some kind of driving force for vision and innovation pushing the web forward as the years go by. Personally, I think we are now well past the point where the viability of the web for mobile apps has been proven, and this would happen naturally due to market forces.

We’ve mostly just touched on the idea of Ionic as a company disappearing or failing here, but I think this open source web-based approach also succeeds in the other factors I mentioned at the beginning of this section. Since Ionic is free and open source I think it’s unlikely we need to worry about sudden pricing or license changes. If Ionic did decide to “go in a different direction” we would still be able to use the open source code that Ionic is comprised of. Finally, the skills you develop in learning to build Ionic applications are highly transferable as in the end, we are just learning to build for the web, not the language of a specific “tool”.

Always bet on the web

If there is one technology that has stood the test of time it is the web. Technologies come and go, but HTML/CSS/JavaScript and the World Wide Web are likely going to be around for a long time to come.

The portability and longevity of the web is the key advantage of using web views to build mobile applications.

Creating Reusable Cross-Framework Components with StencilJS

$
0
0

StencilJS is the technology behind the most recent version of the Ionic Framework, which allows Ionic’s components to be used with any framework or with no framework at all (opposed to the situation before where it was tied specifically to Angular). The reason StencilJS can be used to achieve this is that it provides a simplified way to build web components which are just native to the web, rather than to a specific framework.

You don’t need to use StencilJS in order to use Ionic, but we can use StencilJS if we want to create our own custom components that can be used anywhere. That means you could create a web component or web components that you could use in your framework of choice, but those same components could also be used with any other framework.

In the same way that Ionic provides a set of components to use in our applications, we could also provide our own set of components. This could be extremely useful in many situations, but especially where you are creating components that you intend to reuse across multiple projects. Imagine the time and effort you could save as a studio that develops mobile applications for clients and you slowly build up a collection of your own generic components that you can repurpose and reuse anywhere you like.

This also decouples a lot of the work you are doing from whatever framework you happen to be using at the time. In future, if you decide to change frameworks or adopt additional frameworks, you would be able to just directly drop in a lot of the work you have already done.

In this tutorial, we are going to walk through how you can create a collection of your own web components using StencilJS. We will then walk through how to use those components inside of an Ionic/Angular application, but you could use the same components elsewhere.

1. Create a new StencilJS Project

We can create multiple different types of StencilJS projects. Although StencilJS is a tool for building web components (not a framework), it can also be used as a kind of “pseudo-framework” for building applications in place of something like Angular/React/Vue.

A lot of the other StencilJS tutorials I have published on this site focus on that aspect, but in this case, we are going to be creating a StencilJS project specifically for the purpose of creating generic web components to be used elsewhere. This is easy to set up, as it is one of the default starting options when generating a new project.

Run the following command to generate a new StencilJS project:

npm init stencil

When prompted with the following options, choose component:

? Pick a starter › - Use arrow-keys. Return to submit.

   ionic-pwa     Everything you need to build fast, production ready PWAs
   app           Minimal starter for building a Stencil app or website
❯  component     Collection of web components that can be used anywhere

Fill out the additional prompts with information about your project, and then your project will be created. If you like, you can run the project right away to see it in the browser by making it your working directory and running:

npm start

You will find that the start project already includes an example component that you will see when you run the project:

Hello, World! I'm Stencil 'Don't call me a framework' JS

We will keep that component there to demonstrate that we can create a collection of multiple components to be used elsewhere, but we are also going to create our own additional component. This won’t be anything fancy, this is mostly for the sake of demonstrating the use of web components outside of StencilJS rather than learning the aspects of StencilJS itself.

2. Create the Web Components

To keep things simple, but still at least a little interesting, we are going to create a Marauder’s Map component. Harry Potter aficionados will already be familiar with the purpose of the such a map, but I’ll quickly summarise for those not familiar with the wizarding world. The Marauder’s Map displays the locations of people around Hogwarts Castle, but it is written in a special kind of magic ink such that not anybody can read it. Attempts to read the map without knowing the proper incantation will result in personal insults.

That is what our component will do, it will accept a reader prop and display insults to that person, e.g:

<my-marauders-mapreader="Josh"></my-marauders-map>

should result in:

Mr Moony presents his compliments to Josh, and begs them to keep their abnormally large nose out of other people's business.

Mr Prongs agrees with Mr Moony, and would like to add that Josh is an ugly git.

Mr Padfoot would like to register his astonishment that an idiot like that ever became a Professor.

Mr Wormtail bids Josh good day, and advises them to wash their hair, the slimeball.

Create new files at src/components/my-marauders-map/my-marauders-map.tsx and src/components/my-marauders-map/my-marauders-map.css

Add the following to src/components/my-marauders-map/my-marauders-map.tsx:

import{ Component, Prop }from"@stencil/core";

@Component({
  tag:"my-marauders-map",
  styleUrl:"my-marauders-map.css",
  shadow:true})exportclassMyMaraudersMap{/**
   * The first name
   */
  @Prop() reader: string;render(){return(<div><p>
          Mr Moony presents his compliments to {this.reader}, and begs them to
          keep their abnormally large nose out of other people's business.</p><p>
          Mr Prongs agrees with Mr Moony, and would like to add that
          {this.reader} is an ugly git.</p><p>
          Mr Padfoot would like to register his astonishment that an idiot like
          that ever became a Professor.</p><p>
          Mr Wormtail bids {this.reader} good day, and advises them to wash
          their hair, the slimeball.</p></div>);}}

The insults aren’t particularly creative here as they are just taken directly from Harry Potter but inserting the readers’ name in place of Snape’s, but you could perhaps come up with some more random/carefully crafted insults if you wanted.

To test out that this component behaves as you want it to, you can add it to the src/index.html file:

<!DOCTYPE html><htmldir="ltr"lang="en"><head><metacharset="utf-8"/><metaname="viewport"content="width=device-width, initial-scale=1.0, minimum-scale=1.0, maximum-scale=5.0"/><title>Stencil Component Starter</title><scriptsrc="/build/mycomponent.js"></script></head><body><my-componentfirst="Stencil"last="'Don't call me a framework' JS"></my-component><my-marauders-mapreader="Josh"></my-marauders-map></body></html>

and then run the project with npm start. If all is well, you should see the following:

Hello, World! I'm Stencil 'Don't call me a framework' JS
Mr Moony presents his compliments to Josh, and begs them to keep their abnormally large nose out of other people's business.

Mr Prongs agrees with Mr Moony, and would like to add that Josh is an ugly git.

Mr Padfoot would like to register his astonishment that an idiot like that ever became a Professor.

Mr Wormtail bids Josh good day, and advises them to wash their hair, the slimeball.

3. Publish the Web Components

Before we can use these components in another project (an Ionic/Angular application in this particular case), we will need to publish them on npm - either publicly or privately.

You should first modify your package.json file to give your package an appropriate name and description (and any other details you want to fill out).

You can then build your web components using the following command:

npm run build

Then all that is left to do is publish the package to npm. If you already have your npm username set up you will just need to run:

npm publish

and the package will be published to npm. If you do not already have an NPM account set up, you will need to run the following command first:

npm adduser

Here is the package I published for this example (and you can use this package for the next part if you like): joshmorony-example-components

4. Use the Web Components

Now that our set of web components have been built and published, we can make use of them where we like. As I mentioned, we are going to cover the specific case of Ionic/Angular but you can find other framework integrations here: Framework Integration.

In order to use our web components in an Angular application, we must first install the package we published by running the following command in the Angular project:

npm install joshmorony-example-components --save

We must then modify main.ts to import and make a call to defineCustomElements:

import{ enableProdMode }from"@angular/core";import{ platformBrowserDynamic }from"@angular/platform-browser-dynamic";import{ AppModule }from"./app/app.module";import{ environment }from"./environments/environment";import{ defineCustomElements }from"joshmorony-example-components/dist/loader";if(environment.production){enableProdMode();}platformBrowserDynamic().bootstrapModule(AppModule).catch(err => console.log(err));defineCustomElements(window);

Any module that you want to use your web components in you must add the CUSTOM_ELEMENTS_SCHEMA to:

import{ NgModule,CUSTOM_ELEMENTS_SCHEMA}from"@angular/core";import{ CommonModule }from"@angular/common";import{ IonicModule }from"@ionic/angular";import{ FormsModule }from"@angular/forms";import{ RouterModule }from"@angular/router";import{ HomePage }from"./home.page";

@NgModule({
  imports:[
    CommonModule,
    FormsModule,
    IonicModule,
    RouterModule.forChild([{
        path:"",
        component: HomePage
      }])],
  schemas:[CUSTOM_ELEMENTS_SCHEMA],
  declarations:[HomePage]})exportclassHomePageModule{}

Finally, we can just drop the web component in wherever we want to use it now:

<ion-header><ion-toolbar><ion-title>
      Ionic Blank
    </ion-title></ion-toolbar></ion-header><ion-content><divclass="ion-padding"><my-marauders-mapreader="Josh"></my-marauders-map></div></ion-content>

Summary

There is a little more work involved in doing this initially rather than just creating a custom component directly in the Angular application (or whatever framework you are using). However, there are a lot of benefits if you do take the time to learn StencilJS and to create generic web components that can be used anywhere.


Using Services/Providers to Share Data in a StencilJS Application

$
0
0

We’ve recently been discussing various ways to manage state in a StencilJS application, including using Stencil State Tunnel and Redux. We’ve specifically been considering the context of building Ionic applications built with StencilJS, but these concepts apply to any StencilJS application.

We might implement some kind of “state management” solution to keep track of things like:

  • Settings values that can be accessed throughout the application
  • A logged in user’s data
  • Posts, articles, comments etc.

However, some applications may benefit from a simpler solution rather than a full-featured state management solution like Redux. If you have a background with Angular then you may be used to using services/providers/injectable to fulfill this role. Angular has the concept of an @Injectable built-in, which we can use to create a service that can share data/methods throughout our application.

StencilJS is not as “opinionated” as Angular - remember that whilst StencilJS can afford us a lot of the benefits of a traditional framework, it isn’t actually a framework (it is a web component compiler) and it doesn’t have a bunch of the built-in features that Angular does.

Although this kind of functionality isn’t baked into StencilJS, it is actually quite straight-forward to implement with vanilla JavaScript.

The method of sharing data using a class that we are discussing is commonly referred to as a singleton pattern and it is a technique that has been around for a long time. The basic idea is that we want to share a single instance of a class among multiple pages/components/services, such that they are all accessing the same methods and data.

A class is like a blueprint for creating objects, and we can create multiple objects from a single class. For example, we can do this:

let myService =newMyService()

To create a new object based on the MyService class, and we can do this as many times as we like. Each time we do it, we are creating a completely separate and independent object. With the singleton pattern, we would just do this once and create a single object based on the class that is shared throughout our entire application. In this way, that shared singleton object provides the same methods and data no matter what is accessing it or where it is accessing it from.

Creating a Singleton Service in StencilJS

The concept is simple enough: instantiate a single object from a class and share that object throughout the application. Let’s take a look at what that might actually look like though. We will create a simple dummy service to demonstrate.

Create a file at src/services/my-service.ts and add the following:

import{ MyDataType }from"../interfaces/my-data";classMyServiceController{public myData: MyDataType[];constructor(){}asyncload(){if(this.myData){returnthis.myData;}else{// Load data and then...returnthis.myData;}}asyncgetData(){const data =awaitthis.load();return data;}addData(data){this.myData.push(data);}}exportconst MyService =newMyServiceController();

At this point, if you are familiar with Angular, you will probably that this looks almost identical to what you would do in Angular - except that there is no @Injectable decorator, and we are exporting an instance of the class at the bottom.

We are just using some dummy methods and data here, but the general idea is that we have a service that is keeping track of some data (maybe posts or todos). We have the myData class member that will store the data, we have a method to load an initial set of data, we have a addData method for adding more data, and a getData method to return the current set of data.

We might want to make use of the methods/data available in this class in multiple pages/components in our StencilJS application. Perhaps from one page, we will want to call the getData method to get all of the current data, but we might also want to call the addData method from a different page and have that data made available to the page making the getData call.

To achieve this, we create a new instance of the service like this:

exportconst MyService =newMyServiceController();

We not only create a new instance of MyServiceController, we also export it so that we will be able to import this object elsewhere in our application. Notice that we declare the object using const instead of say var or let. By using const we ensure that our singleton service can’t be overwritten, which is the point of a singleton service - we want to declare a single instance and use that throughout the life of the application. It’s not required to use the const keyword, but it does help enforce the “singleton-ness” of the object.

Now that we have our service, we just need to be able to make use of it throughout the application. To do that, you will be able to import it anywhere like this:

import{ MyService }from"../../services/my-service";

and then in the component that you have imported MyService into, you will immediately be able to make use of all of the data/methods that the service provides:

MyService.addData(data);
this.data =await MyService.getData();

We will be able to import this service in any of our pages/component/services and we will be sharing the same instance. If we addData in one component, and then later use getData from a different component, the data added by one component will be available to the other.

Summary

This approach isn’t perhaps as robust or scalable as using a full state management solution like Redux, but it is a lot simpler and often an application will not require anything more advanced than a simple singleton to manage state. Although this kind of functionality isn’t available out of the box like it is with a full/opinionated framework like Angular, it is quite simple to achieve with just standard ES6 JavaScript classes.

State Management with Redux in Ionic & StencilJS: Loading Data

$
0
0

Over the past few weeks we have been covering various aspects of state management in Ionic applications - both with Angular (using NgRx) and StencilJS (using Redux).

So far, we have only covered the basics concepts of Ionic + StencilJS + Redux, but this tutorial is going to jump straight into a realistic example of using Redux for an Ionic/StencilJS application. We will be using Redux to store data loaded from a local JSON file using the Fetch API (although you could just as easily make the request to a real server). With the data loaded into the Redux store, we will be able to access the state/data we need from the components in our application.

We will also handle loading and error/failure states so that our application is able to respond accordingly to these situations (e.g. we might want to show a loading overlay whilst the data is in the process of being loaded, or we might want to display an error message to the user if the data fails to load).

Although we will be using the Ionic PWA Toolkit in this example, these concepts will apply generically to any StencilJS application.

Before We Get Started

This is an advanced tutorial, and if you don’t already have an understanding of the basic concepts of Redux, I would highly recommend that you watch this video first: What is Redux?.

I’ll preface this tutorial by saying that you don’t necessarily need to use Redux in your StencilJS applications. You might not find the complexity worthwhile for simple applications and may find it easier to manage data/state through services - especially if you are more at the beginner level.

However, although there is a bit more work involved in setting up and learning a state management solution like Redux, it does provide powerful benefits.

The Basic Concept

If you’re reading this you should already have somewhat of an understanding behind the basic idea of how actions and reducers work (or at least what their role is). An action describes some intent (e.g. SET_FILTER), and a reducer takes in the current state and an action and produces a new state that reflects the result of that action.

Since I have already given you the context that we are going to be loading in some data from a JSON file, you might expect that we would just need to create a single action like:

  • LOAD_DATA

However, we will actually be creating three separate actions to handle this process:

  • LOAD_DATA_BEGIN
  • LOAD_DATA_SUCCESS
  • LOAD_DATA_FAILURE

First, we will dispatch a LOAD_DATA_BEGIN action. Depending on the success of our fetch request, we will then either dispatch a LOAD_DATA_SUCCESS action or a LOAD_DATA_FAILURE action. We do this because we don’t just immediately get the data when we load it. First, there is a period of time whilst the data is loading (e.g. a request to some API is in progress) in which we don’t have access to the data - we might want to display something specific in our application during this time. Whilst the data will likely eventually load in most of the time, it is possible that an error could occur (e.g. there was a bug in your code or the server you are requesting data from is down). In that case, we probably also want to make sure that our application handles that situation appropriately.

Using these three actions will allow us to more accurately describe the state of our application, and result in a more bullet-proof solution that allows us to handle multiple different scenarios that can arise from loading data.

Installing Redux

Once you have a StencilJS project created (it doesn’t matter whether you choose an Ionic PWA or not, that is just what I will be using in the example code) you will need to install the following packages:

npm install redux --save

This will, probably unsurprisingly, install Redux itself.

npm install redux-thunk --save

This is additional middleware for Redux, which is basically like a plugin that adds extra functionality. Redux Thunk will allow us to use an asynchronous function as an action (which will allow us to create an action that launches our asynchronous fetch request).

npm install redux-logger --save

This is some more middleware that will provide us with some nice debug log messages - this is extremely useful as it allows us to easily see what actions are being triggered and what the resulting state looks like.

npm install @stencil/redux --save

Finally, we have the StencilJS package for Redux which basically just provides functionality for integrating Redux into our StencilJS components.

Setting up Redux in StencilJS

Before we get into the specifics of implementing our data loading solution, let’s first just get a basic implementation of Redux set up in our StencilJS project. We are going to need to create a few files/folders and add a bit of configuration for our Redux store.

Create a file at src/store/index.ts and add the following:

import{ createStore, applyMiddleware }from"redux";import rootReducer from"../reducers/index";import thunk from"redux-thunk";import logger from"redux-logger";constconfigureStore=(preloadedState: any)=>createStore(rootReducer, preloadedState,applyMiddleware(thunk, logger));export{ configureStore };

When using Redux, we have a single “store” that stores all of the state for our application. We use this file to configure that store, which involves supplying it with the reducers we will create, any initial state that we want, and any middleware that we want to use. This will likely look pretty similar for most implementations, the only “special” thing we are really doing here is setting up our thunk and logger middleware. The reducers are being pulled in from a different file that we will create soon.

Modify your root component at src/components/app-root/app-root.tsx to configure the store:

import{ Component, Prop }from"@stencil/core";import{ Store }from"@stencil/redux";import{ configureStore }from"../../store/index";

@Component({
  tag:"app-root",
  styleUrl:"app-root.css"})exportclassAppRoot{
  @Prop({ context:"store"}) store: Store;componentWillLoad(){this.store.setStore(configureStore({}));}render(){return(<ion-app><ion-router useHash={false}><ion-route url="/" component="app-home"/><ion-route url="/profile/:name" component="app-profile"/></ion-router><ion-nav /></ion-app>);}}

We also need to do a little configuration for the store in our root component for the application. We import Store from the StencilJS package for redux and set it up as a @Prop() in the component. Then, inside of the componentWillLoad lifecycle hook, we make a call to the setStore method using the configureStore function we just set up in the previous file.

Create a file at src/reducers/index.ts and add the following:

import dataReducer from"./data";import{ combineReducers }from"redux";const rootReducer =(combineReducers as any)({
  dataReducer
});exportdefault rootReducer;

Now we need to set up our reducers (which we referenced in our store file). This index.ts file will combine all of the reducers we create for our application, but in this case, we are just going to have a single dataReducer.

We are going to set up a simple version of our dataReducer that is being imported now, but we will focus on the actual implementation of the reducer later.

Create a file at src/reducers/data.ts and add the following:

import{ Actions, ActionTypes }from"../actions/index";interfaceDataState{
  items: string[];
  loading: boolean;
  error: any;}constgetInitialState=()=>{return{
    items:[],
    loading:false,
    error:null};};const dataReducer =(
  state: DataState =getInitialState(),
  action: ActionTypes
)=>{switch(action.type){// handle different actions}return state;};exportdefault dataReducer;

This is the basic outline of our reducer, but we have removed the implementation details - this is what most reducers will look like to begin with. We set up a DataState interface to represent the type of data/state we want to hold for this reducer - an array of items that will be simple strings, a loading state that will be true when the data is in the process of being loaded, and an error for holding any errors that occur.

We then define a getInitialState function that returns the initial state we want to use - most of the time this is just going to be empty/blank/null values.

Then we have the dataReducer itself, which takes in the state and an action. It will then switch between the various possible actions (in our case this will be LOAD_DATA_BEGIN, LOAD_DATA_SUCCESS, and LOAD_DATA_FAILURE). The responsibility of the reducer is to return some new state based on the current state and the action that has been supplied. Again, if you aren’t already reasonably familiar with these general concepts I would recommend watching my Redux video first.

Next, we need to set up our actions that will be passed into the reducer.

Create a file at src/actions/data.ts and add the following:

import{ Actions }from"../actions/index";exportinterfaceLoadDataBeginAction{
  type: Actions.LOAD_DATA_BEGIN;}exportconstloadDataBegin=()=>async(dispatch, _getState)=>{returndispatch({
    type: Actions.LOAD_DATA_BEGIN});};exportinterfaceLoadDataSuccessAction{
  type: Actions.LOAD_DATA_SUCCESS;
  payload: any;}exportconstloadDataSuccess= data =>async(dispatch, _getState)=>{returndispatch({
    type: Actions.LOAD_DATA_SUCCESS,
    payload:{ data }});};exportinterfaceLoadDataFailureAction{
  type: Actions.LOAD_DATA_FAILURE;
  payload: any;}exportconstloadDataFailure= error =>async(dispatch, _getState)=>{returndispatch({
    type: Actions.LOAD_DATA_FAILURE,
    payload:{ error }});};

First, we import Actions from the index file for the actions that we will create in just a moment - in this file we will provide some consistent names for our actions so that if we accidentally make a typo when typing out LOAD_DATA_BEGIN or any of the other actions (I seem to have a habit of typing BEING instead of BEGIN), we are immediately going to see the error if we are using something like Visual Studio Code (because the property won’t exist on Actions, as opposed to just typing out a string value where the code editor wouldn’t know that it was a mistake).

Then we create our three actions inside of this file, and for each action, we create an interface to describe its structure. Each action requires a type that will describe what the action does (e.g. LOAD_DATA_BEGIN) and it can also optionally have a payload which can contain additional data. The payload in our case might be the items we want to load in for LOAD_DATA_SUCCESS or the error that occurred for LOAD_DATA_FAILURE. No payload is required for LOAD_DATA_BEGIN because it is just launching the process for loading the data.

Notice that the actions with a payload have that payload passed into the function:

exportconstloadDataSuccess= data =>async(dispatch, _getState)=>{exportconstloadDataFailure= error =>async(dispatch, _getState)=>{

whereas the action with no payload does not pass in any parameters:

exportconstloadDataBegin=()=>async(dispatch, _getState)=>{

Now we just need to create that actions index file.

Create a file at src/actions/index.ts and add the following:

import{
  LoadDataBeginAction,
  LoadDataSuccessAction,
  LoadDataFailureAction
}from"./data";// Keep this type updated with each known actionexport type ActionTypes =| LoadDataBeginAction
  | LoadDataSuccessAction
  | LoadDataFailureAction;exportenum Actions {LOAD_DATA_BEGIN="LOAD_DATA_BEGIN",LOAD_DATA_SUCCESS="LOAD_DATA_SUCCESS",LOAD_DATA_FAILURE="LOAD_DATA_FAILURE"}

This file doesn’t actually do much, its main purpose is to list the various available actions so that they can be imported and used elsewhere. Again, if you are using something like Visual Studio Code, this would allow you to just start typing:

Actions.

In another file where you are importing Actions and it will immediately pop up with a list of all of the available actions. This saves you time looking them up all the time, and it also prevents mistakes through typos.

Create Test Data

We’ve got the basic structure for our Redux store set up now, but before we implement the rest of it we are going to need some test data. As I mentioned, we are going to make a GET request with fetch, but we are just going to be using a local JSON file as the data source. You can modify this data with your own file, or you could make a real HTTP request to some API if you prefer.

Create a file at src/assets/test-data.json and add the following:

{"items":["car","bike","shoe","grape","phone","bread","valyrian steel","hat","watch"]}

Implementing the Actions and Reducer

Now we get to the bit that actually makes our actions/reducer do something interesting. Let’s consider how we want this to work.

  • When we dispatch a LOAD_DATA_BEGIN action we want to trigger the fetch request and set the loading state to true. The following two actions should be dispatched automatically depending on whether or not the data loading succeeds.
  • When the LOAD_DATA_SUCCESS action is dispatched, we want to set the loading state to false and we want to set the items state to the data payload that has been loaded in
  • When the LOAD_DATA_FAILURE action is dispatched, we want to set the loading state to false and we want to set the error state to whatever error occurred

Let’s begin by making our dataReducer reflect this intent.

Modify src/reducers/data.ts to reflect the following:

import{ Actions, ActionTypes }from"../actions/index";interfaceDataState{
  items: string[];
  loading: boolean;
  error: any;}constgetInitialState=()=>{return{
    items:[],
    loading:false,
    error:null};};const dataReducer =(
  state: DataState =getInitialState(),
  action: ActionTypes
)=>{switch(action.type){case Actions.LOAD_DATA_BEGIN:{return{...state,
        loading:true,
        error:null};}case Actions.LOAD_DATA_SUCCESS:{return{...state,
        loading:false,
        items: action.payload.data
      };}case Actions.LOAD_DATA_FAILURE:{return{...state,
        loading:false,
        error: action.payload.error
      };}}return state;};exportdefault dataReducer;

Remember that our reducer does not modify the existing state, it creates a new state. This is why we would return something like this:

return{...state
      };

It uses the spread operator to take all of the properties out of the existing state, and add them to the new state object that we are returning. In this sense, we are creating a new state that exactly reflects the previous state not just returning the existing state. However, we don’t want the state to be unchanged, that is why we do this:

return{...state,
        loading:false,
        items: action.payload.data
      };

First, we reconstruct the old state inside of our new state, but then we specifically overwrite the loading and items properties. Therefore, we aren’t modifying the existing state (this is not allowed in Redux), we are supplying a new different state.

Each of our actions supplies new state properties to reflect what we wanted to achieve with those actions, using the payload that is passed into it if necessary. But where does that payload come from? Where is the fetch request happening? So far, we have done a whole lot of describing and not much doing. Let’s finally add the key ingredient.

Remember before how we set up the redux-thunk middleware? This was so that we could use an asynchronous function as an action. Let’s create that function now.

Modify src/actions/data.ts to reflect the following:

import{ Actions }from"../actions/index";interfaceDataResponse{
  items: string[];}exportfunctionloadData(){returnasync dispatch =>{// Trigger the LOAD_DATA_BEGIN actiondispatch(loadDataBegin());try{let response =awaitfetch("/assets/test-data.json");handleErrors(response);let json: DataResponse =await response.json();// Trigger the LOAD_DATA_SUCCESS actiondispatch(loadDataSuccess(json.items));return json.items;}catch(error){// Trigger the LOAD_DATA_FAILURE actiondispatch(loadDataFailure(error));}};}functionhandleErrors(response){if(!response.ok){thrownewError(response.statusText);}return response;}// ACTIONSexportinterfaceLoadDataBeginAction{
  type: Actions.LOAD_DATA_BEGIN;}exportconstloadDataBegin=()=>async(dispatch, _getState)=>{returndispatch({
    type: Actions.LOAD_DATA_BEGIN});};exportinterfaceLoadDataSuccessAction{
  type: Actions.LOAD_DATA_SUCCESS;
  payload: any;}exportconstloadDataSuccess= data =>async(dispatch, _getState)=>{returndispatch({
    type: Actions.LOAD_DATA_SUCCESS,
    payload:{ data }});};exportinterfaceLoadDataFailureAction{
  type: Actions.LOAD_DATA_FAILURE;
  payload: any;}exportconstloadDataFailure= error =>async(dispatch, _getState)=>{returndispatch({
    type: Actions.LOAD_DATA_FAILURE,
    payload:{ error }});};

The key change in this file is this:

exportfunctionloadData(){returnasync dispatch =>{// Trigger the LOAD_DATA_BEGIN actiondispatch(loadDataBegin());try{let response =awaitfetch("/assets/test-data.json");handleErrors(response);let json: DataResponse =await response.json();// Trigger the LOAD_DATA_SUCCESS actiondispatch(loadDataSuccess(json.items));return json.items;}catch(error){// Trigger the LOAD_DATA_FAILURE actiondispatch(loadDataFailure(error));}};}functionhandleErrors(response){if(!response.ok){thrownewError(response.statusText);}return response;}

We are creating a loadData() function that, when called, will dispatch the LOAD_DATA_BEGIN action using the action we have already created for it further below in the file. This will then make that fetch request and if it is successful it will dispatch the LOAD_DATA_SUCCESS action whilst also passing the items that were loaded into it. If an error occurs during this process, which will be caught by our try/catch block, then the LOAD_DATA_FAILURE action will be dispatched instead.

Now all we need to do is call that loadData() method to kick off this whole process.

Consuming State in Your Components

We’re almost done! But, there is one more thing we need to take care of. We have everything set up, but we still need to use it somewhere. We’re going to walk through an example of triggering our load and consuming state from a Redux store in the home page of a StencilJS/Ionic application.

Modify src/components/app-home/app-home.tsx to reflect the following:

import{ Component, State, Prop }from"@stencil/core";import{ Store, Action }from"@stencil/redux";import{ loadData }from"../../actions/data";

@Component({
  tag:"app-home",
  styleUrl:"app-home.css"})exportclassAppHome{
  @State() items: any;
  @State() loading: boolean;
  @State() error: any;

  @Prop({ context:"store"}) store: Store;
  loadData: Action;componentWillLoad(){this.store.mapStateToProps(this, state =>{const{
        dataReducer:{ items, loading, error }}= state;return{
        items,
        loading,
        error
      };});this.store.mapDispatchToProps(this,{
      loadData
    });}componentDidLoad(){this.loadData();}render(){return[<ion-header><ion-toolbar color="danger"><ion-title>Ionic + StencilJS + Redux</ion-title></ion-toolbar></ion-header>,<ion-content><ion-list lines="none">{this.items.map(item =>(<ion-item><ion-label>{item}</ion-label></ion-item>))}</ion-list></ion-content>];}}

We have set up three member variables with the StencilJS @State() decorator (which causes our template to re-render to reflect changes each time any of these values change). We then use mapStateToProps from the store to map the state from the store onto those member variables, which will make them accessible to us in the component. There is a lot of weird/fancy destructuring assignment syntax going on here, but it’s basically just a neater way to write this.items = state.dataReducer.items for each piece of state that we want to set up. You can learn more about destructuring assignments here if you like: Understanding { Destructuring } = Assignment.

With that done, we can just simply access this.items, this.loading, and this.error in our component and it will reflect whatever values they are supposed to contain. We do still need to call that loadData() function somewhere, though.

To do that, we set up a member variable called loadData. We then use the mapDispatchToProps method from the store to assign the loadData method imported from our actions file to the member variable. Then we just simply call this.loadData() from our componentDidLoad method to automatically trigger the load process as soon as the component has loaded.

If you check out the console logs when running your application you should now see the various actions being triggered:

redux-logger showing successful data load

This is due to our use of redux-logger which is really cool because it allows you to see the previous state and then how the current action changed the new state.

Just for a bit of fun, let’s purposefully make our load request fail. If we modify this call:

let response =awaitfetch("/assets/test-data.json");

to this:

let response =awaitfetch("/wrong/path/test-data.json");

It is going to fail. Let’s see what happens to our Redux store in that scenario:

redux-logger showing unsuccessful data load

You can see that the LOAD_DATA_FAILURE action is triggered and the appropriate error is supplied. We haven’t implemented it in this example, but we could then easily make use of this new state in our component to display an appropriate error message to the user since it would be available through this.error.

Summary

Rather than having to manually manage state and write conditions for various things that might happen, this whole process is now kind of “out of sight, out of mind”. It requires a little more legwork initially, but now we can just trigger a single loadData() function, and our component will reflect an appropriate state - no matter if the data loading succeeds or fails.

Basic and Advanced Tab Navigation with Ionic & StencilJS

$
0
0

A tabbed navigation interface is very commonly used in mobile applications and, as with most things user interface related, the Ionic web components make implementing this kind of interface relatively easy. We can make use of the <ion-tabs>, <ion-tab>, <ion-tab-bar>, and <ion-tab-button> components to create an interface with multiple tabs that display different components that we can easily switch between:

Tabbed navigation with Ionic and StencilJS

In this tutorial, we are going to look at two different approaches to implementing tab navigation in an Ionic & StencilJS application. The first will be a basic implementation that allows for switching between components using tabbed navigation, but each individual tab will be limited to displaying just a single component.

The second approprach will provide each tab with its own navigation system, allowing for additional pages/components to be pushed within an individual tab. This would allow you to create a master/detail navigation pattern (or pretty much anything else) within an individual tab.

Before we Get Started

This tutorial will assume that you already have a grasp on the basics of building Ionic applications with StencilJS. If you need to learn more of the basics first, you might want to check out my other StencilJS tutorials.

1. Getting Ready

We will be using, more or less, the same project structure for both of our example. If you want to follow along with the examples, I would recommend setting up a new Ionic/StencilJS project with the following components:

  • app-root
  • app-tabs
  • app-home
  • app-profile
  • app-detail

With both approaches, the general structure is mostly the same. We have our app-root component which will contain our routing information as usual. The app-tabs component will set up the tabs interface and the app-home, app-profile, and app-detail components will be used inside of the tabs interface.

For the basic example, we will just be using app-home and app-profile inside of the tabs interface and providing the ability to switch between those. In the advanced example, we will add the ability to “push” the additional app-detail page inside of the tab that contains app-profile.

2. Basic Tabs

This first example is going to demonstrate a basic implementation of tabbed navigation that will allow you to switch between multiple components in a tab view, but you will not be able to navigate within individual tabs.

Modify src/components/app-tabs/app-tabs.tsx to reflect the following:

import{ Component }from"@stencil/core";

@Component({
  tag:"app-tabs",
  styleUrl:"app-tabs.css"})exportclassAppTabs{render(){return[<ion-tabs><ion-tab tab="tab-home" component="app-home"/><ion-tab tab="tab-profile" component="app-profile"/><ion-tab-bar slot="bottom"><ion-tab-button tab="tab-home"><ion-icon name="map"/><ion-label>Home</ion-label></ion-tab-button><ion-tab-button tab="tab-profile"><ion-icon name="information-circle"/><ion-label>Profile</ion-label></ion-tab-button></ion-tab-bar></ion-tabs>];}}

This sets up the general structure for our tabs. We define everything inside of the <ion-tabs> components, including each individual tab which is created with <ion-tab> and then the <ion-tab-bar> which provides the buttons for switching between the various tabs. Notice that we give a name to each <ion-tab> using the tab property, and then we supply that name to the <ion-tab-button> so that it knows which tab to activate when clicked.

We also assign the component that the tab should display by using the component property, and just providing the tag of the component that we want to use. Now we just need to set up the routing.

Modify src/components/app-root/app-root.tsx to reflect the following:

import{ Component }from"@stencil/core";

@Component({
  tag:"app-root",
  styleUrl:"app-root.css"})exportclassAppRoot{render(){return(<ion-app><ion-router useHash={false}><ion-route component="app-tabs"><ion-route url="/" component="tab-home"/><ion-route url="/profile" component="tab-profile"/></ion-route></ion-router><ion-nav /></ion-app>);}}

We create a route for our app-tabs component similarly to how we would create a normal route, except that there is no url attached directly to it. Instead, we provide additional routes inside of the route for app-tabs that connects particular URLs to our tabs. Notice that the component we supply to the routes is the tab name we gave them in app-tabs not the actual component itself - we want the router to active the tab that contains the component, not the component itself.

That’s all we need to do for a basic tabs set up. If you load the application now it should load up the default / route, which will display the tab-home tab in our tabbed navigation. You should then be able to switch back and forth between the two tabs.

3. Advanced Tabs

This next implementation will give each tab its own <ion-nav> component, which will allow it to provide full navigation capabilities within individual tabs. This means that each tab can maintain its own navigation, and you could navigate between multiple pages/components within an individual tab.

There are only a few minor modifications required in order to get this working. Let’s take a look.

Modify src/components/app-tabs/app-tabs.tsx to reflect the following:

import{ Component }from"@stencil/core";

@Component({
  tag:"app-tabs",
  styleUrl:"app-tabs.css"})exportclassAppTabs{render(){return[<ion-tabs><ion-tab tab="tab-home"><ion-nav /></ion-tab><ion-tab tab="tab-profile"><ion-nav /></ion-tab><ion-tab-bar slot="bottom"><ion-tab-button tab="tab-home"><ion-icon name="map"/><ion-label>Home</ion-label></ion-tab-button><ion-tab-button tab="tab-profile"><ion-icon name="information-circle"/><ion-label>Profile</ion-label></ion-tab-button></ion-tab-bar></ion-tabs>];}}

This is more or less the same as the basic example, except that instead of assigning a component directly to the <ion-tab> we add an <ion-nav> component inside of the tab. Now let’s up the routing.

Modify src/components/app-root/app-root.tsx to reflect the following:

import{ Component }from"@stencil/core";

@Component({
  tag:"app-root",
  styleUrl:"app-root.css"})exportclassAppRoot{render(){return(<ion-app><ion-router useHash={false}><ion-route component="app-tabs"><ion-route url="/" component="tab-home"><ion-route component="app-home"/></ion-route><ion-route url="/profile" component="tab-profile"><ion-route component="app-profile"/><ion-route url="/detail" component="app-detail"/></ion-route></ion-route></ion-router><ion-nav /></ion-app>);}}

Again, pretty similar, except that now we have one additional layer or nesting for our routes. Inside of the route for each individual tab, we supply further routes to determine what to display in that tab. Let’s take a closer look at the tab-profile tab which is the interesting one here:

<ion-route url="/profile" component="tab-profile"><ion-route component="app-profile"/><ion-route url="/detail" component="app-detail"/></ion-route>

The first additional <ion-route> that we set up just provides the default component for that tab - e.g. the one that will be activated when the user goes to /profile. In this case, that means that app-profile will be displayed. Then we add an additional route with a different url. This means that when the user goes to /profile/detail the app-detail component will be activated inside of the tab-profile tab.

This completes our advanced tabbed navigation implementation, but I will just quickly show you an example of using this. The easiest way to navigate about the application is to use simple buttons with href and routerDirection, and if we added a button like this on our app-profile component:

<ion-buttonhref="/profile/detail"routerDirection="forward">Push Detail Page</ion-button>

We would be able to push our app-detail page into the tab-profile tab, and then (as long as we add a back button) navigate back to the default app-profile component within that tab. However, you might also want to navigate programmatically. This is easy to do as well, as ultimately everything can just be controlled by changing the URL. We could, for example, modify our app-profile component to look like this:

import{ Component }from"@stencil/core";

@Component({
  tag:"app-profile",
  styleUrl:"app-profile.css"})exportclassAppProfile{private navCtrl: HTMLIonRouterElement;componentDidLoad(){this.navCtrl = document.querySelector("ion-router");}someCleverLogic(){// do something cleverthis.navCtrl.push("/profile/detail");}render(){return[<ion-header><ion-toolbar color="primary"><ion-title>Profile</ion-title></ion-toolbar></ion-header>,<ion-content padding><ion-button href="/profile/detail" routerDirection="forward">
          Push Detail Page(href)</ion-button><ion-button onClick={()=>this.someCleverLogic()}>
          Push Detail Page(programmatically)</ion-button></ion-content>];}}

Both of these approaches to navigation will achieve the same result - we will be in the tab-profile tab with the app-profile page activated initially, and then the app-detail page will be pushed into view in that same tab.

Summary

Both of these tab implementations are rather similar, and also rather straight-forward to implement when you consider what we are achieving with such a small amount of code. We can gain the full navigation power of using individual <ion-nav> components inside each tab with relatively few changes to the overall structure.

Using NgRx Effects for Data Loading in an Ionic & Angular Application

$
0
0

As we have discussed quite a bit now, the idea with state management solutions like Redux and NgRx is to dispatch actions which are interpreted by reducers in order to produce a new state. In a simple scenario, as was the case for the last NgRx tutorial, we might dispatch a CreateNote action and supply it with the note we want to create, which then allows the reducer to appropriately add this data to the new state:

createNote(title):void{let id = Math.random().toString(36).substring(7);let note ={
      id: id.toString(),
      title: title,
      content:""};this.store.dispatch(newNoteActions.CreateNote({ note: note }));}

However, things are not always so simple. If we consider the context for this tutorial (loading data), there is a bit more that needs to happen. As well as dispatching the action for loading data, we also need to trigger some kind of process for actually loading the data (usually by making an HTTP request to somewhere).

This is where we can make use of NgRx Effects which allows us to create “side effects” for our actions. Put simply, an @Effect() will allow us to run some code in response to a particular action being triggered. In our case, we will use this concept to trigger our HTTP request to load the data.

Another aspect of loading data is that it is asynchronous and may not always succeed, and a single LoadData action isn’t enough to cover all possible scenarios. This is something we covered in detail in the [Ionic/StencilJS/Redux version of this tutorial], but the basic idea is to have three actions for data loading:

  • LoadDataBegin
  • LoadDataSuccess
  • LoadDataFailure

We will initially trigger the LoadDataBegin action. We will have an @Effect() set up to listen for this particular action, which will trigger our HTTP request. If this request is successfully executed, we will then trigger the LoadDataSuccess action automatically within the effect, or if an error occurs we will trigger the LoadDataFailure action.

If you would like more context to this approach, or if you do not already understand how to set up NgRx in an Ionic/Angular application, I would recommend reading the tutorials below:

Before We Get Started

This is an advanced tutorial, and it assumes that you are already comfortable with Ionic/Angular and that you also already understand the basics of NgRx and state management. If you are not already comfortable with these concepts, please start with the tutorials I linked above.

This tutorial will also assume that you already have an Ionic/Angular application with NgRx set up, we will just be walking through the steps for setting up this data loading process with NgRx Effects.

Finally, you will need to make sure that you have installed NgRx Effects in your project with the following command:

npm install --save @ngrx/effects

We will walk through the configuration for NgRx Effects later in the tutorial.

1. Create the Test Data

To begin with, we are going to need some data to load in via an HTTP request. We will just be using a local JSON file to achieve that, but if you prefer you could easily swap this approach out with a call to an actual server.

Create a file at src/assets/test-data.json with the following data:

{"items":["car","bike","shoe","grape","phone","bread","valyrian steel","hat","watch"]}

2. Create the Actions

We are going to create our three actions for data loading first, which will follow a similar format to any other action we might define (again, if you are unfamiliar with this please read the tutorials linked in the introduction).

Create a file at src/app/actions/data.actions.ts and add the following:

import{ Action }from"@ngrx/store";exportenum ActionTypes {
  LoadDataBegin ="[Data] Load data begin",
  LoadDataSuccess ="[Data] Load data success",
  LoadDataFailure ="[Data] Load data failure"}exportclassLoadDataBeginimplementsAction{
  readonly type = ActionTypes.LoadDataBegin;}exportclassLoadDataSuccessimplementsAction{
  readonly type = ActionTypes.LoadDataSuccess;constructor(public payload:{ data: any }){}}exportclassLoadDataFailureimplementsAction{
  readonly type = ActionTypes.LoadDataFailure;constructor(public payload:{ error: any }){}}export type ActionsUnion = LoadDataBegin | LoadDataSuccess | LoadDataFailure;

The main thing to note here is that our LoadDataSuccess and LoadDataFailure actions will include a payload - we will either pass the loaded data along with LoadDataSuccess or we will pass the error to LoadDataFailure.

3. Create the Reducer

Next, we will define our reducer for the data loading. Again, this will look similar to any normal reducer, but this will highlight a particularly interesting aspect of what we are doing (which we will talk about in just a moment).

Create a file at src/app/reducers/data.reducer.ts and add the following:

import*as fromData from"../actions/data.actions";exportinterfaceDataState{
  items: string[];
  loading: boolean;
  error: any;}exportconst initialState: DataState ={
  items:[],
  loading:false,
  error:null};exportfunctionreducer(
  state = initialState,
  action: fromData.ActionsUnion
): DataState {switch(action.type){case fromData.ActionTypes.LoadDataBegin:{return{...state,
        loading:true,
        error:null};}case fromData.ActionTypes.LoadDataSuccess:{return{...state,
        loading:false,
        items: action.payload.data
      };}case fromData.ActionTypes.LoadDataFailure:{return{...state,
        loading:false,
        error: action.payload.error
      };}default:{return state;}}}exportconstgetItems=(state: DataState)=> state.items;

First of all, we’ve defined the structure of our DataState to include an items property that will hold our loaded data, a loading boolean that will indicate whether the data is currently in the process of being loaded or not, and an error that will contain any error that occurred.

The three actions are being handled in a reasonably predictable manner. The LoadDataBegin action returns a new state with the loading boolean set to true and the error to null. The LoadDataSuccess and LoadDataFailure actions are more interesting. They are both using the payload provided to the action, either to add items to the new state or an error. But as of yet, we aren’t actually seeing where this data is coming from - nowhere in our actions or reducer have we done anything like launch an HTTP request. This is where our “side effect” created with NgRx effects will come into play - this will be triggered upon LoadDataBegin being dispatched, and it will be this side effect that is responsible for triggering the further two actions (and supplying them with the appropriate payload).

We also define a getItems function at the bottom of this file to return the items state specifically - we will use this in a selector later but it isn’t really important to the purpose of this tutorial.

4. Create the Service

Before we create our effect to handle loading the data, we need to write the code responsible for loading the data. To do this, we will implement a service like the one below:

Create a service at src/app/services/data.service.ts that reflects the following:

import{ Injectable }from"@angular/core";import{ HttpClient }from"@angular/common/http";

@Injectable({
  providedIn:"root"})exportclassDataService{constructor(private http: HttpClient){}loadData(){returnthis.http.get("/assets/test-data.json");}}

This service quite simply provides a loadData method that will return our HTTP request to load the data as an Observable, which can then be used in the @Effect() we will create.

5. Create the Effect

Now we get to the key element of this process. There is a bit going on in the code below, but the key idea is that this @Effect will be triggered whenever the LoadDataBegin action is dispatched.

Create a file at src/app/effects/data.effects.ts and add the following:

import{ Injectable }from"@angular/core";import{ Actions, Effect, ofType }from"@ngrx/effects";import{ map, switchMap, catchError }from"rxjs/operators";import{of}from"rxjs";import{ DataService }from"../services/data.service";import*as DataActions from"../actions/data.actions";

@Injectable()exportclassDataEffects{constructor(private actions: Actions,private dataService: DataService){}

  @Effect()
  loadData =this.actions.pipe(ofType(DataActions.ActionTypes.LoadDataBegin),switchMap(()=>{returnthis.dataService.loadData().pipe(map(data =>newDataActions.LoadDataSuccess({ data: data })),catchError(error =>of(newDataActions.LoadDataFailure({ error: error }))));}));}

We inject Actions from @ngrx/effects and then we use that to listen for the actions that have been triggered. Our loadData class member is decorated with the @Effect() decorator, and then we pipe the ofType operator onto the Observable of actions provided by Actions to listen for actions specifically of the type LoadDataBegin.

We then use a switchMap to return a new observable, which is created from our HTTP request to load the data. We then add two additional operators onto this, map and catchError. If the map is triggered then it means the data has been loaded successfully, and so we create a new LoadDataSuccess action and supply it with the data that was loaded. If the catchError is triggered it means that the request (and thus the observable stream) has failed. We then return a new observable stream by using of and we trigger the LoadDataFailure action, supplying it with the relevant error.

This is a tricky bit of code, and may be hard to understand if you don’t have a solid grasp of Observables/RxJS. If you are struggling with this, just keep that key idea in mind: Listen for LoadDataBegin, trigger LoadDataSuccess if the HTTP request succeeds, trigger LoadDataFailure if it fails.

We will need to make use of this effect elsewhere (and your application may include other effects), so we will create an index file that exports all of our effects for us.

Create a file at src/app/effects/index.ts and add the following:

import{ DataEffects }from"./data.effects";exportconst effects: any[]=[DataEffects];

If you created any more effects, you could add them to the effects array here.

6. Configure Everything

We are mostly done with setting up our data loading process now, but we do have a few loose ends to tie up. We need to set up our reducer properly and configure some stuff in our root module. Let’s take care of that now.

Modify src/app/reducers/index.ts to reflect the following:

import{
  ActionReducer,
  ActionReducerMap,
  createFeatureSelector,
  createSelector,
  MetaReducer
}from"@ngrx/store";import{ environment }from"../../environments/environment";import*as fromData from"./data.reducer";exportinterfaceAppState{
  data: fromData.DataState;}exportconst reducers: ActionReducerMap<AppState>={
  data: fromData.reducer
};exportconst metaReducers: MetaReducer<AppState>[]=!environment.production
  ?[]:[];exportconstgetDataState=(state: AppState)=> state.data;exportconst getAllItems =createSelector(
  getDataState,
  fromData.getItems
);

Again, nothing new here. We just add our data reducer to our reducers (of which we only have one anyway in this example), and we also create a selector at the bottom of this file so that we can grab just the items if we wanted. For the sake of this demonstration, we will just be looking at the result from getDataState which will allow us to see all three properties in our data state: items, loading, and error.

Modify src/app/app.module.ts to include the EffectsModule:

import{ NgModule }from"@angular/core";import{ BrowserModule }from"@angular/platform-browser";import{ RouteReuseStrategy }from"@angular/router";import{ IonicModule, IonicRouteStrategy }from"@ionic/angular";import{ SplashScreen }from"@ionic-native/splash-screen/ngx";import{ StatusBar }from"@ionic-native/status-bar/ngx";import{ HttpClientModule }from"@angular/common/http";import{ AppComponent }from"./app.component";import{ AppRoutingModule }from"./app-routing.module";import{ StoreModule }from"@ngrx/store";import{ EffectsModule }from"@ngrx/effects";import{ reducers, metaReducers }from"./reducers";import{ effects }from"./effects";

@NgModule({
  declarations:[AppComponent],
  entryComponents:[],
  imports:[
    BrowserModule,
    HttpClientModule,
    IonicModule.forRoot(),
    AppRoutingModule,
    StoreModule.forRoot(reducers,{ metaReducers }),
    EffectsModule.forRoot(effects)],
  providers:[
    StatusBar,
    SplashScreen,{ provide: RouteReuseStrategy, useClass: IonicRouteStrategy }],
  bootstrap:[AppComponent]})exportclassAppModule{}

There are a couple of things going on here, including setting up the HttpClientModule and the StoreModule, but these things should already be in place. In the context of this tutorial, the important part is that we are adding the EffectsModule to our imports and supplying it with the array of effects that we exported from the index.ts file for our effects folder.

Keep in mind that although we are using forRoot for both the Store and the Effects in this example (which will make these available application-wide) it is also possible to use forFeature instead if you want to organise your code into various modules.

7. Load Data & Listen to State Changes

Everything is ready to go now, but we still need to make use of our state in some way. What we are going to do now is extend our DataService to provide a method that dispatches the initial LoadDataBegin action. We will also create some methods to return various parts of our state tree. You might wish to do something a bit different (for example, you might wish to trigger the LoadDataBegin action elsewhere), this is just to demonstrate how the data loading process works.

Modify src/app/services/data.service.ts to reflect the following:

import{ Injectable }from"@angular/core";import{ HttpClient }from"@angular/common/http";import{ Store }from"@ngrx/store";import*as DataActions from"../actions/data.actions";import{ AppState, getAllItems, getDataState }from"../reducers";

@Injectable({
  providedIn:"root"})exportclassDataService{constructor(private store: Store<AppState>,private http: HttpClient){}loadData(){returnthis.http.get("/assets/test-data.json");}load(){this.store.dispatch(newDataActions.LoadDataBegin());}getData(){returnthis.store.select(getDataState);}getItems(){returnthis.store.select(getAllItems);}}

Now we have the ability to just call the load() method on our data service to trigger the loading process. We will just need to trigger that somewhere (e.g. in the root component):

import{ Component }from"@angular/core";import{ DataService }from"./services/data.service";

@Component({
  selector:"app-root",
  templateUrl:"app.component.html"})exportclassAppComponent{constructor(private dataService: DataService){this.dataService.load();}}

and then we can subscribe to getData(), or any other method we created for grabbing state from our state tree, to do something with our state:

import{ Component, OnInit }from"@angular/core";import{ DataService }from"../services/data.service";

@Component({
  selector:"app-home",
  templateUrl:"home.page.html",
  styleUrls:["home.page.scss"]})exportclassHomePageimplementsOnInit{constructor(private dataService: DataService){}ngOnInit(){this.dataService.getData().subscribe(data =>{
      console.log(data);});}}

In this case, we are just logging out the result, which would look like this:

showing successful ngrx data load

This is what a successful load would look like, but just for the sake of experiment, you might want to try causing the request to fail (by providing an incorrect path to the JSON file for example). In that case, you would see that the items array remains empty, and that there is an error present in the state:

showing unsuccessful ngrx data load

Summary

As is the case with NgRx/Redux in general, the initial set up requires a considerable amount more work, but the end result is nice and easy to work with. With the structure above, we now have a reliable way to load data into our application, a way to check if the data is in the process of being loaded or not, a way to make state available wherever we need it in our application, and to also gracefully handle errors that occur.

Should Ionic & Angular Developers Learn StencilJS

$
0
0

This article was originally published via email to people who are subscribed to my newsletter, for the purpose of introducing my new book and providing some context around the benefits of using StencilJS to build Ionic applications. This article was written specifically with Ionic/Angular developers in mind, but it also provides a general assessment of Stencil against other frameworks.


Near the end of last week, you may have seen the announcement of the StencilJS 1.0 beta. StencilJS is the tool that powers the Ionic web components and you can also use it to build your own web components. However, it can also be used to build “blazing fast apps using pure web components” - this means you can build an entire Ionic application without needing to include a framework, but with StencilJS you can still enjoy many of the benefits of a traditional framework.

Given the context of this email, and that you’ve probably already figured out that I’ve been writing a new book about Ionic & StencilJS, you might guess that my answer to the question I posed is: yes. Of course, my hope is that many of you (who would primarily be using Angular currently) will read and enjoy this book, but I want to give you a little more context to help make that decision.

First of all, I want to be very clear that this is in no way “the end of Angular” for Ionic applications by my assessment, and I’m not advising people to jump ship to the new cool thing on the block. I continue to use both Angular and StencilJS to build Ionic applications. But, I do want to talk about why (as a long-time Ionic/Angular developer myself) you might be interested in adding Stencil to your skillset.

I don’t really think anybody “should” necessarily learn anything (ultimately that’s up to you/your team/your goals), but I do think StencilJS is a great fit and would be of great benefit to many Ionic developers - as an alternative to Angular, and also as a complementary tool to Angular applications.

The Benefits of StencilJS

There are primarily two approaches to using StencilJS:

  1. To build reusable web components that work with any framework (or none at all) just like Ionic itself
  2. To use it as the basis for building your entire application in place of a traditional framework like Angular, React, or Vue

The first point is a huge benefit to StencilJS, but it is the second point that I have been focusing on a lot over the past year. If you set out to build an application with Stencil, you will find that the project structure and development environment feels very much like that of a typical framework… except that StencilJS isn’t a framework. You get a lot of the benefits of using a framework, without actually needing to include one in your project.

As I tweeted out recently, you can fit all of the dependencies required to develop and build a complete Ionic application in just a couple of lines:

"dependencies":{"@ionic/core":"one"},"devDependencies":{"@stencil/core":"one","workbox-build":"4.3.1"}

The only dependency actually required by your built application is @ionic/core (not even @stencil/core needs to be included in the built application, and as Manu points out in the tweet above workbox-build isn’t required).

Not having to use a framework is cool, but there is nothing wrong with using frameworks/libraries, so the question still remains of what benefits StencilJS provides. I think these benefits are primarily:

  1. Simplicity - this can be seen as either a positive or a negative, but StencilJS has only a few StencilJS specific concepts/patterns to learn, most of what you code is just modern vanilla JavaScript.
  2. Less overhead - since your applications just need to include the tiny StencilJS runtime, rather than a full framework, the bundled build sizes of the application can be drastically smaller than alternatives (check out the graph below for an example). This is especially powerful if you intend to ship your application as a PWA.
  3. Reuse and future proofing - A big scary factor in adopting a particular framework is that fear of “backing the right horse”, if you are investing a lot of time and effort into a particular framework, you don’t want that work to become redundant. This is less of an issue with StencilJS since it is designed with the intent of being “future-proof”. With StencilJS, it is primarily web components that you are building, which are native to the web platform and don’t require a specific framework to run.
Bundle size comparison of Stencil to other options

The graph above (from the announcement post) shows a comparison between the bundle size for a typical “todo” style application built with StencilJS (Stencil One) versus other options.

As I mentioned in the beginning, I’m not here to convince you to drop your current framework of choice - whether that is Angular, React, Vue, or something else - for StencilJS. However, it is a powerful tool to have in your skillset, and it’s something I’m excited to teach people about.

About my new book and resources…

Since learning StencilJS, which was mostly just for a bit of fun and to write content initially, I have found myself reaching for it more and more as a default for the applications I want to build. This was quite unexpected given how much I like using Angular, but even though I do still use both frameworks, I do find myself wanting to do most of my new work with Ionic + Stencil.

As always, I have been and will continue to release free content on my blog about using Ionic & StencilJS. However, I have also been working on writing my next big premium resource, which will provide you with a solid grounding in Ionic & StencilJS.

Like my previous book, it will cover everything from the bare-bone basics all the way through to advanced concepts, all tied together with some solid real-world examples.

There is still a little way to go before I am finished, but if you think you might be interested in checking out this new book/resource, you can view the initial landing page here: Creating Ionic Applications with StencilJS.

There will be more details to come about the book and its contents in the near future (I will update the page above with more details and a complete table of contents before it is released). In the meantime, feel free to let me know if you have any questions or thoughts about Ionic/StencilJS.

Creating a Dynamic/Adaptable Splash Screen for Capacitor (Android)

$
0
0

For me, the final touches and app store preparation stuff has alway been the most dull and frustrating part of building applications. Once you’ve finally finished coding your application you probably won’t be super keen to create 50 different image files and resize them all to the correct resolution. It can be time-consuming, tedious, and boring, but it’s these final touches that can really add to or detract from the quality of the final proudct. It’s something that you should take care in doing.

When it comes to splash screens, you want to make sure that your splash screen displays well across the many different resolutions and screen sizes that are available - from very small and low resolution, to very large and high resolution.

By default, a Capacitor application will have default splash screens for various densities/resolutions set up for you. You can just replace these with our own splash screens of the same size, but this can be time consuming and with just a single portrait/landscape splash screen for each resolution, it won’t display perfectly on all screen sizes.

In this tutorial, I will present to you another option for creating your splash screens for Android that might make the process a bit easier. Although I am writing this tutorial in the context of Capacitor, this concept can be applied to any native Android application.

What is a 9-Patch File

The solution to our splash screen woes is the 9-Patch file. We can create 9-Patch files inside of Android Studio (you can also create them in an image editor program if you wish). A 9-Patch file is a special type of image that has an extra 1px border all the way around the original image. Within this 1px border, individual pixels can be coloured either black or left transparent to instruct how the image should be stretched:

Example of creating 9-patch splash screen for Capacitor

If you look closely at the image above, you will see this example splash screen has that 1px border all the way around. The sections I have circled in red are where black pixels have been placed. By marking sections on the top and left border with black pixels, we can indicate the sections that we want to be stretched to fit the necessary screen dimensions (these sections are shown in pink in the image above).

You can also add black pixels on the right and bottom border, but this does not define the area to be stretched. This defines the area to be “filled”, which is not required in our case for splash screens. The 9-Patch file is not just for splash screens, you can also use them in other contexts, and in some cases you might want to add something like text on top of the image and so it is useful to be able to define the area where this text is allowed to be “filled” into the image.

The basic idea is that it will allow us to define the areas of the splash screen that can be stretched. Generally we won’t care if the a background colour is stretched, but we probably don’t want our logo/text to be stretched and distored to fit the screen.

Instead of creating a bunch of different versions of our splash screen, we can instead just create a single 9-Patch file for each resolution:

  • mdpi
  • hdpi
  • xhdpi
  • xxhdpi
  • xxxhdpi

Creating 9-Patch Files for Splash Screens

With a basic understanding of what a 9-Patch file is, we will now walk through how to use 9-Patch files as your splash screen in a Capacitor project. At this point, I will assume that you already have a Capacitor project created and that you have added the android platform with:

npx cap add android

I will also assume that you haven’t modified/deleted any of the default splash screens that Capacitor includes.

1. Remove and Rename

By default, we will have both landscape (land) and portrait (port) splash screens - we won’t need to make this distinction anymore. First, open up your Capacitor project in Android Studio:

npx cap open android

Once your project has opened, go to app > res > drawable. I find that it is easier to work with the standard file system to perform the next step, so just Right Click on drawable and choose Reveal in Finder....

In this folder you will find a drawable folder for each of the device resolutions, for both landscape and portrait orientations. The splash screen for each particular orientation/resolution will be inside the matching folder. At this point you should delete all of the landscape folders and rename all of the portrait folders to just drawable-hdpi, drawable-xhdpi, and so on. We only need one image for each resolution as our 9-Patch file will allow us to scale our original image both vertically and horizontally.

2. Create your Splash Screen

Next, you will need to replace the default Capacitor splash screen in all of the drawable folders with your own splash screen of the same size/resolution.

3. Create the 9-Patch Files

Now, back in Android Studio, you should Right Click on each of your splash screens and choose Create 9-Patch File.... Make sure to save these new files in the same folder as the original splash screen and keep the splash.9.png name format. Once you have created the 9-Patch file you can delete the original splash screen (although you might want to keep a backup until you are done).

4. Define the Stretchable Areas

If you double-click on one of your 9-Patch files that you created in Android Studio, you will see that it opens up an editor like the one in the image below:

Example of creating 9-patch splash screen for Capacitor

How exactly you modify this 9-Patch file will depend on how exactly you want it to be stretched, but let’s just assume a basic solid colour splash screen with a logo in the middle like the default Capacitor splash screen.

The process for defining the stretchable areas goes like this (and be warned, the editor can take a little getting used to):

  1. Click Show patches so that it is easier to see the stretchable areas
  2. Drag one of the existing vertical handles from the right-side to the left-side until it is past your logo
  3. Drag one of the existing horizontal handles from the bottom-side to the top-side until it is past your logo
  4. Create a new stretchable area on the other side of the logo by clicking and dragging outside of the image boundary from where the new stretchable area should begin to the end of the image. If you don’t get it perfect right away, you can readjust using the new handles created.
  5. Create another new stretchable area for the vertical space on the other side of the logo
  6. Adjust the handles until you are happy and you have something that looks like the image above

In the end, you want some black pixels on the top and left indicating the areas that can be stretched - there shouldn’t be any black pixels on the right or the bottom. Check the previews in the right hand side of the screen to see that it appears as you want it to

TIP: When working with larger splash screens, it can be harder to create additional stretchable areas because you can’t fit the whole image on the screen, and there is no room off the top and the bottom to drag and create new boundaries (i.e. it’s impossible to click outside of the bounds of the image).

It is easier to create the stretchable areas this way (by just clicking and dragging outside of the boundary), but remember it all just comes down to whether that 1px border is coloured with black pixels or not. What you can do is just zoom in all the way and then go to the corner of the side that you want to create a new stretchable area on. Just add a few black pixels to the border by clicking and dragging along the border (only on the sides, don’t put pixels in the corner). When you zoom out, you will now have a new area with handles on both sides that you can drag.

5. Modify the Splash XML File

The final modification we need to make is to change the launch_splash.xml file for the splash screen. By default with a Capacitor project, it will look like this:

<?xml version="1.0" encoding="utf-8"?><bitmapxmlns:android="http://schemas.android.com/apk/res/android"android:src="@drawable/splash"android:scaleType="centerCrop"/>

We just need to change the bitmap here to nine-patch:

<?xml version="1.0" encoding="utf-8"?><nine-patchxmlns:android="http://schemas.android.com/apk/res/android"android:src="@drawable/splash"android:scaleType="centerCrop"/>

Now you can just run Build > Clean Project in Android Studio, and then you should be able to successfully run your application with your adaptable splash screen.

StencilJS vs Angular for Building Ionic Applications

$
0
0

Since Ionic now uses web components to deliver their collection of user interface elements for building mobile applications, we are not limited to building Ionic applications in just one way. Web components can work with any JavaScript framework, or without even using a framework at all. This degree of freedom is fantastic, but perhaps also a little confusing. If you are a beginner, just getting started with Ionic, you might not have any idea what approach you want to use - or perhaps even why you (probably) need to use something like StencilJS or Angular with Ionic. Now you have a complicated decision to make before you can even get started.

As someone who teaches both StencilJS and Angular for building Ionic applications, I have been trying to figure out how best to answer the question:

“Should I use Stencil or Angular to build Ionic applications?”

Especially since I now have books targeted at beginner to intermediate Ionic developers for both of these options, I wanted to be able to provide some guidance on how you might go about deciding. It feels like a big decision to make when you are just getting started - you don’t want to make the “wrong” choice. If you find yourself in this position now, hopefully, I can put you at ease a little bit by offering my point of view that I don’t think there is a wrong choice to make here, there are just different choices.

The conclusion to these kinds of articles are almost always “it depends” - this is usually for good reason, and this one will be no different. It is also worth keeping in mind that StencilJS and Angular are not the only two options for building Ionic applications, these are just the options that I prefer and that I have experience with. Although I won’t be talking about the specifics of approaches like React and Vue for building Ionic applications, a lot of the points I will make about Angular will also apply to React and Vue to some degree.

Although we typically use a framework in combination with Ionic’s web components (Ionic mostly handles the user interface, whereas the framework deals with a lot of the application logic), StencilJS can fill the role of a framework for us but it is actually a web component compiler, not a framework. In this sense, Angular/React/Vue are similar as they are more like traditional frameworks, whereas StencilJS takes quite a different approach. This is why some of the comparisons I make between StencilJS and Angular can also be applied to React and Vue.

I can’t give you a definitive answer in this article, but I did want to provide a “too long, didn’t read” summary at the beginning which boils down the key points I will make and expand upon throughout the article. This is a simplistic overview, but if you don’t feel like you have any other basis for making a decision between the two approaches, these points should help.

Use Stencil:

  • If you are already quite comfortable with modern JavaScript and web development concepts
  • You like the idea of not needing to include a traditional framework and you want to keep your application sizes optimised/small
  • You prefer using standard JavaScript over using framework specific concepts & syntax

Use Angular:

  • If you are not as comfortable with modern JavaScript and web development concepts, and will need to rely more heavily on community resources and tutorials
  • You like the idea of conforming to a well-defined application architecture rather than deciding on implementation details yourself
  • You would like more development convenience features built-in rather than keeping application sizes as optimised/small as possible

If you’re really stuck, just pick either and decide later if you want to switch. They are both fantastic approaches, and it isn’t that important of a decision - you can always come back and attempt the other approach if you feel like one way isn’t clicking with you. You might see picking the “wrong” approach for you initially as a waste of time, but I really don’t think that it is. Learning something in two different contexts can really help to reinforce concepts, and having a bit more knowledge about a popular technology (even if you don’t end up using it) can be helpful.

In the rest of this article, I am going to expand on some of the aspects I considered when coming to my recommendations.

General Philosophy/Methodology

If you were to look at the project structure of an Ionic/StencilJS and an Ionic/Angular project, you would see that they are actually very similar.

They both have a src folder where most of your coding happens and a www folder that contains the built output of your application. Most of your application will be built, in both cases, by building out a bunch of different components - these components are nested within one another and displayed using (usually) a URL based routing/navigation system. They even both have an assets folder for serving your static assets like images and they also have global files for storing global CSS rules.

If you were to switch from StencilJS to Angular or vice versa, you would likely already feel very at home within the general structure of the project. Where the main differences come in is in the building of the various components and services your application will use, and the general methodology of the approaches.

The key difference between the two is that StencilJS is a web component compiler, whereas Angular is a more typical application framework. StencilJS relies primarily on the power of browsers and the web component specification, whereas Angular ships code with your application to power the framework.

StencilJS does have a few specific concepts you will need to learn, but for the most part, you are just building with standard modern JavaScript/TypeScript. StencilJS gives you the key features/structure you need to effectively build an application, but relies on standard browser implementations for most of the functionality.

Angular has a lot of Angular specific concepts to learn, but although it is less so than with StencilJS, a large chunk of your coding will still use standard JavaScript/TypeScript. Angular has a lot more functionality built-in to the framework itself, and you will find that there are “Angular ways” to do things out of the box like HTTP requests, form management, DOM manipulation, and more.

To give you a quick overview, let’s take a look at a couple of specific examples

In Angular, we would use the Angular specific concepts/syntax for creating our templates. One common scenario in a template is to loop over data and display part of a template associated with that data. For example, we might want to loop over every element in a “todos” array, and we want to render out each todo to the template. Assume in this example that for both cases we have a “todos” class member that contains an array of all of our todos available on “this.todos”.

With Angular, we would achieve that using Angular’s special *ngFor structural directive, which would look like this:

<ion-list><ion-item*ngFor="let todo of todos"><ion-label>{{todo.title}}</ion-label></ion-item></ion-list>

In StencilJS, we would just use standard JavaScript concepts to loop over our data. To achieve this same functionality, we would use the standard map operator on our array, which allows us to loop through each element in the array, and we can return a part of the template for each element:

<ion-list>{this.todos.map((todo)=>(<ion-item><ion-label>{todo.title}</ion-label></ion-item>))}</ion-list>

NOTE: StencilJS also uses JSX for templates, which allows you to use JavaScript and HTML together.

If we wanted to create some kind of singleton service to share data or functionality throughout an application, we can achieve this quite easily with either Angular or StencilJS, but in somewhat different ways.

Again, Angular has some specific built-in concepts for this. In the case of a singleton service, we would create the service using an @Injectable and then we would “inject” it into classes that we wanted to make use of the service in using Angular’s concept of dependency injection through the constructor:

import{ Injectable }from'@angular/core';

@Injectable({
  providedIn:'root'})exportclassTodoService{public todos =[];addTodo(todo){this.todos.push(todo);}}
import{ Component }from'@angular/core';import{ TodoService }from'../services/todo.service';

@Component({
  selector:'app-home',
  templateUrl:'./home.page.html',
  styleUrls:['./home.page.scss']})exportclassHomePage{constructor(public todoService: TodoService){}myMethod(){this.todoService.addTodo({
            title:'test'});}}

This sets up our service on a todoService class member, and will allow us to use it throughout the class with this.todoService.

When using StencilJS there is no pre-defined way in which you should go about this. Instead, you can just fall back to standard JavaScript concepts. One way we could implement this in StencilJS, and it is the method that I typically use, is to create and export the class that implements the service, and then just use standard imports to make that functionality available elsewhere in the application:

classTodoServiceController{public todos =[];addTodo(todo){this.todos.push(todo);}}exportconst TodoService =newTodoServiceController();
import{ Component, State, h }from"@stencil/core";import{ TodoService }from"../../services/todos";

@Component({
  tag:"app-home",
  styleUrl:"app-home.css"})exportclassAppHome{myMethod(){
        TodoService.addTodo({
            title:'test'});}}

In my opinion, the StencilJS approach here is a bit easier. But perhaps the downside is that since there is no particular “StencilJS way” that you have to use, it might be harder to figure out what you should be doing initially (this is a problem I aimed to alleviate with my StencilJS book, by providing examples of ways to handle most common scenarios).

Difficulty/Learning Curve

It’s difficult to say whether StencilJS or Angular would be easier for a beginner to learn (especially since I originally learned Angular years before StencilJS existed), but on the whole, I would hazard a guess and say: StencilJS is the easier option.

StencilJS is mostly a bit of extra tooling around standard JavaScript, whereas Angular is a full-blown framework. Naturally, there is a lot more to learn before you can become efficient with Angular. There are quite a few concepts in Angular that can be tricky to wrap your head around initially.

With that said, although it might take a longer time to learn the various Angular concepts, there are also some benefits to this. I’ve touched on this a bit in this article, but Angular is quite “opinionated” and there is generally always an “Angular way” to do things. In a way, this can be helpful to beginners even if it does create some friction. In a sense, you are given less freedom, but as a beginner who might not really know how to approach a lot of situations, this can be a good thing.

Community and Resources

The community and resources available around a particular technology are hugely important, especially for beginners. StencilJS is far younger than Angular, so naturally, there are far more resources and tutorials available for Angular.

If you feel like you are going to need heavy guidance for building features in your application, and would benefit a great deal from following guided tutorials, then this is a big factor to consider. The web is full of Angular tutorials as it has been around for many years.

This doesn’t mean there isn’t also a lot of support for StencilJS, and there is an interesting factor to consider here. The StencilJS community and StencilJS specific resources will continue to grow over time, but remember that we aren’t really building “StencilJS Apps” we are just building JavaScript apps with Stencil. This means that you can apply any generic JavaScript/Web Development advice/tutorials to building your StencilJS applications. The downside is that the advice/tutorials may be a bit more difficult to apply as they often won’t be written specifically in the context of a StencilJS application.

Summary

I’ve tried to keep this article as factual, fair, and to the point as I can. I don’t really have much of a natural bias here anyway since I actively use both of these approaches, and I sell products that teach both of these approaches.

Nonetheless, it is quite difficult to create a fair comparison between any two similar technologies, and impossible to capture all the nuances when trying to simplify things. There are many factors and considerations that aren’t talked about in this article, but I feel that this should serve as a reasonable summary for somebody trying to decide between the two.

If you have the time, I’d recommend not relying on my summary and to just give both a try. See what clicks more with you and what you find fun, because I think that is one of the biggest factors.


Using RxJS Observables with StencilJS and Ionic

$
0
0

Recently, we’ve been covering a few different ways to handle state management in an Ionic and StencilJS application. This has included using simple singleton services and far more complex state management solutions like Redux.

If you have a background in Angular you may be used to using observables as part of managing state in an application, e.g. having a service that provides an observable that emits data changes. Observables are provided by the RxJS library which is included and used in Angular by default, so it is commonly used by Angular developers. RxJS is not included in StencilJS by default, but that doesn’t mean that we can’t use it if we want to - we just need to install it.

In this tutorial, we will be extending on the singleton service concept we have covered previously to include the use of observables. Similarly to the previous tutorial, we will be creating a service that has the responsibility of saving/loading data and providing it to the application. However, we will be modifying it to instead provide a class member variable that we can subscribe to in order to get access to the data, as well as automatically receive any future updates to that data.

To do this, we will be making use of a partiuclar type of observable called a BehaviorSubject.

Using a BehaviorSubject

We covered the concept of using a BehaviorSubject a while ago specifically for Angular applications. The general concept is no different here, but let’s quickly recap what exactly a BehaviorSubject is.

A BehaviorSubject is a type of observable (e.g. a stream of data that we can subscribe to). If you are not already familiar with the general concept of an observable, it might be worth doing a little bit of extra reading first. RxJS as a whole is quite complex, but the concept of an observable is reasonably straight-forward. You can create observables, or have one supplied to you, and that observable can emit data over time. Anything that is “subscribed” to that observable will get notified every time new data is emitted - just like your favourite YouTube channel.

I say that a BehaviorSubject is a type of observable because it is a little different to a standard observable. We subscribe to a BehaviourSubject just like we would a normal observable, but the benefit of a BehaviourSubject for our purposes is that:

  • It will always return a value, even if no data has been emitted from its stream yet
  • When you subscribe to it, it will immediately return the last value that was emitted immediately (or the initial value if no data has been emitted yet)

We are going to use the BehaviorSubject to provide the data that we want to access throughout the application. This will allow us to:

  • Just load data once, or only when we need to
  • Ensure that some valid value is always supplied to whatever is using it (even if a load has not finished yet)
  • Instantly notify anything that is subscribed to the BehaviorSubject when the data changes

1. Installing RxJS in a StencilJS Application

Now that we have a general understanding of observables, and more specifically a BehaviorSubject, let’s start building out our solution. All you will need to begin with is to have either an existing StencilJS project, or to create a new one. It does not matter whether this is a generic StencilJS application or an Ionic/StencilJS application.

To install RxJS, you will need to run the following command:

npm install rxjs

2. Creating a Service that uses Observables

For the general concept behind using a singleton service in a StencilJS application, I would recommend first reading the previous tutorial:

In this tutorial, we will mostly be focusing on the incorpoation of the BehaviorSubject.

Create a file at src/services/my-service.ts and add the following:

import{ BehaviorSubject }from"rxjs";import{ MyDataType }from"../interfaces/my-data";classMyServiceController{public myData: BehaviorSubject<MyDataType[]>=newBehaviorSubject<MyDataType[]>([]);private testStorage: MyDataType[]=[];// Just for testingconstructor(){}load():void{this.myData.next(this.testStorage);}addData(data):void{this.testStorage.push(data);this.myData.next(this.testStorage);}}exportconst MyService =newMyServiceController();

This is similar in style to the simple singleton service created in the previous tutorial, with the obvious inclusion of the BehaviorSubject. We create a new BehaviorSubject like this:

public myData: BehaviorSubject<MyDataType[]>=newBehaviorSubject<MyDataType[]>([]);

This sets up a new class member variable called myData and it has a type of BehaviorSubject<MyDataType[]>. This means that it will be a BehaviorSubject that supplies values of the type MyDataType[] (i.e. an array of elements of the type MyDataType). The definition of this type is not important, but if you are curious, this is the interface I have defined at /interfaces/my-data:

exportinterfaceMyDataType{
  title: string;
  description: string;}

We assign a new BehaviorSubject to our class member by instantiating an instance with the new keyword, and we supply an empty array as an initial value: ([]). The BehaviorSubject will always supply some value to anything that subscribes to it, even if it has not emitted any data yet. By supplying this initial blank array, we know that we will get a blank array back if no data has been loaded/emitted yet.

Since this is a public class member variable, we will be able to access this observable directly wherever we include this service.

In this example, we are just using another variable called testStorage to act as our storage mechanism, but you could replace this with something else. You might want to pull values in from the browsers local storage, or perhaps you might be loading data from some additional service like Firebase.

However we want to load that data, in our load() method we will just need to do whatever is required to load the data, and then call:

// handle loading data// emit datathis.myData.next(/* supply loaded data here */)

This will cause our BehaviorSubject to emit whatever data is supplied to next, and anything that is subscribed to myData will receive that data. Our addData method is similar, we would just do something like this:

addData(data):void{// handle adding new data to storage mechanism// emit datathis.myData.next(/* supply new data here */);}

First, we would have to handle doing whatever is required to store that new data wherever we want it, and then once again call the next method with our new data to emit it to any subscribers.

3. Subscribing to Observables

We still need to “consume” the data/state that is being provided, but doing that with our observable is quite simple. You could subscribe to the observable anywhere you like, but typically this would happen somewhere like the componentDidLoad lifecycle hook that is triggered automatically:

componentDidLoad(){
    MyService.myData.subscribe(data =>{
      console.log("Received data: ", data);});}

Every time new data is emitted by the BehaviorSubject this function will run:

data =>{
    console.log("Received data: ", data);}

Using our testStorage example, this would create a result like this if we were to add some new data three times:

Received data:  []
Received data:  [{...}]
Received data:  (2) [{...}, {...}]

Typically we would want to do more than just log the data out, we might also want to make use of this data in our template. Let’s take a look at a more complete implementation:

import{ Component, State, h }from"@stencil/core";import{ MyService }from"../../services/my-service";import{ MyDataType }from"../../interfaces/my-data";

@Component({
  tag:"app-home",
  styleUrl:"app-home.css"})exportclassAppHome{
  @State() items: MyDataType[]=[];componentDidLoad(){
    MyService.myData.subscribe(data =>{
      console.log("Received data: ", data);this.items =[...data];});}testAddData(){
    MyService.addData({
      title:"test",
      description:"test"});}render(){return[<ion-header><ion-toolbar color="primary"><ion-title>Home</ion-title></ion-toolbar></ion-header>,<ion-content class="ion-padding"><ion-button onClick={()=>this.testAddData()}>Test</ion-button><ion-list>{this.items.map(item =>(<ion-item><ion-label>{item.title}</ion-label></ion-item>))}</ion-list></ion-content>];}}

This example provides a button that can be used to add new test data, and it will also display all of the current data in an <ion-list>. Every time the Test button is clicked, a new item should pop up in the list automatically.

An important thing to note about this example is that we are doing this:

    MyService.myData.subscribe(data =>{this.items =[...data];});

instead of this:

    MyService.myData.subscribe(data =>{this.items = data;});

Instead of just updating this.items with the array returned from our observable, we instead create a new array and use the spread operator to pull out all of the elements inside of the data array and add them to this new array. When using StencilJS there are two important things to keep in mind in order to make sure your template updates correctly:

  1. Use the @State decorator on any variables that you want to update the template
  2. Assign new values instead of updating old values - mutating arrays or objects will not cause template updates in StencilJS

If you do not do this, then the render() function will not be triggered and your view/template will not update in response to data changes. These steps are only required for variables that you want to update the template.

Summary

Wherever possible, and especially with StencilJS, I like to avoid using additional libraries and use plain JavaScript concepts wherever I can in applications. This cuts down on often unnecessary overhead and JavaScript/TypeScript now provides so much out of the box that we can make use of.

However, I have spent a lot of time developing Angular applications, and have found observables to be infinitely useful/efficient. Although it is good to attempt to cut down on waste and not include unnecessary libraries, RxJS is one of those libraries that can provide a lot of value and it is likely something I will use in most of my StencilJS applications.

Using the Capacitor Storage API for Storing Data

$
0
0

When building our applications, we will often want to store data in some kind of storage mechanism such that it is available to use even after the application has been exited and returned to later. A common way to do this for web-based applications is to make use of localStorage which is available through the global window object. For example, storing a bit of data in local storage is as simple as doing this in a browser environment:

window.localStorage.setItem("username","josh")

This will store data in the browser’s local storage, but there are some drawbacks to this - mostly the potential for the data to be wiped by the operating system in order to free up space (although this is uncommon). When running an application natively (e.g. if we have created a native build for iOS or Android) we have additional native storage options that we can make use of which are more stable.

If you have a background with building Ionic applications with Angular, then you may have used the IonicStorageModule at some point. This can be used in Angular applications to automatically utilise the best storage option available, depending on the environment that the application is running in.

In this tutorial, we will be covering something similar, except we will be using the Storage API that is provided by default with Capacitor. The Capacitor Storage API will store data in (and retrieve data from) different locations depending on the environment the application is running in. The storage mechanisms utilised are:

Throughout this tutorial and an associated video I filmed, we are also going to use this as a chance to get a little exposure to how Capacitor plugins work. We will discuss how we can use the same Storage API in our code even though the underlying implementation for each platform differs. We will not be discussing this in a great deal of detail, nor will be walking through how to actually create a custom plugin, but the idea is just to expose you to the idea a little bit.

It is worth noting that this is not an all-in-one solution for storage. Although you can store complex data like arrays and objects (e.g. storing an array of todos would be fine), it is still just a simple key-value storage system. This means that you provide a key and then you can get whatever value is stored on that key. If your application has more complex requirements, like the need to query data, you might require a different storage solution.

Even though data stored in local storage is unlikely to be wiped by the operating system or otherwise lost, I generally prefer only to use local storage (even native local storage) for “unimportant” data that can be lost (e.g. preferences, cached data). For data that is important, I prefer to use a solution where data can be restored if necessary (e.g. a remote database like CouchDB, MongoDB, or Firestore). This is, of course, up for you to decide what best suits your needs.

Using the Capacitor Storage API

In this example, we are going to create a service using Ionic and StencilJS that will just export a few functions that will allow us to easily interact with the Storage API. Although this example is specifically for StencilJS, the same basic concepts can be utilised in other scenarios as well - as long as you have Capacitor installed.

For now, we are just going to focus on implementing and using the service, and then in the following section we will discuss the underlying implementation details.

Create a file at src/services/storage.ts that reflects the following:

import{ Plugins }from"@capacitor/core";const{ Storage }= Plugins;exportasyncfunctionset(key: string, value: any): Promise<void>{await Storage.set({
    key: key,
    value:JSON.stringify(value)});}exportasyncfunctionget(key: string): Promise<any>{const item =await Storage.get({ key: key });returnJSON.parse(item.value);}exportasyncfunctionremove(key: string): Promise<void>{await Storage.remove({
    key: key
  });}

In this example, we are creating and exporting three functions: set, get, and remove. The main reasons that we are doing this instead of just using Storage from Capacitor directly wherever we require are:

  • All of the implementation details are in this file, and our application doesn’t need to worry about how data is being stored. It can just call get, set, or remove
  • We only need to import the Storage API from Capacitor in one place
  • We can only store string values in storage, and these functions will automatically handle using JSON.stringify to convert arrays/objects into JSON strings and then convert them back again using JSON.parse when we retrieve the values

The Capacitor Storage API is simple enough already, but we have made our job even easier by creating these helper functions. To use those functions, we would then just import them somewhere like this:

import{ Component, State, h }from"@stencil/core";import{get,set}from"../../services/storage";

@Component({
  tag:"app-home",
  styleUrl:"app-home.css"})exportclassAppHome{
  @State() testValue: string;asynccomponentDidLoad(){this.testValue =awaitget("myValue");
    console.log(this.testValue);}changeValue(value){this.testValue = value;set("myValue",this.testValue);}render(){return[<ion-header><ion-toolbar color="primary"><ion-title>Home</ion-title></ion-toolbar></ion-header>,<ion-content class="ion-padding"><h2>Current value:</h2><p>{this.testValue}</p><ion-item><ion-label>Change value:</ion-label><ion-input onInput={(ev: any)=>this.changeValue(ev.target.value)}/></ion-item></ion-content>];}}

I’ve just set up a simple example here that allows the user to input any value they like into the <ion-input> area. Whenever this value is changed, it will automatically be saved to storage. If the application is refreshed, the current value will be retrieved from storage.

Summary

With the implementation above, it now doesn’t matter which platform we are running on, it will automatically use the appropriate local storage system for each platform - whether that is window.localStorage, UserDefaults, or SharedPreferences. If you are just looking for simple data storage, and you are using Capacitor already, then this is a good approach to use by default.

If you are interested in understanding more of the implementation details behind Capacitor’s Storage API, don’t forget to check out the extension video for this tutorial.

Creating a Local Capacitor Plugin to Access Native Functionality (iOS/Swift)

$
0
0

One of the biggest issues and limitations faced by Ionic developers, and other “hybrid” application developers, is the reliance upon third-party solutions for accessing native functionality.

Tools like Capacitor (as well as Cordova) provide us with a way to access Native APIs and run native code from within the browser environment that most of the mobile application is contained within. Typically, we are able to do the vast majority of our work using web code - however, if you do not know how to write and run some native code yourself, you could find yourself getting stuck and relying on solutions created by other people.

In this tutorial, we are first going to highlight how relying on a third-party for native functionality can cause issues and roadblocks. We will then walk through how we can, reasonably simply, write and run our own Native iOS code from an Ionic application using Capacitor. Although understanding Native iOS code (Swift) will obviously be a big benefit here, Swift is similar enough to JavaScript/TypeScript such that with a few searches and some sample code to reference, you will likely be able to build out your own simple solutions even if you have no Swift knowledge.

Before We Get Started

This will be an advanced tutorial and I will be assuming that you already have a basic understanding of using Capacitor, and a reasonably solid understanding of whatever you are using to build your Ionic applications. This particular example will be using StencilJS with Ionic, but if you are using Angular, React, Vue or something else that will be of little consequence.

The Problem with Core APIs

The issue with relying on the core set of Native APIs maintained by Capacitor/Cordova is that they are limited in scope, and you would typically just find “core” functionality like:

  • Camera
  • Splash Screen
  • Storage
  • Push Notifications
  • Keyboard
  • Filesystem
  • Geolocation

This is to be expected, because the amount of “native stuff” you might want to do is almost limitless, and it’s just not feasible for a project to provide (and maintain) a way to access everything you might ever want to use.

The Problem with Community Plugins

If we find ourselves wanting to use something that isn’t covered by one of the Core API’s, we can then turn to community published/maintained plugins. These are plugins that the general community (not the Ionic/Capacitor team) have built and shared for others to use. You will generally find that the community creates a much broader range of plugins to access native functionality.

The issue with community plugins is that these are most often built and maintained by people volunteering their time to help others. There are no guarantees that the plugin you find will work or that if there are any issues or updates required that the person who created it will be willing or able to fix it.

There is also no guarantee that you will even find a community plugin that offers the functionality you are looking for.

The Solution

A lot of the time, probably in the majority of cases for most people, you can build what you need using one of the two options above. But, if you find yourself in a position where neither of those options are working, your application development could come to a quick halt.

If you really want to take charge of your application, and not have to worry about relying on others to provide the solution you need, it is important to understand how to write and run your own native code through Capacitor. The general concept is actually quite simple - although the implementation itself does require a bit of work.

Capacitor acts as a messenger between your web code and the native platform (iOS in this case). If we want to execute some native code, then we just add that native code to the native project that Capacitor creates for us, and then we make a call to that native code from our web code through Capacitor. In general, a method to execute some native code in a Capacitor plugin would look something like this:

SomePlugin.swift

@objcfuncmyMethod(_ call:CAPPluginCall){// get anything passed in from the web code from Capacitor's "call"// do whatever native stuff you need// pass data back to the web code through Capacitor's "call"}

No matter what you are building, this same basic concept will usually apply:

  1. Pass in data to the native code through Capacitor
  2. Execute the native code
  3. Pass data back to the web code through Capacitor

We are going to walk through building out a solution using this concept. What we will be building is a “simple” way to add some native code to your project that you can run. This will not be a “proper” plugin in the sense that it could be easily installed into another project, or published as your own community plugin, this is just a quick way to write and access native code in an individual project.

If you would like a little more context as to how Capacitor “plugins” work before we begin, I would recommend watching this video: Exploring the Source Code: Understanding Capacitor’s Storage API


Accessing HealthKit with Ionic

The solution that we are going to attempt to build out is a way to access data from HealthKit. Specifically, I needed to access statistics for the total distance run/walked from a particular start date for an application that I am currently building.

There is no default Capacitor API to do this, and although it may be possible to find an existing Capacitor/Cordova plugin that does this, we can also just build it out ourselves. In this case, we don’t need a full plugin that provides access to every aspect of HealthKit - we just need to pull in that little bit of data, and that won’t take that much code. Building out this solution ourselves means that:

  1. We know the plugin will do exactly what we need
  2. We don’t need to worry about finding a community plugin that offers the functionality we need
  3. We can easily make modifications to our own plugin whenever required
  4. We don’t have to worry about whether anybody is around to maintain the plugin
  5. We can reduce bulk by only including what we specifically need, rather than having to include plugins that include a bunch of functionality we don’t need

If you are not already familiar with Swift it is going to be a bit harder to figure out what you need to do, but by referencing the HealthKit Documentation (or whatever you want to use) and a few Google searches you will likely be able to piece together the native code that you need.

After doing a bit of reading about HealthKit, I was able to determine that:

  1. I would need to first get permission from the user before being able to access HealthKit data
  2. I would need to perform some kind of query to retrieve the data I wanted

We will implement this in full in a moment, but with a general understanding of what a Capacitor plugin would look like, we might guess that our solution in Swift would end up looking something like this:

DistancePlugin.swift

importCapacitorimportHealthKit

@objc(DistancePlugin)publicclassDistancePlugin:CAPPlugin{@objcfuncauthorize(_ call:CAPPluginCall){// Check if health kit is available// Request permission}@objcfuncgetDistance(_ call:CAPPluginCall){// Pass in date from web code// run query// Pass result back to web code}}

Again, if you are not already familiar with Swift, then filling in these blanks will likely mean finding some example snippets through Google searches. You will need to be able to do this to implement your own plugins, but we will walk through the complete implementation for this particular plugin now.

1. Enabling HealthKit

First, we will need to enable HealthKit in our iOS project and add usage descriptions. I will assume at this point that you already have a project created with Capacitor integrated and the iOS platform added.

To enable HealthKit, you will need to open the project in XCode:

npx cap open ios

You will then need to go to the Capabilities tab, and switch HealthKit to ON:

HealthKit enabled in XCode iOS Capabilities tab

You will also need to add usage descriptions in your Info.plist file that describes how you intend to use the information from HealthKit. To do this you will need to open:

App > Info.plist

Within this file, you will need to Right Click and select Add Row. You will then need to select:

Privacy - Health Update Usage Description

and then in the value field, you will need to add a description like:

To track distance walked or run

You will need to then repeat this process again for:

Privacy - Health Share Usage Description

Once you have added both, you should see entries like this:

Info.plist in XCode

If you do not know what entries you need to add for the functionality you are using (it may be that you don’t need to add anything to our Info.plist) and are not able to find it in the documentation, just try running your application. You will likely see an error triggered in the XCode logs that will state what permission is missing from your Info.plist file.

2. Creating the Plugin

There are a few steps we need to take to create and expose our plugin to Capacitor. First, we will create the plugin file itself.

Create a new file at App/DistancePlugin.swift by right-clicking App (in the XCode project explorer) and selecting New file…

Choose an iOS Swift file and name it DistancePlugin.swift

Add the following code to the file:

importFoundationimportCapacitorimportHealthKitvar healthStore:HKHealthStore=HKHealthStore();

@objc(DistancePlugin)publicclassDistancePlugin:CAPPlugin{@objcfuncauthorize(_ call:CAPPluginCall){ifHKHealthStore.isHealthDataAvailable(){let allTypes =Set([HKObjectType.quantityType(forIdentifier:.stepCount)!,HKObjectType.quantityType(forIdentifier:.distanceWalkingRunning)!])
            
            healthStore.requestAuthorization(toShare: allTypes, read: allTypes){(success, error)inif!success {
                    call.reject("Could not get permission")return}
            
                call.resolve();}}else{
            call.reject("Health data not available")}}@objcfuncgetDistance(_ call:CAPPluginCall){guardlet start = call.options["startDate"]as?Stringelse{
            call.reject("Must provide start date")return}let dateFormatter =DateFormatter();
        dateFormatter.dateFormat ="yyyy/MM/dd";let now =Date()let startDate = dateFormatter.date(from: start);let distanceQuantityType =HKQuantityType.quantityType(forIdentifier:.distanceWalkingRunning)!let predicate =HKQuery.predicateForSamples(withStart: startDate, end: now, options:HKQueryOptions.strictStartDate)let query =HKStatisticsQuery(quantityType: distanceQuantityType, quantitySamplePredicate: predicate, options:.cumulativeSum){_, result,_inguardlet result = result,let sum = result.sumQuantity()else{
                call.reject("Could not query data");return}let totalDistance = sum.doubleValue(for:HKUnit.meter())
            
            call.resolve(["totalDistance": totalDistance
            ])}
        
        healthStore.execute(query)}}

This is the final implementation of the plugin we are creating, I will briefly talk through what it is doing but this specific implementation isn’t really the focus of this tutorial.

First, it is important that we have these two imports:

importCapacitorimportHealthKit

as this will expose both Capacitor and HealthKit functionality to this file. We are also creating a global instance of HKHealthStore that we will be able to access through this plugin:

var healthStore:HKHealthStore=HKHealthStore();

This store only needs to be created once and can be reused. We then have our two methods: authorize and getDistance. We can do whatever native stuff we like in these methods, as long as they eventually call call.resolve in the successful case, or call.reject in the unsuccessful case, which will then pass back whatever is necessary to Capacitor (and then to our web code).

The authorize method first checks if HealthKit is available, and then it requests permission from the user for the distanceWalkingRunning data. It is important that you only request information you actually need access to. The user needs to individually allow each bit of data that you are requesting.

The getDistance method allows a startDate to be passed in from our web code to Capacitor. We then run a query that will return the total sum of the distance walked or run in meters from the startDate to the current date. This result is then passed back through Capacitor to our web code.

3. Register the Plugin with Capacitor

In order for this plugin to be accessible by Capacitor and our web code, there is another step we need to take. You will need to create another new file along with DistancePlugin.swift.

This time, using the New File… dialog in XCode, you will need to create a new Objective-C file and give it the same name as your plugin file, e.g. DistangePlugin. After you have created this file, you should have two files inside of App like this:

  • DistancePlugin.swift
  • DistancePlugin.m

When you create this new file, XCode will prompt you to create a “Bridging Header” which will create an App-Bridging-Header.h file (you should do this).

Add the following code to DistancePlugin.m:

#import<Foundation/Foundation.h>
#import<Capacitor/Capacitor.h>CAP_PLUGIN(DistancePlugin,"DistancePlugin",CAP_PLUGIN_METHOD(authorize,CAPPluginReturnPromise);CAP_PLUGIN_METHOD(getDistance,CAPPluginReturnPromise);)

This defines our DistancePlugin and its methods, and it will now be available on:

Capacitor.Plugins.DistancePlugin.authorize()

4. Using the Plugin

Now, all we need to do is make use of this plugin, which we do in a similar way to any normal Capacitor plugin. This plugin will be exposed through the Capacitor web runtime, so our implementation will look a little different because we won’t be importing the plugin like a normal Capacitor plugin.

This example is for StencilJS, but the same basic concept will apply regardless:

import{ Component, h }from"@stencil/core";

declare var Capacitor;const{ DistancePlugin }= Capacitor.Plugins;

@Component({
  tag:"app-home",
  styleUrl:"app-home.css"})exportclassAppHome{asyncgetDistance(){let result =await DistancePlugin.authorize();let data =await DistancePlugin.getDistance({ startDate:"2019/07/01"});
    console.log(data);}render(){return[<ion-header><ion-toolbar color="primary"><ion-title>Home</ion-title></ion-toolbar></ion-header>,<ion-content class="ion-padding"><ion-button onClick={()=>this.getDistance()} expand="block">
          Get Distance
        </ion-button></ion-content>];}}

If you run the application on an iOS device, you should be able to click the Get Distance button to return the total distance walked/run since 2019/07/01 or whatever date you want to supply.

The first time you execute this code, the authorisation screen will display:

Authorisation screen for HealthKit on iOS

But on subsequent attempts to get the distance data, the authorisation screen will not be shown again, and the resulting data will be logged immediately, e.g:

{"totalDistance":8940.4301789706806}

Summary

The general process for exposing any native functionality you want through Capacitor is reasonably straight-forward, the difficult part is most likely going to be piecing together the Swift/Objective-C code you need to make what you want work. With some practice, as with anything, you will become more familiar with the Swift (or Java/Kotlin for Android) and it will become easier to do.

Remember that with Capacitor, the native project you are working with is no different to any other standard native iOS project. When searching for information, you do not need to search ”how to do X with Capacitor” you can just search ”how to do X with iOS/Swift” and you should find plenty of results. The only thing that is really specific to Capacitor here is the concept of using call to pass data between the web code and the native code.

Eventually, you will never have to worry about finding yourself in a position where there isn’t already a plugin available to do what you need, as you will have full and confident control over the underlying native project that your Ionic application uses.

If you would like to see how to do this for Android, check out this video: Running Native iOS/Android Code with Ionic.

Building a Notepad Application from Scratch with Ionic (StencilJS)

$
0
0

A difficult part of the beginner’s journey to learning Ionic is the step between understanding some of the basics and actually building a fully working application for the first time. Concepts explained in isolation can make sense, but it may be difficult to understand when to use them in the context of building an application. Even after spending some time learning about Ionic, you might find yourself starting a new project with no idea where to begin.

The aim of this tutorial is to provide a complete walkthrough of building a simple (but not too simple) Ionic application from start to finish using StencilJS. I have attempted to strike a balance between optimised/best-practice code, and something that is just straight-forward and easy enough for beginners to understand. Sometimes the “best” way to do things can look a lot more complex and intimidating, and don’t serve much of a purpose for beginners until they have the basics covered. You can always introduce more advanced concepts to your code as you continue to learn.

I will be making it a point to take longer to explain smaller concepts in this tutorial, more so than in some of my other tutorials, since it is targeted at people right at the beginning of their Ionic journey. However, I will not be able to cover everything in the level of depth required if you do not already have somewhat of an understanding. You may still find yourself stuck on certain concepts. I will mostly be including just enough to introduce you to the concept in this tutorial, and I will link out to further resources to explain those concepts in more depth where possible.

What will we be building?

The example we will be building needs to be simple enough such that it won’t take too much effort to build, but it also needs to be complex enough to be a realistic representation of a real application.

I decided on building a notepad application for this example, as it will allow us to cover many of the core concepts such as:

  • Navigation/Routing
  • Templates
  • Displaying data
  • Event binding
  • Types and Interfaces
  • Services
  • Data Input
  • Data Storage
  • Styling

As well as covering important concepts, it is also a reasonably simple and fun application to build. In the end, we will have something that looks like this:

Screenshot of a notepad application in Ionic

We will have an application that allows us to:

  • Create, delete, and edit notes
  • Save and load those notes from storage
  • View a list of notes
  • View note details

Before We Get Started

Last updated for Ionic 4.6.2

This tutorial will assume that you have read at least some introductory content about Ionic, have a general understanding of what it is, and that you have everything that you need to build Ionic applications set up on your machine. You will also need to have a basic understanding of HTML, CSS, and JavaScript.

If you do not already have everything set up, or you don’t have a basic understanding of the structure of an Ionic/StencilJS project, take a look at the additional resource below for a video walkthrough.

Additional resources:

1. Generate a New Ionic Project

Time to get started! To begin, we will need to generate a new Ionic/StencilJS application. We can do that with the following command:

npm init stencil

At this point, you will be prompted to pick a “starter” from these options:

? Pick a starter › - Use arrow-keys. Return to submit.

❯  ionic-pwa     Everything you need to build fast, production ready PWAs
   app           Minimal starter for building a Stencil app or website
   component     Collection of web components that can be used anywhere

We will want to choose the ionic-pwa option, which will create a StencilJS application for us with Ionic already installed. Just select that option with your arrow keys, and then hit Enter.

You will also need to supply a Project name, you can use whatever you like for this, but I have called my project ionic-stencil-notepad. After this step, just hit Y when asked to confirm.

You can now make this new project your working directory by running the following command:

cd ionic-stencil-notepad

and you can run the application in the browser with this command:

npm start

2. Create the Required Pages/Services

This application will have two pages:

  • Home (a list of all notes)
  • Detail (the details of a particular note)

and we will also be making use of the following services/providers:

  • Notes
  • Storage

The Notes service will be responsible for handling most of the logic around creating, updating, and deleting notes. The Storage service will be responsible for helping us store and retrieve data from local storage. We are going to create these now so that we can just focus on the implementation later.

The application is generated with an app-home component (we use “components” as our “pages”) by default, so we can keep that and make use of it, but we will get rid of the app-profile component that is also automatically generated.

Delete the following folder:

  • src/components/app-profile

Create the following files in your project:

  • src/components/app-detail/app-detail.tsx
  • src/components/app-detail/app-detail.css
  • src/services/notes.ts
  • src/services/storage.ts

We have created an additional app-detail component for our Detail page - this component includes both a .tsx file that will contain the template and logic, and a .css file for styling. We also create a notes.ts file that will define our Notes service and a storage.ts file that will define our Storage service. Notice that these files have an extension of .ts which is just a regular TypeScript file, as opposed to the .tsx extension the component has which is a TypeScript + JSX file. If you are not already familiar with JSX/TSX then I would recommend that you read the following resource before continuing.

Additional resources:

3. Setting up Navigation/Routing

Now we move on to our first real bit of work - setting up the routes for the application. The “routes” in our application determine which page/component to show when a particular URL path is active. We will already have most of the work done for us by default, we will just need to add/change a couple of things.

Modify src/components/app-root/app-root.tsx to reflect the following:

import{ Component, h }from"@stencil/core";

@Component({
  tag:"app-root",
  styleUrl:"app-root.css"})exportclassAppRoot{render(){return(<ion-app><ion-routeruseHash={false}><ion-routeurl="/"component="app-home"/><ion-routeurl="/notes"component="app-home"/><ion-routeurl="/notes/:id"component="app-detail"/></ion-router><ion-nav/></ion-app>);}}

Routes in our Ionic/StencilJS application are defined by using the <ion-route> component. If you require more of an introduction to navigation in an Ionic/StencilJS application, check out the additional resource below:

Additional resources:

We have kept the default route for app-home but we have also added an additional /notes route that will link to the same component. This is purely cosmetic and is not required. By doing this, I think that the URL structure will make a little more sense. For example, to view all notes we would go to /notes and to view a specific note we would go to /notes/4.

We’ve also added a route for the app-detail component that looks like this:

/notes/:id

By adding :id to the path, which is prefixed by a colon : we are creating a route that will accept parameters which we will be able to grab later (i.e. URL parameters allow us to pass dynamic values through the URL). That means that if a user goes to the following URL:

http://localhost:8100/notes

They will be taken to the Home page. However, if they go to:

http://localhost:8100/notes/12

They will be taken to the Detail page, and from that page, we will be able to grab the :id value of 12. We will make use of that id to display the appropriate note to the user later.

4. Starting the Notes/Home Page

The Home page, which will display a list of all of the notes the user has added, will be the default screen that user sees. We are going to start implementing the template for this page now. We don’t have everything in place that we need to complete it, so we will just be focusing on getting the basic template set up.

Modify src/components/app-home/app-home.tsx to reflect the following:

import{ Component, h }from"@stencil/core";

@Component({
  tag:"app-home",
  styleUrl:"app-home.css"})exportclassAppHome{render(){return[<ion-header><ion-toolbarcolor="primary"><ion-title>Notes</ion-title><ion-buttonsslot="end"><ion-button><ion-iconslot="icon-only"name="clipboard"/></ion-button></ion-buttons></ion-toolbar></ion-header>,<ion-content><ion-list><ion-itembuttondetail><ion-label>Title goes here</ion-label></ion-item></ion-list></ion-content>];}}

This template is entirely made up of Ionic’s web components. We have the <ion-header> which contains the title for our page, and we have <ion-buttons> set up inside of the <ion-toolbar> which will allow us to place a set of buttons either to the left or the right of the toolbar. In this case, we just have a single button in the end slot which we are using as the button to trigger adding a new note. By giving our icon a slot of icon-only it will style the icon so that it is larger (since it doesn’t have text accompanying it).

Then we have our <ion-content> section which provides the main scrolling content section of the page. This contains an <ion-list> with a single <ion-item>. Later, we will modify this list to create multiple items - one for each of the notes that are currently stored in the application.

There will be more information available about all of this, including “slots”, in the additional resources at the end of this section.

Although we will not be making any major changes to the class/logic for our Home page just yet, let’s make a few minor changes so that we are ready for later functionality.

There are two key bits of functionality that we will want to interact with from our pages in this application. The first is Ionic’s ion-alert-controller which will allow us to display alert prompts and request user input (e.g. we will prompt the user for the title of the note when they want to create a new note). The second is Ionic’s ion-router, so that we can programatically control navigation (among other things which we will touch on later).

To use this functionality, we need to get a reference to the Ionic web components that provide that functionality - this is done quite simply enough by using document.querySelector to grab a reference to the actual web component in the document. If you are not familiar with this concept, I would recommend first watching the additional resource below:

Additional resources:

We already have an <ion-router> in our application (since that is used to contain our routes), so we can just grab a reference to that whenever we need it. However, in order to create alerts we will need to add the <ion-alert-controller> to our application. We will add this to the root components template.

Modify src/components/app-root/app-root.tsx to reflect the following:

import{ Component, h }from"@stencil/core";

@Component({
  tag:"app-root",
  styleUrl:"app-root.css"})exportclassAppRoot{render(){return(<ion-app><ion-routeruseHash={false}><ion-routeurl="/"component="app-home"/><ion-routeurl="/notes"component="app-home"/><ion-routeurl="/notes/:id"component="app-detail"/></ion-router><ion-alert-controller/><ion-nav/></ion-app>);}}

Notice that we have added <ion-alert-controller> in the template above. Now we will just need to grab a reference to that in our home page (and we are going to add a couple more things here as well).

Modify src/components/app-home/app-home.tsx to reflect the following:

import{ Component, h }from"@stencil/core";

@Component({
  tag:"app-home",
  styleUrl:"app-home.css"})exportclassAppHome{componentDidLoad(){}addNote(){const alertCtrl = document.querySelector("ion-alert-controller");
    console.log(alertCtrl);}render(){return[<ion-header><ion-toolbarcolor="primary"><ion-title>Notes</ion-title><ion-buttonsslot="end"><ion-button><ion-iconslot="icon-only"name="clipboard"/></ion-button></ion-buttons></ion-toolbar></ion-header>,<ion-content><ion-list><ion-itembuttondetail><ion-label>Title goes here</ion-label></ion-item></ion-list></ion-content>];}}

You can see that we have created an addNote method that we will use for creating new notes. We haven’t fully implemented this yet, but we have created the reference to the ion-alert-controller that we need in order to launch the alert prompt that will ask the user for the title of their note.

We have also added a componentDidLoad lifecycle hook - this functions just like a regular method, except that it will be triggered automatically as soon as the home component has loaded. We will make use of this later.

It’s going to be hard for us to go much further than this without starting to work on our Notes service, as this is what is going to allow us to add, update, and delete notes. Without it, we won’t have anything to display!

5. Creating an Interface

Before we implement our Notes service, we are going to define exactly “what” a note is by creating our own custom type with an interface.

StencilJS uses TypeScript, which is basically JavaScript with “types”. A type gives us a way to enforce that data is what we expect it to be, and you will often see variables, methods, and parameters followed by a colon : and then a type. For example:

let myName: string ="Josh"

Since we have added : string after the variable we defined, it will enforce that myName can only be a string. If we tried to assign a number to myName it wouldn’t allow us to do it. I don’t want to dive too deep into types and interfaces here, so I will link to another tutorial in the additional resources section below.

Create a folder and file at src/interfaces/note.ts and add the following:

exportinterfaceNote{
  id: string;
  title: string;
  content: string;}

This will allow us to import a Note type elsewhere in our application, which will allow us to force our notes to follow the format defined above. Each note must have an id that is a string, a title that is a string, and content that is a string.

Additional resources:

6. Implement the Notices Service

The “page” components in our application are responsible for displaying views/templates on the screen to the user. Although they are able to implement logic of their own, the majority of the complex logic performed in our applications should be done in “services”.

A service does not display anything to the user, it is just a “helper” that is used by components/pages in our application to perform logic/data operations. Our pages can then call the methods of this service to do work for it. This way, we can keep the code for our pages light, and we can also share the data and methods available through services with multiple pages in our application (whereas, if we define methods in our pages they are only accessible to that one page). Services are the primary way that we are able to share data between different pages.

Our Notes service will implement various methods which will allow it to:

  • Create a note and add it to an array in the data service
  • Delete notes from that array
  • Find and return a specific note by its id
  • Save the array of notes to storage
  • Load the array of notes from storage

Since our Notes service will rely on adding data to, and retrieving data from, the browsers local storage (which will allow us to persist notes across application reloads), we should tackle creating the Storage service first.

Modify src/services/storage.ts to reflect the following:

const storage = window.localStorage;exportfunctionset(key: string, value: any): Promise<void>{returnnewPromise((resolve, reject)=>{try{
      storage && storage.setItem(key,JSON.stringify(value));resolve();}catch(err){reject(`Couldnt store object ${err}`);}});}

export function remove(key: string): Promise<void>{returnnewPromise((resolve, reject)=>{try{
      storage && storage.removeItem(key);resolve();}catch(err){reject(`Couldnt remove object ${err}`);}});}

export function get(key: string): Promise<any>{returnnewPromise((resolve, reject)=>{try{if(storage){const item = storage.getItem(key);resolve(JSON.parse(item));}resolve(undefined);}catch(err){reject(`Couldnt get object: ${err}`);}});}

The main purpose of this service is to provide three methods that we can easily use to interact with local storage: get, set, and remove. This service allows us to contain all of the “ugly” code in one place, and then throughout the rest of the application we can just make simple calls to get, set, and remove to store the data that we want.

For more information about how browser based local storage works, and a more advanced solution for dealing with storage, check out the additional resource below. The solution detailed in the tutorial below will make use of the best storage mechanism available depending on the platform the application is running on (e.g. on iOS and Android it will use native storage, instead of the browsers local storage). This is generally a better solution than the above, but it does depend on using Capacitor in your project.

Additional resources:

Now let’s implement the code for our Notes service, and then talk through it. I’ve added comments to various parts of the code itself, but we will also talk through it below.

import{set,get}from"./storage";import{ Note }from"../interfaces/note";classNotesServiceController{public notes: Note[];asyncload(): Promise<Note[]>{if(this.notes){returnthis.notes;}else{this.notes =(awaitget("notes"))||[];returnthis.notes;}}asyncsave(): Promise<void>{returnawaitset("notes",this.notes);}

  getNote(id): Note {returnthis.notes.find(note => note.id === id);}

  createNote(title): void {// Create a unique id that is one larger than the current largest idlet id = Math.max(...this.notes.map(note =>parseInt(note.id)),0)+1;this.notes.push({
      id: id.toString(),
      title: title,
      content:""});this.save();}

  updateNote(note, content): void {// Get the index in the array of the note that was passed inlet index =this.notes.indexOf(note);this.notes[index].content = content;this.save();}

  deleteNote(note): void {// Get the index in the array of the note that was passed inlet index =this.notes.indexOf(note);// Delete that element of the array and resave the dataif(index >-1){this.notes.splice(index,1);this.save();}}
}

export const NotesService = new NotesServiceController();

First of all, if you are not familiar with the general concept of a “service” in StencilJS, I would recommend reading the following additional resource first.

Additional resources:

At the top of the file, we import our Storage methods that we want to make use of, and the interface that we created to represent a Note. Inside of our service, we have set up a notes class member which will be an array of our notes (the Note[] type means it will be an array of our Note type we created).

Variables declared above the methods in our service (like in any class) will be accessible throughout the entire class using this.notes.

Our load function is responsible for loading data in from storage (if it exists) and then setting it up on the this.notes array. If the data has already been loaded we return it immediately, otherwise we load the data from storage first. If there is no data in storage (e.g. the result from the get call is null) then we instead return an empty array (e.g. []) instead of a null value. This method (and others) are marked as async which means that they run outside of the normal flow of the application and can “wait” for operations to complete whilst the rest of the application continues executing. In this case, if we need to load data in from storage then we need to “wait” for that operation to complete.

It is important to understand the difference between synchronous and asynchronous code behaviour, as well as how async/await works. If you are not already familiar with this, then you can check out the following resources.

Additional resources:

The save function in our service simply sets our notes array on the notes key in storage so that it can be retrieved later - we will call this whenever there is a change in data, so that when we reload the application the changes are still there.

The getNote function will accept an id, it will then search through the notes array and return the note that matches the id passed in. We will make use of this in our detail page later.

The createNote function handles creating a new note and pushing it into the notes array. We do have an odd bit of code here:

let id = Math.max(...this.notes.map(note =>parseInt(note.id)),0)+1;

We need each of our notes to have a unique id so that we can grab them appropriately through the URL. To keep things simple, we are using a simple numeric id (an id could be anything, as long as it is unique). To ensure that we always get a unique id, we use this code to find the note with the largest id that is currently in the array, and then we just add 1 to that.

The updateNote method will find a particular note and update its content, and the deleteNote method will find a particular note and remove it.

7. Finishing the Notes Page

With our notes service in place, we can now finish off our Home page. We will need to make some modifications to both the class and the template.

Modify src/components/app-home/app-home.tsx to reflect the following:

import{ Component, State, h }from"@stencil/core";import{ Note }from"../../interfaces/note";import{ NotesService }from"../../services/notes";

@Component({
  tag:"app-home",
  styleUrl:"app-home.css"})exportclassAppHome{
  @State() notes: Note[]=[];asynccomponentDidLoad(){this.notes =await NotesService.load();}asyncaddNote(){const alertCtrl = document.querySelector("ion-alert-controller");let alert =await alertCtrl.create({
      header:"New Note",
      message:"What should the title of this note be?",
      inputs:[{
          type:"text",
          name:"title"}],
      buttons:[{
          text:"Cancel"},{
          text:"Save",
          handler:async data =>{
            NotesService.createNote(data.title);this.notes =[...(await NotesService.load())];}}]});

    alert.present();}render(){return[<ion-header><ion-toolbarcolor="primary"><ion-title>Notes</ion-title><ion-buttonsslot="end"><ion-button><ion-iconslot="icon-only"name="clipboard"/></ion-button></ion-buttons></ion-toolbar></ion-header>,<ion-content><ion-list><ion-itembuttondetail><ion-label>Title goes here</ion-label></ion-item></ion-list></ion-content>];}}

We have now added a call to the load method of the Notes service, which will handle loading in the data from storage as soon as the application has started. This will also set up the data on the notes class member in the home page. Notice that we have also decorated our notes class member with the @State() decorator - since we want the template to update whenever notes changes, we need to add the @State() decorator to it (otherwise, the template will not re-render and it will continue to display old data). For more information on this, check out the additional resource below.

Additional resources:

The addNote() method will now also allow the user to add a new note. We will create an event binding in the template later to tie a button click to this method, which will launch an Alert prompt on screen. This prompt will allow the user to enter a title for their new note, and when they click Save the new note will be added. Since creating the alert prompt is “asynchronous” we need to mark the addNote method as async in order to be able to await the creation of the alert prompt. In the “handler” for this prompt, we trigger adding the new note using our service, and we also reload the data in our home page so that it includes the newly added note by reassigning this.notes. The reason we use this weird syntax:

this.notes =[...(await NotesService.load())];

instead of just this:

this.notes =await NotesService.load();

Is because in order for StencilJS to detect a change and display it in the template, the variable must be reassigned completely (not just modified). In the second example the data would be updated, but it would not display in the template. The first example creates a new array like this:

this.notes =[/* values in here */]

and inside of that new array, the “spread” operator (i.e. ...) is used to pull all of the values out of the array returned from the load call, and add them to this new array. For a real world analogy, consider having a box full of books. Instead of just taking a book out of the box full of books to get the result we want, we are getting a new empty box and moving all of the books over to this new box (except for the books we no longer want). This is a round-a-bout way of doing the exact same thing, but the difference is that by moving all of our books to the new box StencilJS will be able to detect and display the change.

This isn’t really intuitive, but if you ever run into a situation in StencilJS where you are updating your data but not seeing the change in your template, it’s probably because you either:

  1. Didn’t use the @State decorator, or
  2. You are modifying an array/object instead of creating a new array/object

Now we just need to finish off the template.

Modify the template in src/components/app-home/app-home.tsx to reflect the following:

import{ Component, State, h }from"@stencil/core";import{ Note }from"../../interfaces/note";import{ NotesService }from"../../services/notes";

@Component({
  tag:"app-home",
  styleUrl:"app-home.css"})exportclassAppHome{
  @State() notes: Note[]=[];asynccomponentDidLoad(){this.notes =await NotesService.load();}asyncaddNote(){const alertCtrl = document.querySelector("ion-alert-controller");let alert =await alertCtrl.create({
      header:"New Note",
      message:"What should the title of this note be?",
      inputs:[{
          type:"text",
          name:"title"}],
      buttons:[{
          text:"Cancel"},{
          text:"Save",
          handler:async data =>{
            NotesService.createNote(data.title);this.notes =[...(await NotesService.load())];}}]});

    alert.present();}render(){return[<ion-header><ion-toolbarcolor="primary"><ion-title>Notes</ion-title><ion-buttonsslot="end"><ion-buttononClick={()=>this.addNote()}><ion-iconslot="icon-only"name="clipboard"/></ion-button></ion-buttons></ion-toolbar></ion-header>,<ion-content><ion-list>{this.notes.map(note =>(<ion-itembuttondetailhref={`/notes/${note.id}`}routerDirection="forward"><ion-label>{note.title}</ion-label></ion-item>))}</ion-list></ion-content>];}}

We have modified our button in the header section to include an onClick event binding that is linked to the addNote() method. This will trigger the addNote() method we just created whenever the user clicks on the button.

We have also modified our notes list:

<ion-list>{this.notes.map(note =>(<ion-itembuttondetailhref={`/notes/${note.id}`}routerDirection="forward"><ion-label>{note.title}</ion-label></ion-item>))}</ion-list>

Rather than just having a single item, we are now using a map which will loop over each note in our notes array. Since we want to view the details of an individual note by clicking on it, we set up the following href value:

href={`/notes/${note.id}`}

By using curly braces here, we are able to render out the value of whatever note.id is in our string. In this case, we want to first evaluate the expression /notes/${note.id} to something like '/notes/12' before assigning it to the href, we don’t want the value to literally be /notes/${note.id}. We also supply a routerDirection of forward so that Ionic knows the “direction” of the page transition, which will make sure that it animates that transition correctly (there are different page transition animations for a forward and backward transition).

Finally, we use an “interpolation” to render out a specific notes title value inside of the <ion-label>. An interpolation, which is an expression surrounded by curly braces, is just a way to evaluate an expression before rendering it out on the screen. Therefore, this will display the title of whatever note is currently being looped over in our map.

These concepts are expanded upon in the tutorial on JSX, so make sure to check that out if you are feeling a little lost at this point.

Additional resources:

8. Implement the Notes Detail Page

We just have one more page to implement to finish off the functionality in the application! We want our Detail page to allow the user to:

  • View the details of a note
  • Edit the content of a note
  • Delete a note

Let’s start off with just the logic, and then we will implement the template.

Modify src/components/app-detail/app-detail.tsx

import{ Component, State, Prop, h }from"@stencil/core";import{ Note }from"../../interfaces/note";import{ NotesService }from"../../services/notes";

@Component({
  tag:"app-detail",
  styleUrl:"app-detail.css"})exportclassAppDetail{public navCtrl = document.querySelector("ion-router");

  @Prop() id: string;

  @State() note: Note ={
    id:null,
    title:"",
    content:""};asynccomponentDidLoad(){await NotesService.load();this.note =await NotesService.getNote(this.id);}noteChanged(ev){
    NotesService.updateNote(this.note, ev.target.value);
    NotesService.save();}deleteNote(){setTimeout(()=>{
      NotesService.deleteNote(this.note);},300);this.navCtrl.back();}render(){return[<ion-content/>];}}

In this page, we use the @Prop decorator. If we give this prop the same name as the parameter we set up in our <ion-route> to pass in the id this will allow us to get access to the value that was passed in through the URL. We want to do that because we need to access the id of the note that is supplied through the route, e.g:

http://localhost:8100/notes/12

In our componentDidLoad method, we then use that id to grab the specific note from the notes service. However, we first have to check if the data has been loaded yet since it is possible to load this page directly through the URL (rather than going through the home page first). To make sure that the data has been loaded, we just make a call to the load method from our Notes service. The note is then assigned to the this.note class member.

Since the note is not immediately available to the template, we intialise an empty note with blank values so that our template won’t complain about data that does not exist. Once the note has been successfully fetched, the data in the template will automatically update since we are using the @State decorator.

We have a noteChanged method set up, which will be called every time the data for the note changes. This will ensure that any changes are immediately saved.

We also have a deleteNote function that will handle deleting the current note. Once the note has been deleted, we automatically navigate back to the Home page by using the back method of the ion-router. We actually wait for 300ms using a setTimeout before we delete the note, since we want the note to be deleted after we have navigated back to the home page.

Modify the template in src/components/app-detail/app-detail.tsx to reflect the following:

<ion-header><ion-toolbarcolor="primary"><ion-buttonsslot="start"><ion-back-buttondefaultHref="/notes"/></ion-buttons><ion-title>{this.note.title}</ion-title><ion-buttonsslot="end"><ion-buttononClick={()=>this.deleteNote()}><ion-iconslot="icon-only"name="trash"/></ion-button></ion-buttons></ion-toolbar></ion-header>,<ion-contentclass="ion-padding"><ion-textareaonInput={ev =>this.noteChanged(ev)}value={this.note.content}placeholder="...something on your mind?"/></ion-content>

This template is not too dissimilar to our home page. Since we have our note set up as a class member variable, we can access it inside of <ion-title> to display the title of the current note in this position.

We have our delete button set up in the header which is bound to the deleteNote method we defined, but we also have an additional button this time called <ion-back-button>. This is an Ionic component that simply displays a button that will handle allowing the user to navigate backward. Since it is possible to load the Detail page directly through the URL, and we still want the user to be able to navigate “back” to the Home page in this instance, we supply the back button with a defaultHref of /notes which will cause it to navigate to the /notes route by default if no navigation history is available.

Inside of our content area, we just have a single <ion-textarea> component for the user to write in. Whenever this value changes, we trigger the noteChanged method and pass in the new value. This will then save that new value.

This is a rather simplistic approach to forms. If you would like a more advanced look at how to manage forms in StencilJS, take a look at this preview chapter from my book Creating Ionic Applications with StencilJS:

Additional resources:

We will actually need to make one more change to our home page to finish off the functionality for the application. Currently, the home page loads the data when the component first loads. However, since we can now delete notes, that means the data on the home page might need to change as a result of what happens on our detail page.

To account for this, we are going to set up a listener that will detect every time that the home page is loaded, and we will be able to run some code to refresh the data.

Modify src/components/app-home/app-home.tsx to reflect the following:

import{ Component, State, h }from"@stencil/core";import{ Note }from"../../interfaces/note";import{ NotesService }from"../../services/notes";

@Component({
  tag:"app-home",
  styleUrl:"app-home.css"})exportclassAppHome{
  @State() notes: Note[]=[];public navCtrl = document.querySelector("ion-router");asynccomponentDidLoad(){this.navCtrl.addEventListener("ionRouteDidChange",async()=>{this.notes =[...(await NotesService.load())];});}asyncaddNote(){const alertCtrl = document.querySelector("ion-alert-controller");let alert =await alertCtrl.create({
      header:"New Note",
      message:"What should the title of this note be?",
      inputs:[{
          type:"text",
          name:"title"}],
      buttons:[{
          text:"Cancel"},{
          text:"Save",
          handler:async data =>{
            NotesService.createNote(data.title);this.notes =[...(await NotesService.load())];}}]});

    alert.present();}render(){return[<ion-header><ion-toolbarcolor="primary"><ion-title>Notes</ion-title><ion-buttonsslot="end"><ion-buttononClick={()=>this.addNote()}><ion-iconslot="icon-only"name="clipboard"/></ion-button></ion-buttons></ion-toolbar></ion-header>,<ion-content><ion-list>{this.notes.map(note =>(<ion-itembuttondetailhref={`/notes/${note.id}`}routerDirection="forward"><ion-label>{note.title}</ion-label></ion-item>))}</ion-list></ion-content>];}}

We now have a reference to the ion-router and we set up a listener for the ionRouteDidChange event which will be triggered every time this page is activated.

9. Styling the Application

The functionality of our application is complete now. But we are going to take it one step further and make it look a little nicer. You may have noticed in the templates that we reference color="primary" in the toolbars. Ionic has a default set of colours defined that we can use, including:

  • primary
  • secondary
  • tertiary
  • light
  • danger
  • dark

We can use these default colours, or we can define our own in the src/global/app.scss file. You will find a bunch of CSS variables in this file that can be modified (if you aren’t familiar with CSS4 variables, I would recommend checking out the additional resources section near the end of this article). You can just modify these manually, but it is a better idea to use Ionic’s Color Generator to generate all of the necessary values for you, you just pick the colours that you want:

You can create your own colour scheme, or use the one I have created below.

Add the following to the bottom of src/global/app.scss:

// Ionic Variables and Theming. For more info, please see:
// http://ionicframework.com/docs/theming/

/** Ionic CSS Variables **/:root{--ion-color-primary: #f10090;--ion-color-primary-rgb: 241,0,144;--ion-color-primary-contrast: #ffffff;--ion-color-primary-contrast-rgb: 255,255,255;--ion-color-primary-shade: #d4007f;--ion-color-primary-tint: #f21a9b;--ion-color-secondary: #da0184;--ion-color-secondary-rgb: 218,1,132;--ion-color-secondary-contrast: #ffffff;--ion-color-secondary-contrast-rgb: 255,255,255;--ion-color-secondary-shade: #c00174;--ion-color-secondary-tint: #de1a90;--ion-color-tertiary: #7044ff;--ion-color-tertiary-rgb: 112,68,255;--ion-color-tertiary-contrast: #ffffff;--ion-color-tertiary-contrast-rgb: 255,255,255;--ion-color-tertiary-shade: #633ce0;--ion-color-tertiary-tint: #7e57ff;--ion-color-success: #10dc60;--ion-color-success-rgb: 16,220,96;--ion-color-success-contrast: #ffffff;--ion-color-success-contrast-rgb: 255,255,255;--ion-color-success-shade: #0ec254;--ion-color-success-tint: #28e070;--ion-color-warning: #ffce00;--ion-color-warning-rgb: 255,206,0;--ion-color-warning-contrast: #ffffff;--ion-color-warning-contrast-rgb: 255,255,255;--ion-color-warning-shade: #e0b500;--ion-color-warning-tint: #ffd31a;--ion-color-danger: #f04141;--ion-color-danger-rgb: 245,61,61;--ion-color-danger-contrast: #ffffff;--ion-color-danger-contrast-rgb: 255,255,255;--ion-color-danger-shade: #d33939;--ion-color-danger-tint: #f25454;--ion-color-dark: #222428;--ion-color-dark-rgb: 34,34,34;--ion-color-dark-contrast: #ffffff;--ion-color-dark-contrast-rgb: 255,255,255;--ion-color-dark-shade: #1e2023;--ion-color-dark-tint: #383a3e;--ion-color-medium: #989aa2;--ion-color-medium-rgb: 152,154,162;--ion-color-medium-contrast: #ffffff;--ion-color-medium-contrast-rgb: 255,255,255;--ion-color-medium-shade: #86888f;--ion-color-medium-tint: #a2a4ab;--ion-color-light: #f4f5f8;--ion-color-light-rgb: 244,244,244;--ion-color-light-contrast: #000000;--ion-color-light-contrast-rgb: 0,0,0;--ion-color-light-shade: #d7d8da;--ion-color-light-tint: #f5f6f9;}

By supplying these variables to the :root selector, these variable changes will take affect application wide (although they can still be overwritten by more specific selectors).

This is a good way to add some basic styling to the application, but we might want to get a little more specific. Let’s say we want to change the background colour of all of our <ion-content> sections. We can do that too.

Add the following style to the top of src/global/app.css:

/* Document Level Styles */

ion-content {--ion-background-color:var(--ion-color-secondary);}

Unlike the :root selector which defines variables everywhere, this will only overwrite the --ion-background-color variable inside of any <ion-content> tags. We set the background colour to whatever the --ion-color-secondary value is, but we could also just use a normal colour value here instead of a variable if we wanted to.

We can also add styles just to specific pages if we want. Let’s make some changes to the Home page and Detail page.

Modify src/components/app-home/app-home.css to reflect the following:

ion-item{--ion-background-color: #fff;width: 95%;margin: 15px auto;font-weight: bold;border-radius: 20px;--border-radius: 20px;}

This adds a bit of extra styling to our <ion-item>. We want it to have a rounded border so we supply the border-radius property, but notice we are kind of doing this twice. Inside of the <ion-item> there is a ripple effect component that applies a little animation when the item is clicked. We need the border of this effect to be rounded as well as the item itself. Since the ripple effect is inside of a Shadow DOM, we can only change its style by modifying the --border-radius CSS variable. I realise this probably sounds very confusing, so I would highly recommend checking out the additional resources below on Shadow DOM as this is a big part of styling in Ionic.

Modify src/components/app-detail/app-detail.css to reflect the following:

ion-textarea{background: #fff !important;border-radius: 20px;padding: 20px;height: 100%;}

This just adds some simple styling to the textarea, and with that, we’re done!

Additional resources:

Summary

Although this application is reasonably simple, we have covered a lot of different concepts. If you are still just getting started with Ionic, and even if you’ve been at it for a while, there are more than likely a few concepts that we have covered that might not make complete sense yet. After completing the application, I would recommend going back to the additional resources in each section to read further on any concepts you are struggling with.

If you are looking for something to speed up your Ionic/StencilJS learning journey, then take a look at the Creating Ionic Applications with StencilJS book.
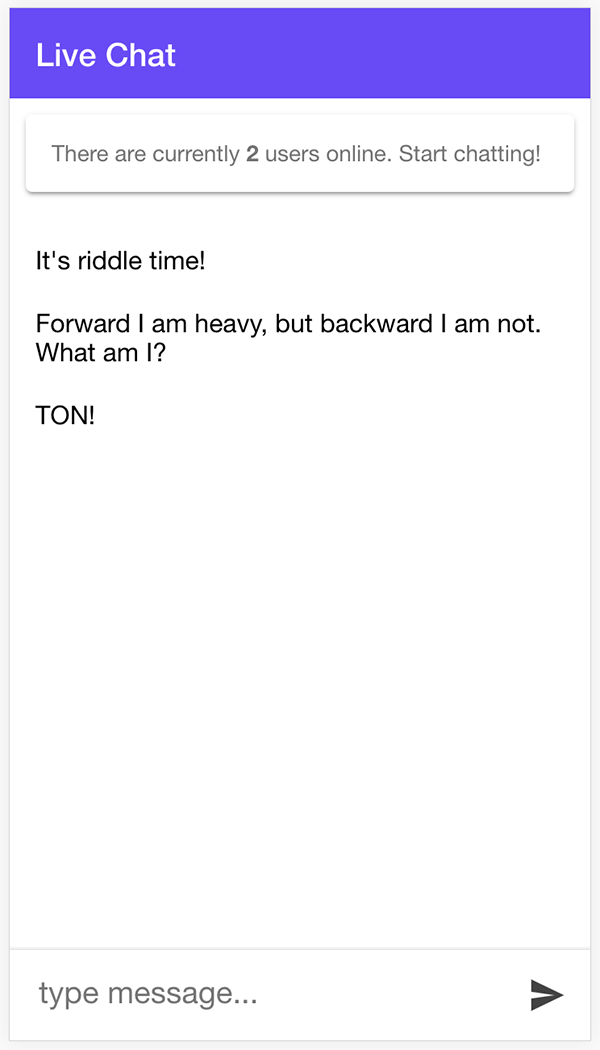
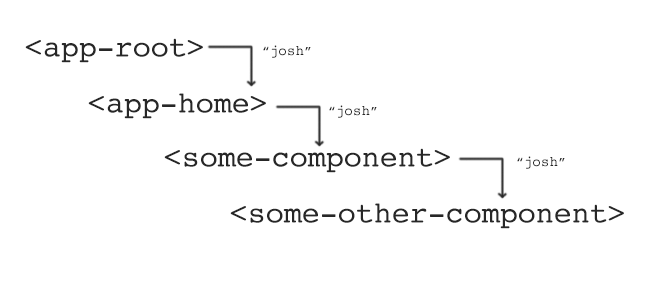
The Basics of Unit Testing in StencilJS

$
0
0

Automated testing such as unit tests and end-to-end tests are, in my view, one of the biggest “level up” mechanics available to developers who are looking to improve their skillset. It is difficult and might require a lot of time to learn to get to the point where you feel competent in writing tests for your code, and even once you have the basics down there is always room for improvement to create better tests - just as you can continue to learn to write better and better code.

The funny thing about automated tests is that they are so valuable, but at the same time not at all required (and are therefore often skipped). You don’t need tests associated with your code to make them work, and writing tests won’t directly impact the functionality of your application at all. However, even though the tests themselves won’t change your code directly or the functionality of your application, they will facilitate positive changes in other ways.

Some of the key benefits of investing time in automated tests include:

  • Documentation - unit tests are set out in such a way that they accurately describe the intended functionality of the application
  • Verification - you can have greater confidence that your application’s code is behaving the way you intended
  • Regression Testing - when you make changes to your application you can be more confident that you haven’t broken anything else, and if you have there is a greater chance that you will find out about it, as you can run the same tests against the new code
  • Code Quality - it is difficult to write effective tests for poorly designed/organised applications, whereas it is much easier to write tests for well-designed code. Naturally, writing automated tests for your applications will force you into writing good code
  • Sleep - you’ll be less of a nervous wreck when deploying your application to the app store because you are going to have a greater degree of confidence that your code works (and the same goes for when you are updating your application)

In this tutorial, we are going to focus on the basics of writing unit tests for StencilJS components. This tutorial will have an emphasis on using Ionic with StencilJS, but the same basic concepts will apply regardless of whether you are using Ionic or not.

If you would like a quick preview of what creating and running unit tests in a StencilJS application looks like, you can check out the video I recorded to accompany this tutorial: Creating Unit Tests for StencilJS Components. Most of the details are in this written tutorial, but the video should help to give you a bit of context.

Key Principles

Before we get into working with some unit tests, we need to cover a few basic ideas. StencilJS uses Jest for unit tests, which is a generic JavaScript testing framework. If you are already familiar with Jasmine then you will already understand most of what is required for writing tests with Jest, because the API is extremely similar.

I have already written many articles on creating unit tests with Jasmine, so if you need a bit of an introduction to the basic ideas I would recommend reading this article first: How to Unit Test an Ionic/Angular Application - of course, we are using Jest not Jasmine (as an Ionic/Angular application uses) but the basic concepts are almost identical.

Although the article above goes into more detail, I’ll also break down the basic concepts here. The basic structure for a unit test might look something like this:

describe('My Service',()=>{it('should correctly add numbers',()=>{expect(1+1).toBe(2);});});

Jest provides the describe, it, and expect methods that we are using above to create the test. In this case, we are creating a test that checks that numbers are added together correctly. This is just an example, and since we are just directly executing 1 + 1 (rather than testing some of our actual code that has the task of doing that) we aren’t really achieving anything because this is always going to work.

  • describe() defines a test suite (e.g. a “collection”) of tests (or “specs”)
  • it() defines a specific test or “spec”, and it lives inside of a suite (describe()). This is what defines the expected behaviour of the code you are testing, e.g. “it should do this”, “it should do that”
  • expect() defines the expected result of a test and lives inside of it()

A unit test is a chunk of code that is written and then executed to test that a single “unit” of your code behaves as expected. A unit test might test that a method returns the expected value for a given input, or perhaps that a particular method is called when the component is initialised. It is important that unit tests are small and isolated, they should only test one very specific thing. For example, we shouldn’t create a single “the component works” test that executes a bunch of different expect statements to test for different things. We should create many small individual unit tests that each have the responsibility of testing one small unit of code.

There are many concepts and principles to learn when it comes to creating automated tests, and you could literally read entire books just on the core concepts of testing in general (without getting into specifics of a particular framework or test runner). However, I think that one of the most important concepts to keep in mind is: Arrange, Act, Assert or AAA. All of your tests will follow the same basic structure of:

  • Arrange - get the environment/dependencies/components set up in the state required for the test
  • Act - run code in the test that will execute the behaviour you are testing
  • Assert - make a statement of what the expected result was (which will determine whether or not the test passed)

We will look at examples of this throughout the tutorial (especially when we get into writing our own unit tests).

Executing Unit Tests in an Ionic/StencilJS Application

Let’s start with running some unit tests and taking a look at the output. By default, a newly generated Ionic/StencilJS application will have a few unit tests and end-to-end tests already created for the default functionality provided. This is great because we can take a look at those tests to get a general idea of what they look like, and also execute the tests to see what happens.

First, you should generate a new ionic-pwa application with the following command:

npm init stencil

Once you have the application generated, and you have made it your current working directory, you should create an initial build of your application with:

npm run build

Then to execute the tests that already exist in the application you will just need to run:

npm test

The first time you run this, it will install all of the required dependencies to run the tests. This might take a while, but it won’t take this long every time you run this command.

The default test output for an untouched blank ionic-pwa application will look like this (I have trimmed this down a little for space):

 PASS  src/components/app-profile/app-profile.spec.ts
 PASS  src/components/app-root/app-root.spec.ts
 PASS  src/components/app-home/app-home.e2e.ts
 PASS  src/components/app-profile/app-profile.e2e.ts
  Console

 PASS  src/components/app-root/app-root.e2e.ts
  Console

 PASS  src/components/app-home/app-home.spec.ts

Test Suites: 6 passed, 6 total
Tests:       13 passed, 13 total
Snapshots:   0 total
Time:        3.208s
Ran all test suites.

We can see that there are 13 tests in total across the three default components, and all of them have executed successfully. Let’s take a closer look at what these tests are actually doing by opening the src/components/app-home/app-home.spec.ts file:

import{ AppHome }from'./app-home';describe('app',()=>{it('builds',()=>{expect(newAppHome()).toBeTruthy();});});

This looks similar to the example test that we looked at before, except now we are actually testing real code. We import the AppHome component into the test file, and then we have a test that creates a new instance of AppHome and checks that it is “truthy”. This doesn’t mean that the result needs to be true but that the result has a “true” value such that it is an object or a string or a number, rather than being null or undefined which would be “falsy”. This test will ensure that AppHome can be successfully instantiated. This is a basic test that you could add to any of your components.

Now let’s have a bit of fun by making it fail by changing toBeTruthy to toBeFalsy:

import{ AppHome }from'./app-home';describe('app',()=>{it('builds',()=>{expect(newAppHome()).toBeFalsy();});});

If we execute the tests now, we will get a failure:

 FAIL  src/components/app-home/app-home.spec.ts
  ● app › builds

    expect(received).toBeFalsy()

    Received: {}

      3 | describe("app", () => {
      4 |   it("builds", () => {
    > 5 |     expect(new AppHome()).toBeFalsy();
        |                           ^
      6 |   });
      7 | });
      8 |

      at Object.it (src/components/app-home/app-home.spec.ts:5:27)

Test Suites: 1 failed, 5 passed, 6 total
Tests:       1 failed, 12 passed, 13 total
Snapshots:   0 total
Time:        3.56s
Ran all test suites.

We can see that we are expecting the received value to be “falsy”, but it is a “truthy” value and so the test fails. This should highlight some of the usefulness of unit tests. When our code isn’t doing what we expect it to, we can see exactly where it is failing and why (assuming the tests are defined well). This is one of the reasons to design small/isolated unit tests, as when a failure occurs it will be more obvious what caused the failure.

NOTE: Remember to change the test back to toBeTruthy so that it doesn’t continue to fail

Now let’s take a look at the unit tests for the profile page defined in src/components/app-profile/app-profile.spec.ts which are a little more interesting:

import{ AppProfile }from'./app-profile';describe('app-profile',()=>{it('builds',()=>{expect(newAppProfile()).toBeTruthy();});describe('normalization',()=>{it('returns a blank string if the name is undefined',()=>{const component =newAppProfile();expect(component.formattedName()).toEqual('');});it('capitalizes the first letter',()=>{const component =newAppProfile();
      component.name ='quincy';expect(component.formattedName()).toEqual('Quincy');});it('lower-cases the following letters',()=>{const component =newAppProfile();
      component.name ='JOSEPH';expect(component.formattedName()).toEqual('Joseph');});it('handles single letter names',()=>{const component =newAppProfile();
      component.name ='q';expect(component.formattedName()).toEqual('Q');});});});

We still have the basic “builds” test, but we also have some specific tests related to the functionality of this particular component. The profile page has some functionality built into that handles formatting the user’s name. These tests cover that functionality. Notice that we don’t just have a single “it formats the name correctly” test. The process for formatting the name involves several different things, so these are good unit tests in that they are individually testing for each “unit” of functionality of the name formatting.

Generally speaking, the more unit tests you have and the more isolated they are the better, but especially as a beginner try not to obsess too much over getting things “perfect”. Having a bloated unit test is still much better than not testing at all. The one thing you really do have to watch out for is that your tests are actually testing what you think they are. You might design a test in a way where it will always pass, no matter what code you have implemented. This is bad, because it will make you think your code is working as expected when it is not. The Test Driven Development approach, which we will briefly discuss in a moment, can help alleviate this.

Writing Our Own Unit Tests

To finish things off, let’s actually build out some tests of our own in a new component. It is simple enough to look at some pre-defined test and have a basic understanding of what is being tested, but when you come to write your own tests it can be really difficult. We will look into creating an additional app-detail component, which will have the purpose of excepting an id as a prop from the previous page, and then using that id to fetch an item from a service.

We are going to follow a loose Test Driven Development (TDD) approach here. This is a whole new topic in itself. It is a structured and strict process for writing tests, but I think it can actually help beginners get into testing. Since there is a strict process to follow, it becomes easier to determine what kind of tests you should be writing and when you should write them.

I won’t get into a big spiel about what TDD is in this tutorial, but for some context, I would recommend reading one of my previous articles on the topic: Test Driven Development in Ionic: An Introduction to TDD.

The basic idea behind Test Driven Development is that you write the tests first. This means that you will be attempting to test code that does not even exist yet. You will follow this basic process:

  1. Write a test that tests the functionality you want to implement
  2. Run the test (it will fail)
  3. Write the functionality to satisfy the test
  4. Run the test (it will hopefully pass - if not, fix the functionality or the test if required)

The key benefit to beginners with this process is that you know what to create tests for, and you can be reasonably confident the test is correct if it fails initially but after implementing the functionality the test works. It is an important step to make sure the test fails first.

Let’s get started by defining the files necessary for our new component. Create the following files:

  • src/components/app-detail/app-detail.tsx
  • src/components/app-detail/app-detail.css
  • src/components/app-detail/app-detail.spec.ts

Before we implement any code at all for the app-detail component, we are going to create a test in the spec file:

import{ AppDetail }from"./app-detail";describe("app",()=>{it("builds",()=>{expect(newAppDetail()).toBeTruthy();});});

If we try to run this, we are going to get a failure:

 FAIL  src/components/app-detail/app-detail.spec.ts
  ● app › builds

    TypeError: app_detail_1.AppDetail is not a constructor

      3 | describe("app", () => {
      4 |   it("builds", () => {
    > 5 |     expect(new AppDetail()).toBeTruthy();
        |            ^
      6 |   });
      7 | });
      8 |

      at Object.it (src/components/app-detail/app-detail.spec.ts:5:12)

 PASS  src/components/app-root/app-root.spec.ts

Test Suites: 1 failed, 6 passed, 7 total
Tests:       1 failed, 13 passed, 14 total
Snapshots:   0 total
Time:        3.363s
Ran all test suites.

This makes sense, because we haven’t even created the AppDetail component yet. Now let’s define the component to satisfy the test:

import{ Component, h }from"@stencil/core";

@Component({
  tag:"app-home",
  styleUrl:"app-home.css"})exportclassAppHome{render(){return[<ion-header><ion-toolbarcolor="primary"><ion-title>Detail</ion-title></ion-toolbar></ion-header>,<ion-contentclass="ion-padding"/>];}}

If you run the tests again, you should see that all of them pass. We’re still in pretty boring territory here, because we’ve seen all of this in the default tests. Let’s create tests for the key functionality of our detail page.

We want two key things to happen in this component:

  • An itemId prop should be available to pass in an items id
  • A call to the getItem() method of the ItemService should be called with the itemId from the prop

We are very specifically and intentionally just checking that a call is made to the getItem() method, not that the correct item is returned from the service. Our unit tests should only be concerned with what is happening in isolation, it is not the role of this unit test to check that the ItemService is also working as intended (this would be the role of the services own unit tests, or of “integration” or “end-to-end” tests which take into consideration the application as a whole rather than individual units of code).

Let’s take a look at how we might implement these tests, and then we will try to satisfy them by implementing some code. We will start with testing the itemId prop.

import{ AppDetail }from"./app-detail";import{ newSpecPage }from"@stencil/core/testing";describe("app",()=>{it("builds",()=>{expect(newAppDetail()).toBeTruthy();});describe("item detail fetching",()=>{it("has an itemId prop",async()=>{// Arrangeconst page =awaitnewSpecPage({
        components:[AppDetail],
        html:`<div></div>`});let component = page.doc.createElement("app-detail");// Act(component asany).itemId =3;
      page.root.appendChild(component);await page.waitForChanges();// Assertexpect(page.rootInstance.itemId).toBe(3);});it("calls the getItem method of ItemService with the supplied id",()=>{});});});

The first thing to notice here is that our "has an itemId prop" test is async - this is necessary where you want to make use of asynchronous code in a test. That brings us to the asynchronous code that we are using await with and that is newSpecPage.

This is a StencilJS specific concept. Sometimes, we will be able to just instantiate our component with new AppDetail() and test what we need, but sometimes we need the component to actually be rendered as StencilJS would build the component and display it in the browser. This means that we can do this:

const page =awaitnewSpecPage({
        components:[AppDetail],
        html:`<app-detail></app-detail>`});

To test rendering our app-detail component. We can supply whatever components we need available, and then define whatever template we want using those components. We aren’t actually doing that here, though. Instead, we are rendering out a simple <div> and then we are manually creating the app-detail element and adding it to the page that we created.

The reason we are doing this is so that we can supply whatever type of prop value we want to the component, which we are doing here:

(component as any).itemId =3;

NOTE: We are also using as any to ignore type warnings.

This is a fantastic concept (using newSpecPage to create a <div> and then appending the actual component) that I came across from Tally Barak in this blog post: Unit Testing Stencil One. That post also has a bunch of other great tips you can check out.

With this method, we assign whatever kind of prop we need to the component, and then we use appendChild to add it to the template. We then wait for any changes to happen, and then we check that the itemId has been set to 3. This test is a good example of how tests can be split up into Arrange, Act, Assert.

If we run this now, the test should fail:

 FAIL  src/components/app-detail/app-detail.spec.ts
  ● app › item detail fetching › has an itemId prop

    expect(received).toBe(expected) // Object.is equality

    Expected: 3
    Received: undefined

      23 |
      24 |       // Assert
    > 25 |       expect(page.rootInstance.itemId).toBe(3);
         |                                        ^
      26 |     });
      27 |
      28 |     it("calls the getItem method of ItemService with the supplied id", () => {

      at Object.it (src/components/app-detail/app-detail.spec.ts:25:40)

Now let’s try to satisfy that test with some code:

import{ Component, Prop, h }from"@stencil/core";

@Component({
  tag:"app-detail",
  styleUrl:"app-detail.css"})exportclassAppDetail{
  @Prop() itemId:number;render(){return[<ion-header><ion-toolbarcolor="primary"><ion-title>Detail</ion-title></ion-toolbar></ion-header>,<ion-contentclass="ion-padding"/>];}}

If you run the tests again, unlike Balrogs in the depths of Moria, they should now pass. Now let’s implement our test for interfacing with the ItemService:

import{ AppDetail }from"./app-detail";import{ ItemService }from"../../services/items";import{ newSpecPage }from"@stencil/core/testing";describe("app",()=>{it("builds",()=>{expect(newAppDetail()).toBeTruthy();});describe("item detail fetching",()=>{it("has an itemId prop",async()=>{// Arrangeconst page =awaitnewSpecPage({
        components:[AppDetail],
        html:`<div></div>`});let component = page.doc.createElement("app-detail");// Act(component as any).itemId =3;
      page.root.appendChild(component);await page.waitForChanges();// Assertexpect(page.rootInstance.itemId).toBe(3);});it("calls the getItem method of ItemService with the supplied id",async()=>{// Arrange
      ItemService.getItem = jest.fn();const page =awaitnewSpecPage({
        components:[AppDetail],
        html:`<div></div>`});let component = page.doc.createElement("app-detail");// Act(component as any).itemId =5;
      page.root.appendChild(component);await page.waitForChanges();// Assertexpect(ItemService.getItem).toHaveBeenCalledWith(5);});});});

This test is making use of an ItemService which we haven’t talked about or created. Typically, you would create that service in the same way by defining some tests first and then implementing the functionality, but for this tutorial, we are just going to create the service in src/services/items.ts:

classItemServiceController{constructor(){}asyncgetItem(id: number){return{ id: id };}}exportconst ItemService =newItemServiceController();

The test that we have created is very similar to the first one, except now we are setting up a “mock/spy” on our ItemService. I would recommend reading a little about mock functions here: Mock Functions. The basic idea is that rather than using our real ItemService we instead swap it out with a “fake” or “mocked” service, which we can then “spy” on to check a bunch of things like whether or not its methods were called in the test.

In this test, we just supply our prop again, but this time we check that at the end of the test the ItemService.getItem method should have been called. This is because the component should automatically take whatever prop is supplied, and then use that value to fetch the item from the service using getItem.

If we run that test now, it should fail:

 FAIL  src/components/app-detail/app-detail.spec.ts
  ● app › item detail fetching › calls the getItem method of ItemService with the supplied id

    expect(jest.fn()).toHaveBeenCalledWith(expected)

    Expected mock function to have been called with:
      [5]
    But it was not called.

      44 |
      45 |       // Assert
    > 46 |       expect(ItemService.getItem).toHaveBeenCalledWith(5);
         |                                   ^
      47 |     });
      48 |   });
      49 | });

      at Object.it (src/components/app-detail/app-detail.spec.ts:46:35)

Now let’s implement the functionality:

import{ Component, Prop, h }from"@stencil/core";import{ ItemService }from"../../services/items";

@Component({
  tag:"app-detail",
  styleUrl:"app-detail.css"})exportclassAppDetail{
  @Prop() itemId:number;asynccomponentDidLoad(){console.log(await ItemService.getItem(this.itemId));}render(){return[<ion-header><ion-toolbarcolor="primary"><ion-title>Detail</ion-title></ion-toolbar></ion-header>,<ion-contentclass="ion-padding"/>];}}

and we should see the following result:

Test Suites: 7 passed, 7 total
Tests:       16 passed, 16 total
Snapshots:   0 total
Time:        3.248s
Ran all test suites.

All of our tests are now passing!

Summary

This has been a somewhat long and in-depth tutorial, but it still barely scratches the surface of testing concepts. There is still much more to learn, and it will take time to become competent in creating automated tests. My advice is always to just start writing tests, and don’t worry too much about making them perfect or following best-practices (just don’t assume that your tests are actually verifying the functionality of your application in the beginning). If you worry too much about this, you might be too intimidated to even start.

If you are already competent in writing tests with Jasmine, Jest, or something similar, then creating tests for StencilJS components likely won’t be too difficult. The biggest difference will likely be the use of newSpecPage to test components where required.

Viewing all 391 articles
Browse latest View live